mcu_verification
 [TOC]
[TOC]
放弃使用香山官方提供的最新的 Difftest 版本
放弃使用最新版本 Difftest 的原因如下:
- 香山最新版本的 Github 仓库里 Difftest 只有 Scala 的版本,无法直接在 Verilog 中引用
- 目前最新版本的 Difftest过于复杂:它支持多核、Cache、Uart、Trap 等模块,导致移植 MCU_Core 到最新版本的 Difftest 时,需要保证这些模块都真确连线,十分复杂。 一开始尝试接入最新版本的 Difftest,结果调试了一两天还是报错无法看到有进展的结果,因此预测将 MCU_Core 接入到最新版本的 Difftest 框架中将消耗很久的时间
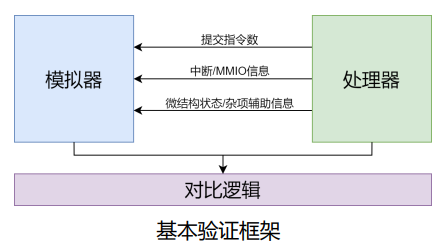
- 目前由于没有 CSR 模块,其实我们的 MCU_Core 的状态仅有“PC+Register”表征,因此 Difftest 框架只需要在指令提交之后比较 PC 跟 Register 即可。 Difftest 核心思想:MCU_Core 执行一条指令->Reference Model 执行一条指令->比较二者的状态(PC + Register)
因此选择了“老版本的 Difftest”版本,其实现的效果是:将单周期 RISC-V 处理器接入到 Difftest 框架中,比较其每次提交指令后,Register 是否跟 Reference Model 相同,比较符合我们目前的测试需求,接入的难度相当于接入最新版本的 Difftest 也更加可控。
接入 Difftest 框架做的修改
为了将 MCU_Core 接入到 Difftest 框架,主要做了如下修改:
修改 Verilog 代码接入 Difftest 框架之后的 Warning,主要包括代码中的“隐式变量声明、信号位宽不匹配、模块重定义”等 Warning。因为 Verilator 相较于 Iverilog 对于语法检查更加严格一些。
在 top.v 中增加接口,因为:
- Difftest 框架需要知道 MCU_Core 的一些内部信号,如 pc, instruction
- 将一些重要的信号从 top 引出来,可以在 Difftest 的时候进行打印,方便判断
1
2
3
4
5
6
7
8
9
10
11
12
13
14
15
16
17
18
// mcu_core/top.v
module top(
input wire clk,
input wire resetn,
// signals used by difftest
output wire [31:0] pc,
output wire [63:0] instr,
output wire wb_en,
output wire [ 4:0] wb_idx,
output wire [31:0] wb_data,
output wire [31:0] id_instr,
output wire [20:0] op_code,
output wire [31:0] src1,
output wire [31:0] src2,
output wire [ 3:0] wb_src,
output wire [31:0] alu_result
// signals used by difftest
);1
2
3
4
5
6
7
8
9
10
11// difftest/csrc/cpu_exec.c
static void execute(uint64_t n) {
for (;n > 0; n --) {
g_nr_guest_inst ++;
printf("Top: instr = 0x%x\n", top->instr);
printf("ID Stage: id_instr=0x%x, opcode = %d, src1 = 0x%x, src2 = 0x%x, wb_src= %d\n", top->id_instr, top->op_code, top->src1, top->src2, top->wb_src);
printf("EXE stage: alu_result = 0x%x\n", top->alu_result);
printf("WB Stage: wb_en=%d, idx=%d, data=%x\n", top->wb_en,
top->wb_idx, top->wb_data);1
2
3
4
5
6
7
8
9
10
11
12Difftest仿真输出
Top: instr = 0x413
ID Stage: id_instr=0x413, opcode = 1, src1 = 0x0, src2 = 0x0, wb_src= 1
EXE stage: alu_result = 0x0
WB Stage: wb_en=0, idx=0, data=0
npc read instr
Read I-Memory: addr = 0x80000004, ins= 0x00009117
NO.2-> pc: 0x80000004, instr: 0x9117, asm: auipc sp, 9
NO.2-> pc: 0x80000004, instr: 0x9117, asm: auipc sp, 9
C-> pmem_read 80000000: 0x0
Read I-Memory: addr = 0x80000000, ins= 0x00000413
pmem_read_rtl: raddr = 0x80000000, rdata= 413如上所示,我们在 top 的接口中定义了一些信号,我们在 Difftest 框架中就可以打印相应的信号值
确定 MCU_Core 提交到 difftest 的时机
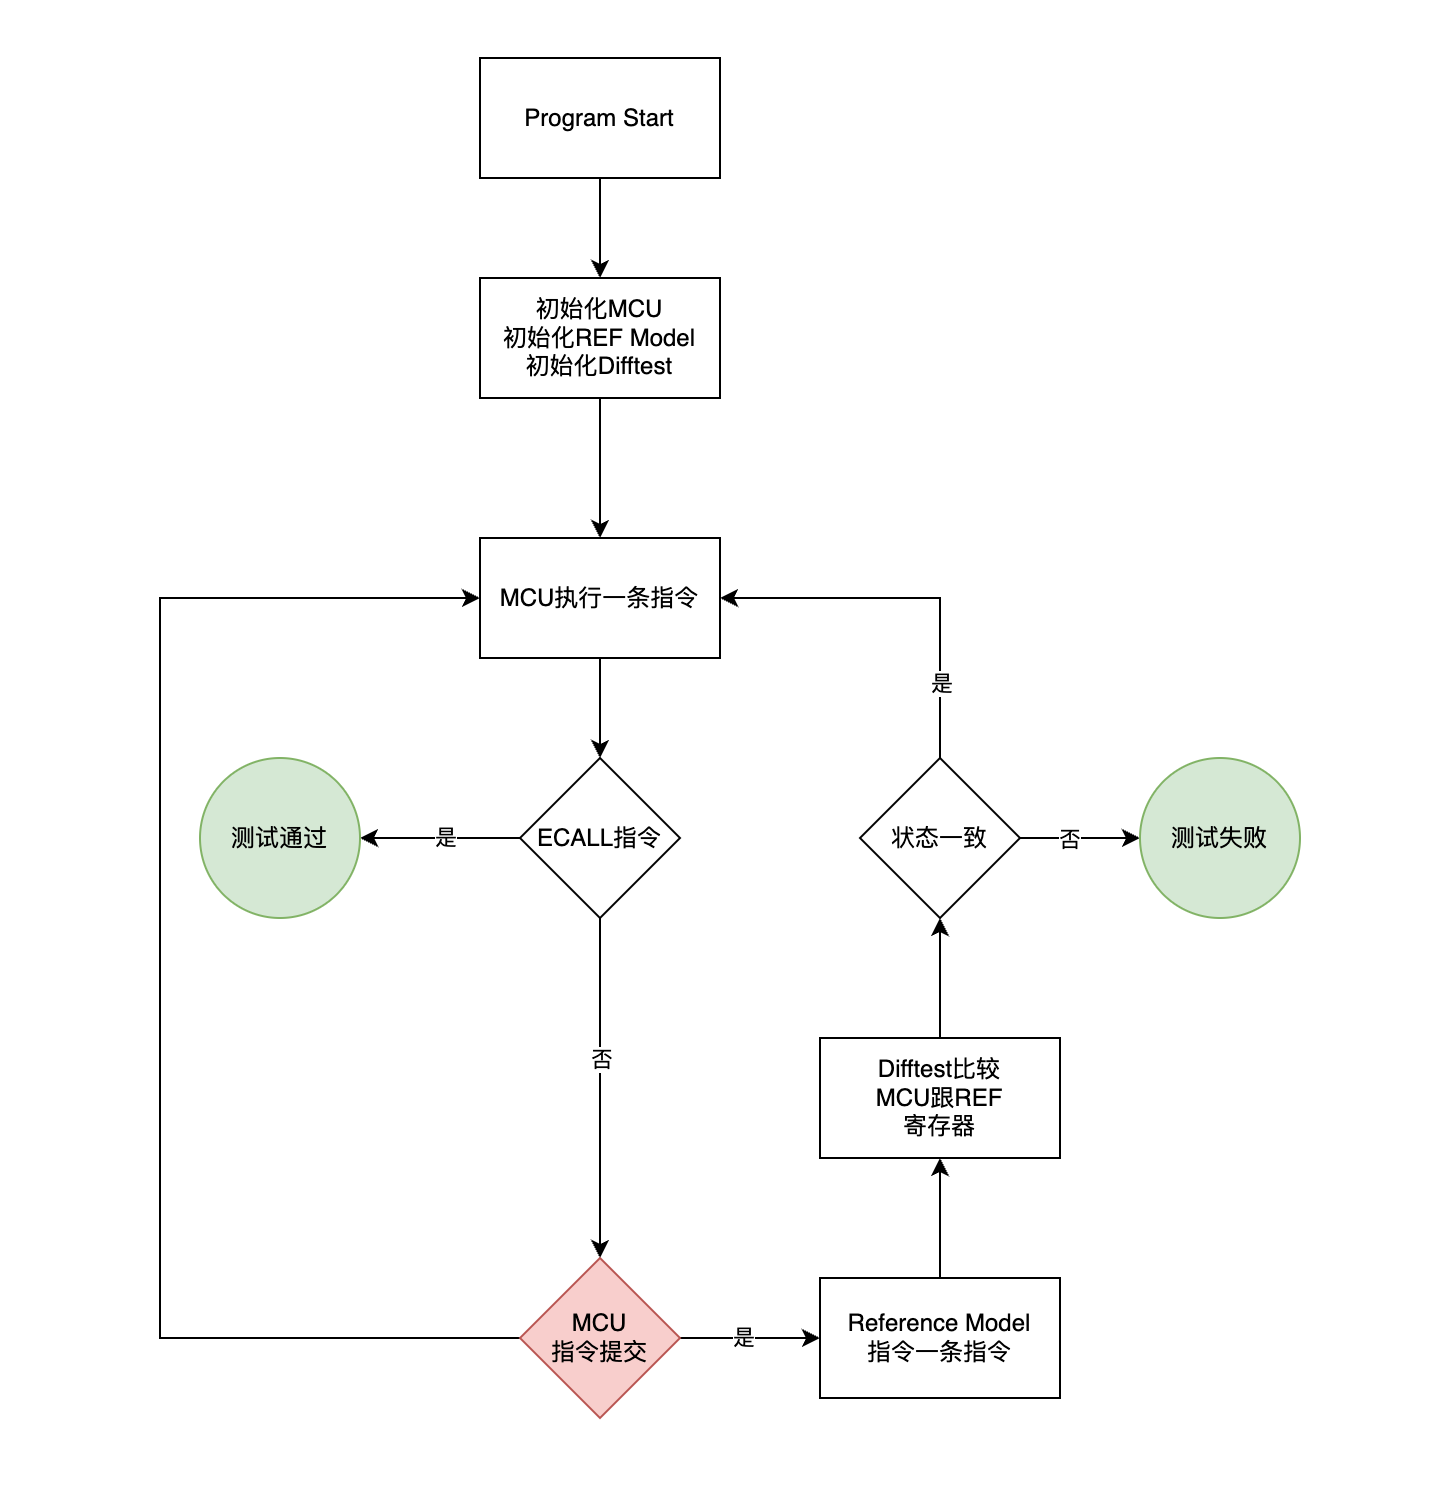 我们不能简单的以
wb_en来判断一条指令是否提交,因为
branch 指令其 wb_en 是 0,但是正常情况下 branch
指令是需要提交的,因此需要通过 hazard 以及 reset
来判断指令提交,具体如下:
- 判断第一条指令的提交:
resetn触发之后,2 个 cycle 才可以读出第一条指令,第一条指令经过 5 个 cycle 才能提交 - 后续指令需要根据 hazard unit
的
flush信号来判断是否会被冲刷,hazard unit 只对 ID 进行冲刷 - 流水线 stall 的时候,需要暂停提交
主要在 top.v 里增加了如下内容
1 |
|
- 由于 Reference Model 是单周期的处理器,其每个 Cycle
就会提交一条指令;我们的 MCU_Core 是 5
级流水线处理器,第一条指令必须等到 5 个 Cycle 之后其结果才会写入到
Register - 我们的 MCU
由于分支预测器的存在,可能会取一条指令,但是这条指令会被冲刷,因此其不会写入到
Register
可见MCU_Core 中的指令,并不是每一个 Cycle 都会写入到
Register,但是 Reference Model 一旦执行一条指令,则会在一个 Cycle 写入到
Register,因此:
- MCU_Core 必须告诉 Difftest 框架,其在某时刻写入到了
Register - Difftest 框架在收到该信号之后,令 Reference Model
执行一步,并且将其结果写入到 Register
经过分析发现,我们的 MCU_Core 不论指令流是何种情况,其在写入
Register 的时候,都会有 wb_en 信号为高,因此我们在 top
中加入该信号,并且在 Difftest 中根据该信号来控制 Reference Model 执行和
Difftest 比较。
c~~ ~~// difftest/csrc/cpu_exec.c~~ ~~/_ difftest begin _/~~ ~~cpu.pc = top->pc; // pc 存入 cpu 结构体~~ ~~dump_gpr(); // 寄存器值存入 cpu 结构体~~ ~~if(top->wb_en){ // <- 判断指令提交再进入 Difftest~~ ~~ difftest*step(top->pc);~~ ~~}~~ ~~/* difftest end \_/~~ ~~
增加ecall指令
在decoder.v里通过DPI-C函数增加ecall指令,这样在译码到ecall指令的时候,会通知DIFFTEST,riscv-test也是一ecall来表明测试结束的
1
2
3
4
5
6
7
8
wire inst_ecall;
assign inst_ecall = instruction_i == 32'h00000073;
always @(*) begin
if (inst_ebreak) ecall();
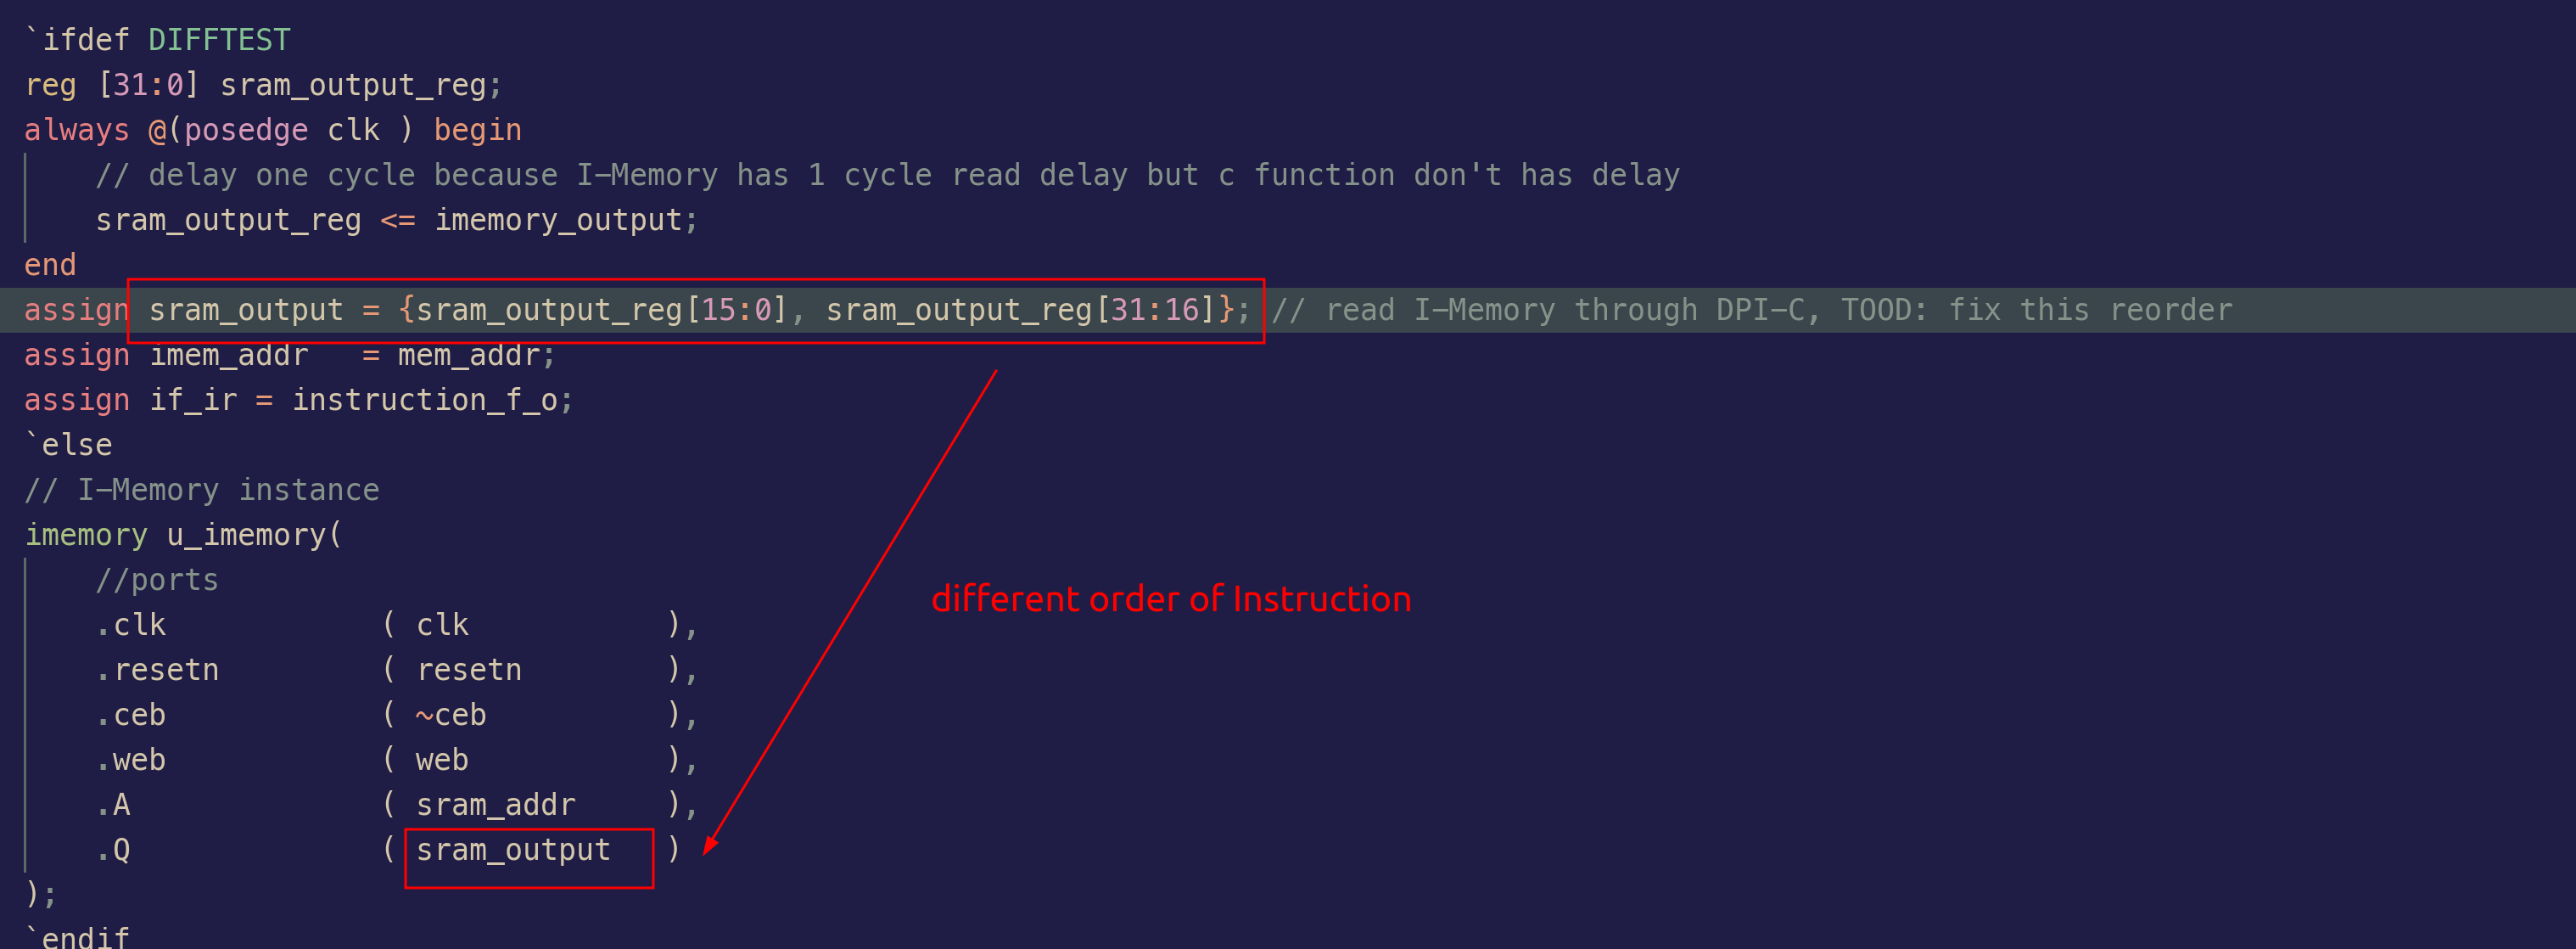
end增加 MCU 的 I-Memory 的读取逻辑,从 Difftest 框架里读取指令、加载到 MCU 中
不同于用 verilog 写的 testbench,Difftest 框架里初始化都是通过 c 函数来将编译好的二进制文件读入内存的。
在 Difftest 代码里,定义了一块内存
pmem用于存储 MCU_Core 的指令通过 load_img 函数来初始化 pmem,实现 I-Memory 的初始化;在 verilog 写的 testbench 中,我们是通过 readmemh 函数来读入二进制文件到内存的
在 verilog 文件中,指令的读取是通过 DPI-C 函数,读取
pmem对应地址的值;在 verilog 写的 testbench 中,指令的读取是直接通过assign instr = i-memory[addr];来实现的在 top 文件中添加 I-memory 的
sram_output、mem_addr端口,在进行 Difftest 的时候,通过这两个端口读取指令数据(而不是通过 imemory 模块读取指令数据)1
2
3
4
5
6
7
8
9
10
11
12
13
14
15
16
17
18
19
20
21
22
23
24
25
26
27
28
29
30
31
32
33
34
35
36
37
38
39
40module pipelineIF
(
input wire clk,
input wire resetn,
// ....
// DIFFTEST
input wire [31:0] imemory_output,
output wire [31:0] imem_addr,
/* output signals to ID stage */
output wire [31:0] instruction_f_o
);
reg [31:0] sram_output_reg;
always @(posedge clk ) begin
// delay one cycle because I-Memory has 1 cycle read delay but c function don't has delay
sram_output_reg <= imemory_output;
end
// read I-Memory through DPI-C, TOOD: fix this reorder
assign sram_output = {sram_output_reg[15:0], sram_output_reg[31:16]};
assign imem_addr = mem_addr;
assign if_ir = instruction_f_o;
// I-Memory instance
imemory u_imemory(
//ports
.clk ( clk ),
.resetn ( resetn ),
.ceb ( ~ceb ),
.web ( web ),
.A ( sram_addr ),
.Q ( sram_output ) // read instruction from imemory in MCU
);
// ...
endmodule在 c 文件中,通过上述 top 文件的端口,实现从
pmem读取指令、加载到 IF Stage
在 Register 中增加 DPI-C 函数将 CPU 的 register 传递给 Difftest 模块
1
2
3
4
5
6
7
8
9
10
11
12
13
14
15
16import "DPI-C" function void set_gpr_ptr(input logic [63:0] a []); // add DPI-C function
module regfile
(
input wire clk_i,
input wire resetn_i,
output wire [REG_DATA_WIDTH-1 :0] rs1_data_o, // rd1
//....
);
//.....
// regfile其余部分均保持不变即可
//.....
initial set_gpr_ptr(regfile_data); // <- 使用该DPI-C函数将mcu_core的register状态传递给Difftest模块
endmodule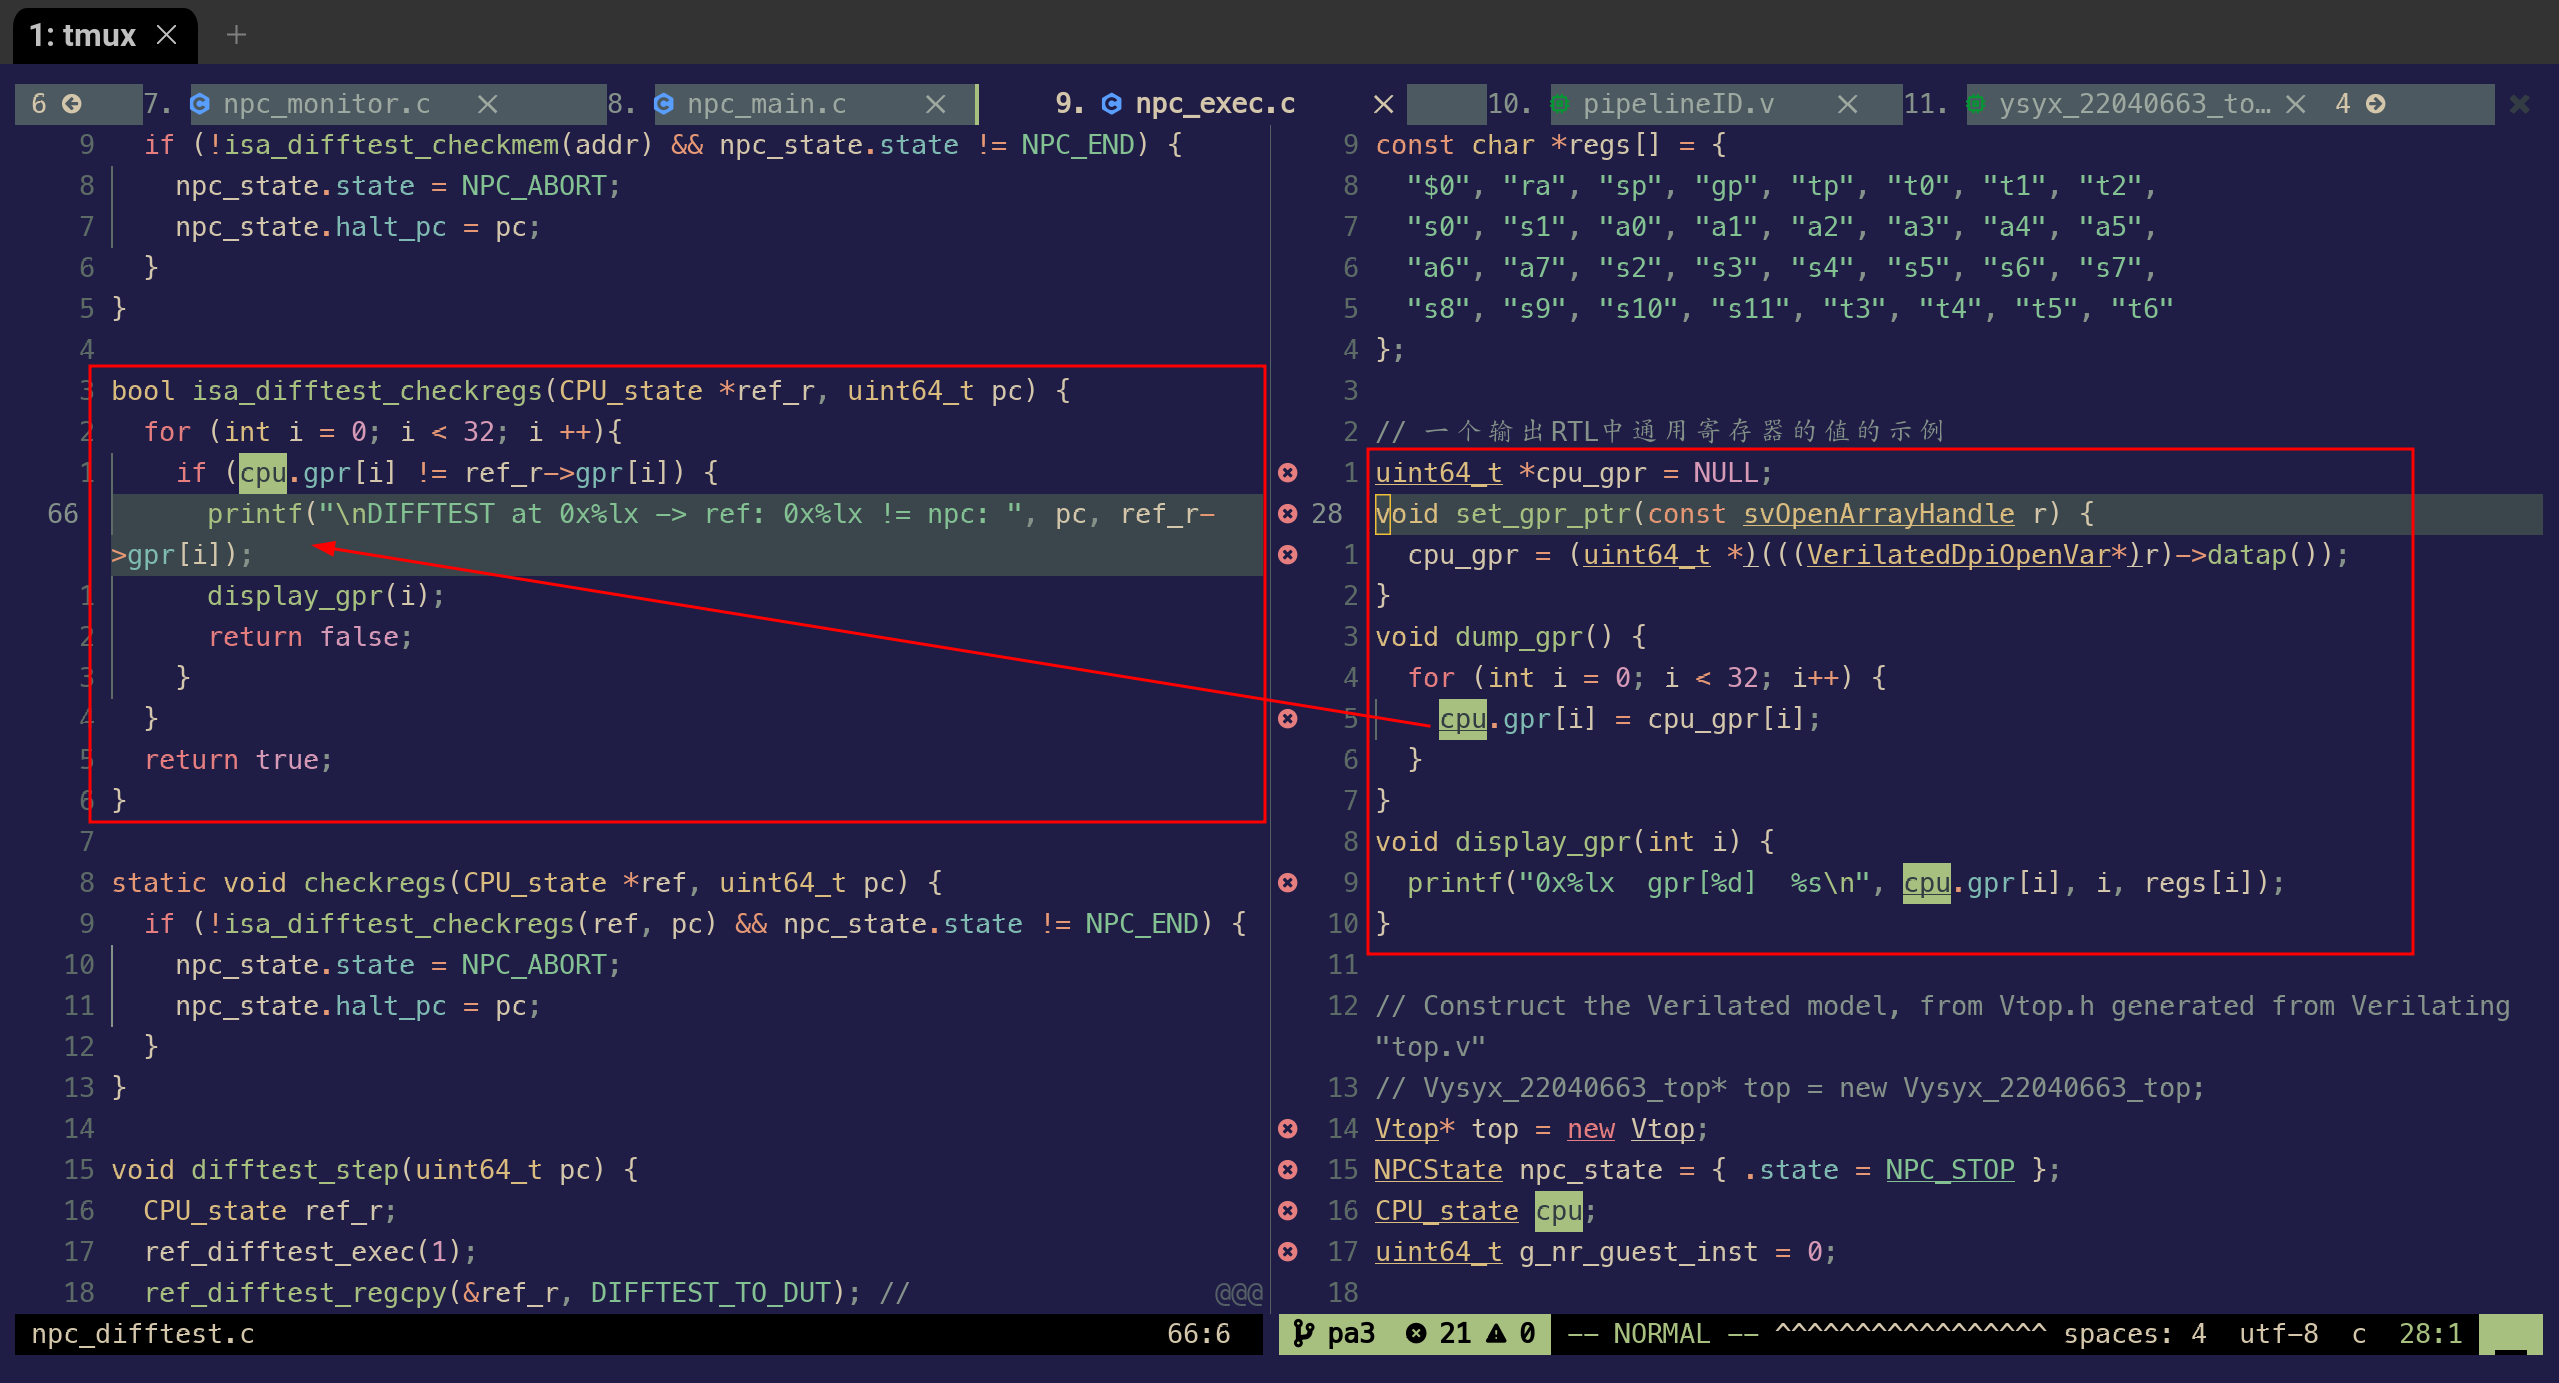
适配 32 bit MCU MCU 是 32 bit 的,其 gpr 宽度为 32,但是 Difftest 框架默认是 64bits,如果不修改 difftest 中读取 MCU gpr 的 C 函数,则会读到错误的数据
1
2
3
4
5
6
7
8
9
10
11
12
13
14
15
16
17
18--- a/npc/csrc/npc_cpu/npc_exec.c
+++ b/npc/csrc/npc_cpu/npc_exec.c
@@ -24,13 +24,13 @@ const char *regs[] = {
};
// 一个输出RTL中通用寄存器的值的示例
-uint64_t *cpu_gpr = NULL;
+uint32_t *cpu_gpr = NULL;
void set_gpr_ptr(const svOpenArrayHandle r) {
- cpu_gpr = (uint64_t *)(((VerilatedDpiOpenVar*)r)->datap());
+ cpu_gpr = (uint32_t *)(((VerilatedDpiOpenVar*)r)->datap());
}
void dump_gpr() {
for (int i = 0; i < 32; i++) {
- cpu.gpr[i] = cpu_gpr[i-1]; // i-1 to make index correct in DPI-C
+ cpu.gpr[i] = cpu_gpr[i]; // i-1 to make index correct in DPI-C
}
}1
2
3
4
5
6
7
8--- a/npc/vsrc/regfile.v
+++ b/npc/vsrc/regfile.v
@@ -5,7 +5,7 @@ file: register file in ID stage
author: fujie
time: 2023年 4月28日 星期五 16时16分32秒 CST
*/
-import "DPI-C" function void set_gpr_ptr(input logic [63:0] a []); // add DPI-C function
+import "DPI-C" function void set_gpr_ptr(input logic [31:0] a []); // add DPI-C function修复函数
dump_gprincsrc/cpu_exec该函数的作用是利用 DPI-C 函数将 MCU 的 registers 的数值读取读取到 c 结构体里(cpu.gpr),后续 Difftest 会比较该结构体的值跟 Reference Model 是否匹配.运行 Difftest 的时候发现,cpu.gpr[i]的值,实际上对应的是寄存器 r[i+1],导致 Difftest 报错,因此将 cpu_gpr[i]更改为 cpu_gpr[i-1]。
1
2
3
4
5
6
7
8
9uint64_t *cpu_gpr = NULL;
void set_gpr_ptr(const svOpenArrayHandle r) {
cpu_gpr = (uint64_t *)(((VerilatedDpiOpenVar*)r)->datap());
}
void dump_gpr() {
for (int i = 0; i < 32; i++) {
cpu.gpr[i] = cpu_gpr[i-1]; // i-1 to make index correct in DPI-C
}
}riscv-tests更改load测试集
问题描述:spike初始化的时候,其Data Memory不是初始化为0, riscv-tests的load相关的测试集在执行load指令之前,都没有往对应的Data Memory地址写入数据, 导致spike执行load之后会取出spike初始化的Data Memory的值,mcu执行load之后会取出0,二者对不上
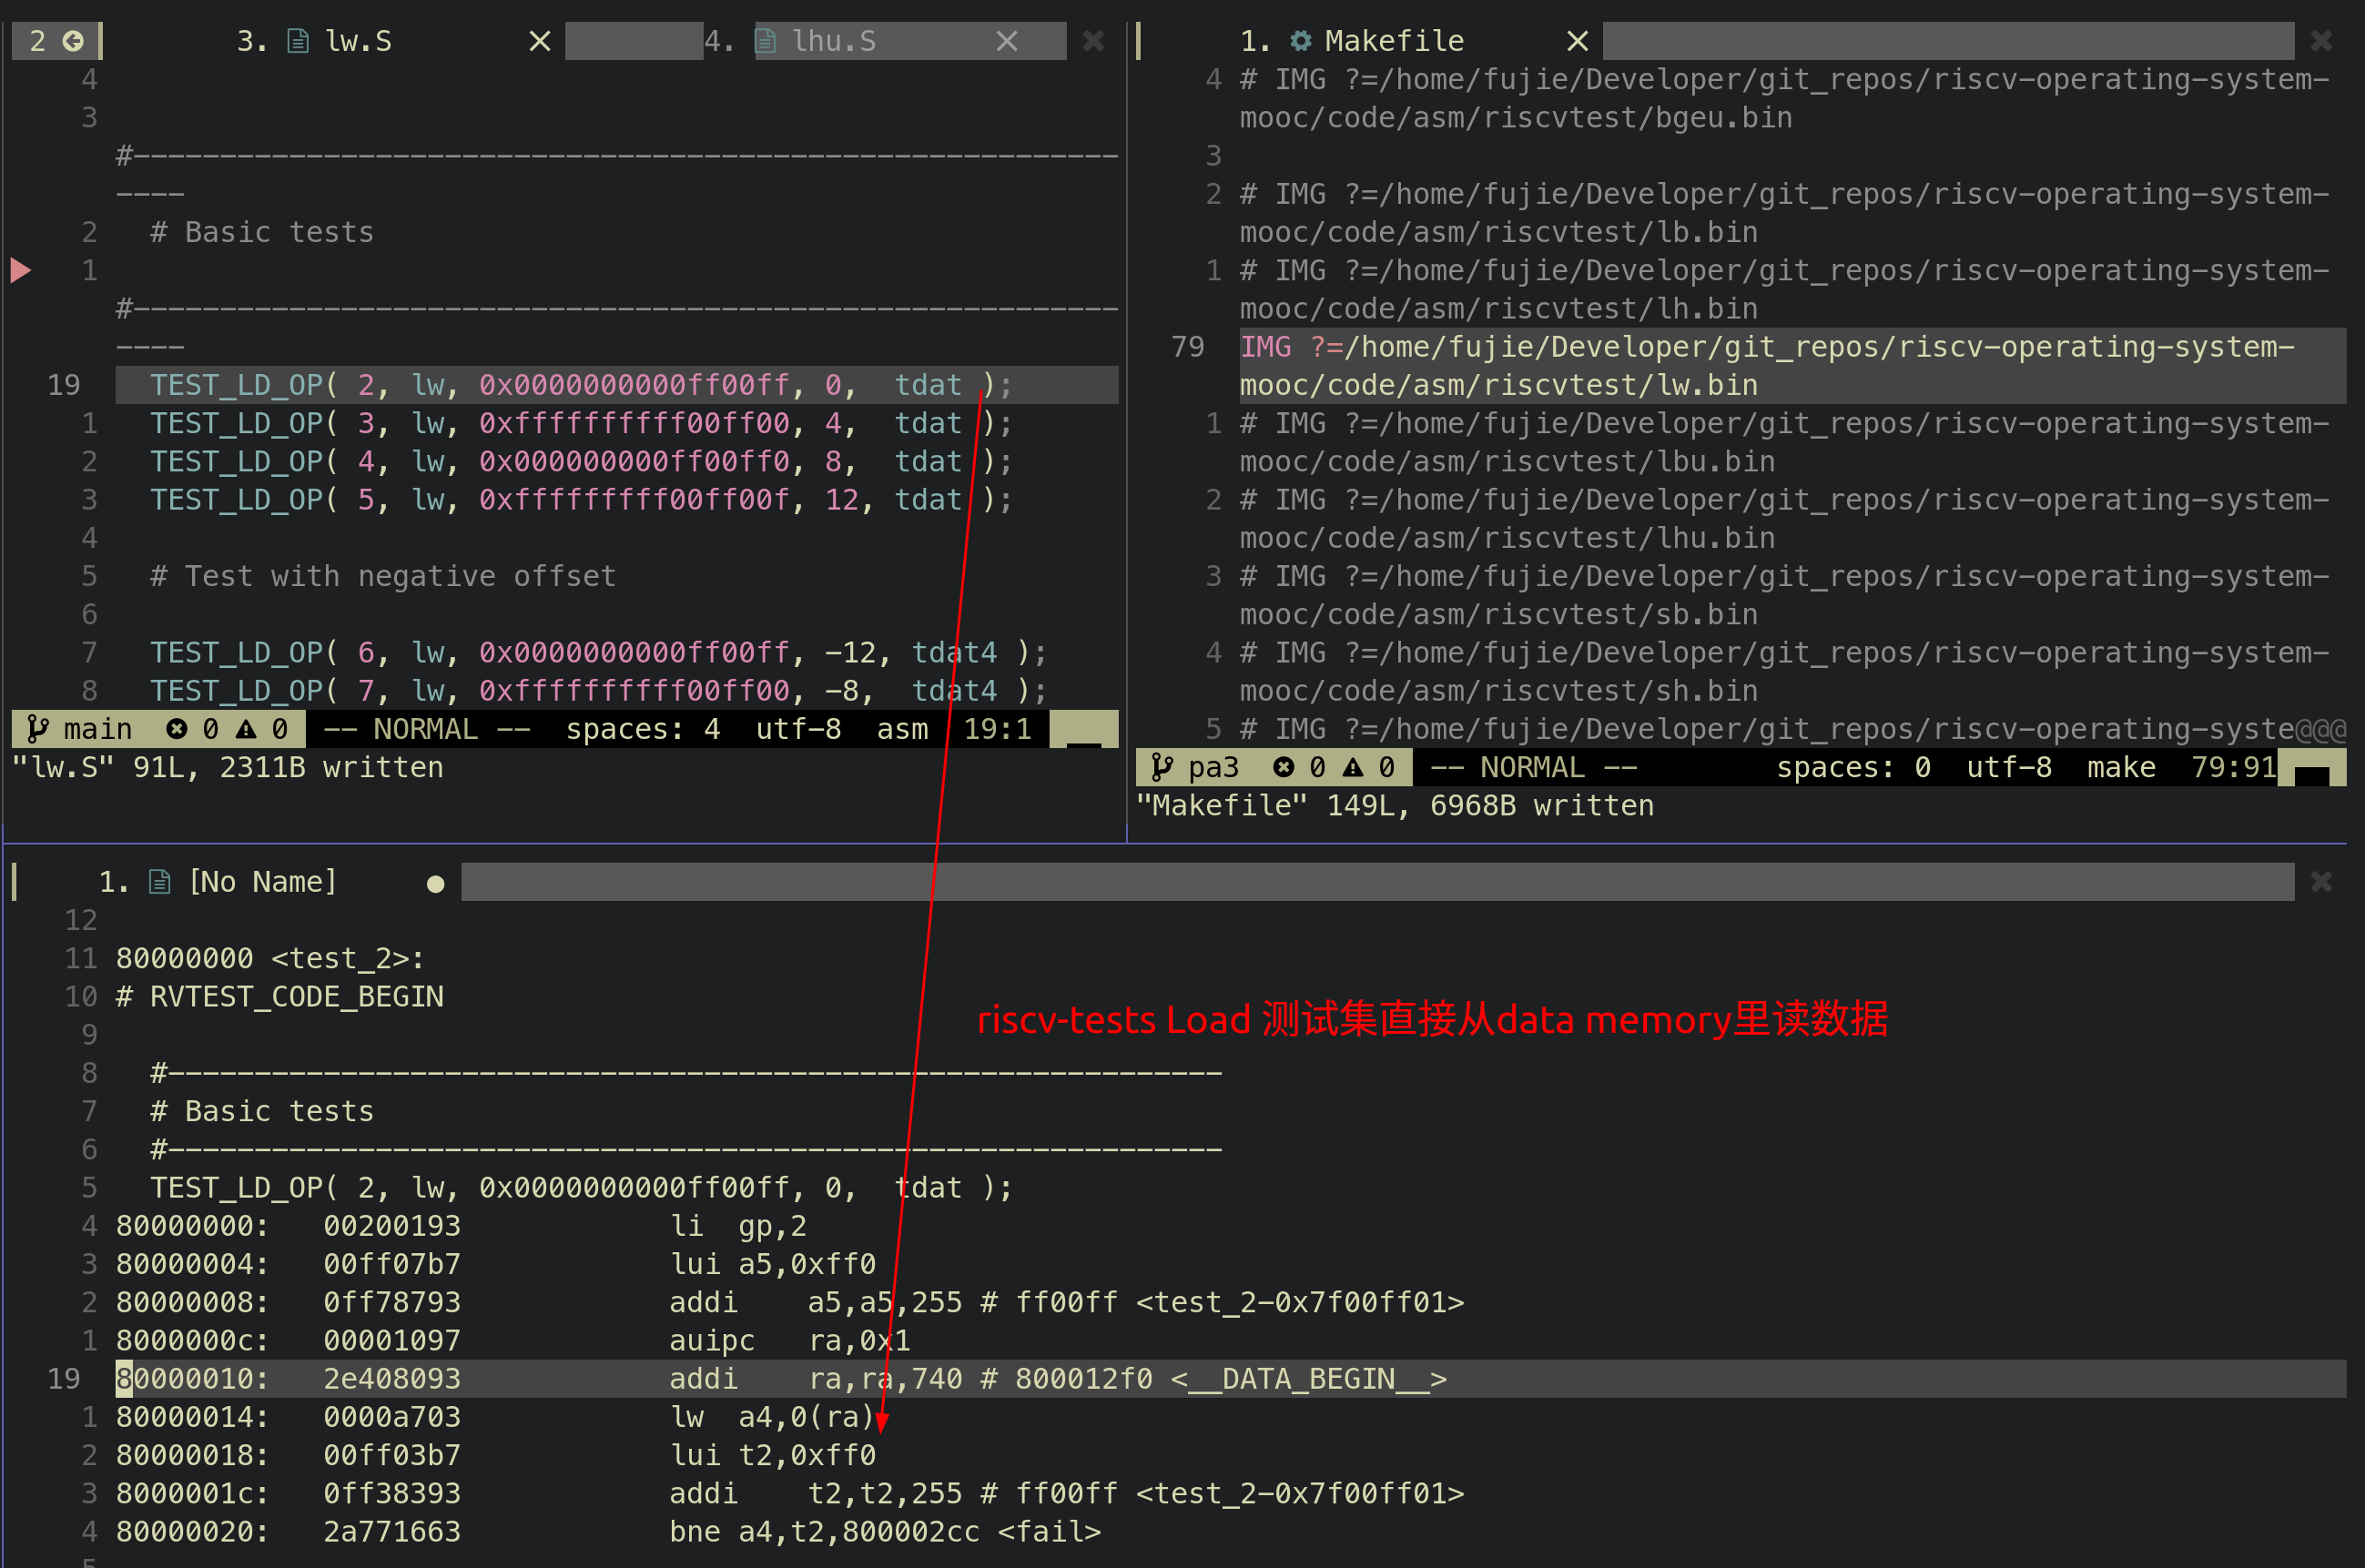
问题解决:修改riscv-tests测试集,在执行之前,执行相应的Store指定往对应地址写入数据,避免spike初始化跟MCU初始化不同,导致load指令读出的结果不同
1
2
3
4
5
6
7
8
9
10
11
12
13
14
15
16
17
18
19
20
21
22
23
24
25
26
27
28
29
30
31
32
33
34
35
36
37
38
39diff --git a/code/asm/riscvtest/test_macros.h b/code/asm/riscvtest/test_macros.h
index 7375715..c748749 100644
--- a/code/asm/riscvtest/test_macros.h
+++ b/code/asm/riscvtest/test_macros.h
@@ -219,6 +219,7 @@ test_ ## testnum: \
TEST_CASE( testnum, x14, result, \
li x15, result; /* Tell the exception handler the expected result. */ \
la x1, base; \
+ sh x15, offset(x1); \
inst x14, offset(x1); \
)
@@ -227,7 +228,7 @@ test_ ## testnum: \
la x1, base; \
li x2, result; \
la x15, 7f; /* Tell the exception handler how to skip this test. */ \
- sw x0, offset(x1); \
+ sw x0, 0(x1); \
store_inst x2, offset(x1); \
load_inst x14, offset(x1); \
j 8f; \
@@ -242,6 +243,8 @@ test_ ## testnum: \
li TESTNUM, testnum; \
li x4, 0; \
1: la x1, base; \
+ li x15, result; \
+ sh x15, offset(x1);\
inst x14, offset(x1); \
TEST_INSERT_NOPS_ ## nop_cycles \
addi x6, x14, 0; \
@@ -257,6 +260,8 @@ test_ ## testnum: \
li x4, 0; \
1: la x1, base; \
TEST_INSERT_NOPS_ ## nop_cycles \
+ li x15, result; \
+ sh x15, offset(x1);\
inst x14, offset(x1); \
li x7, result; \
bne x14, x7, fail; \
riscv-tests更改store测试集
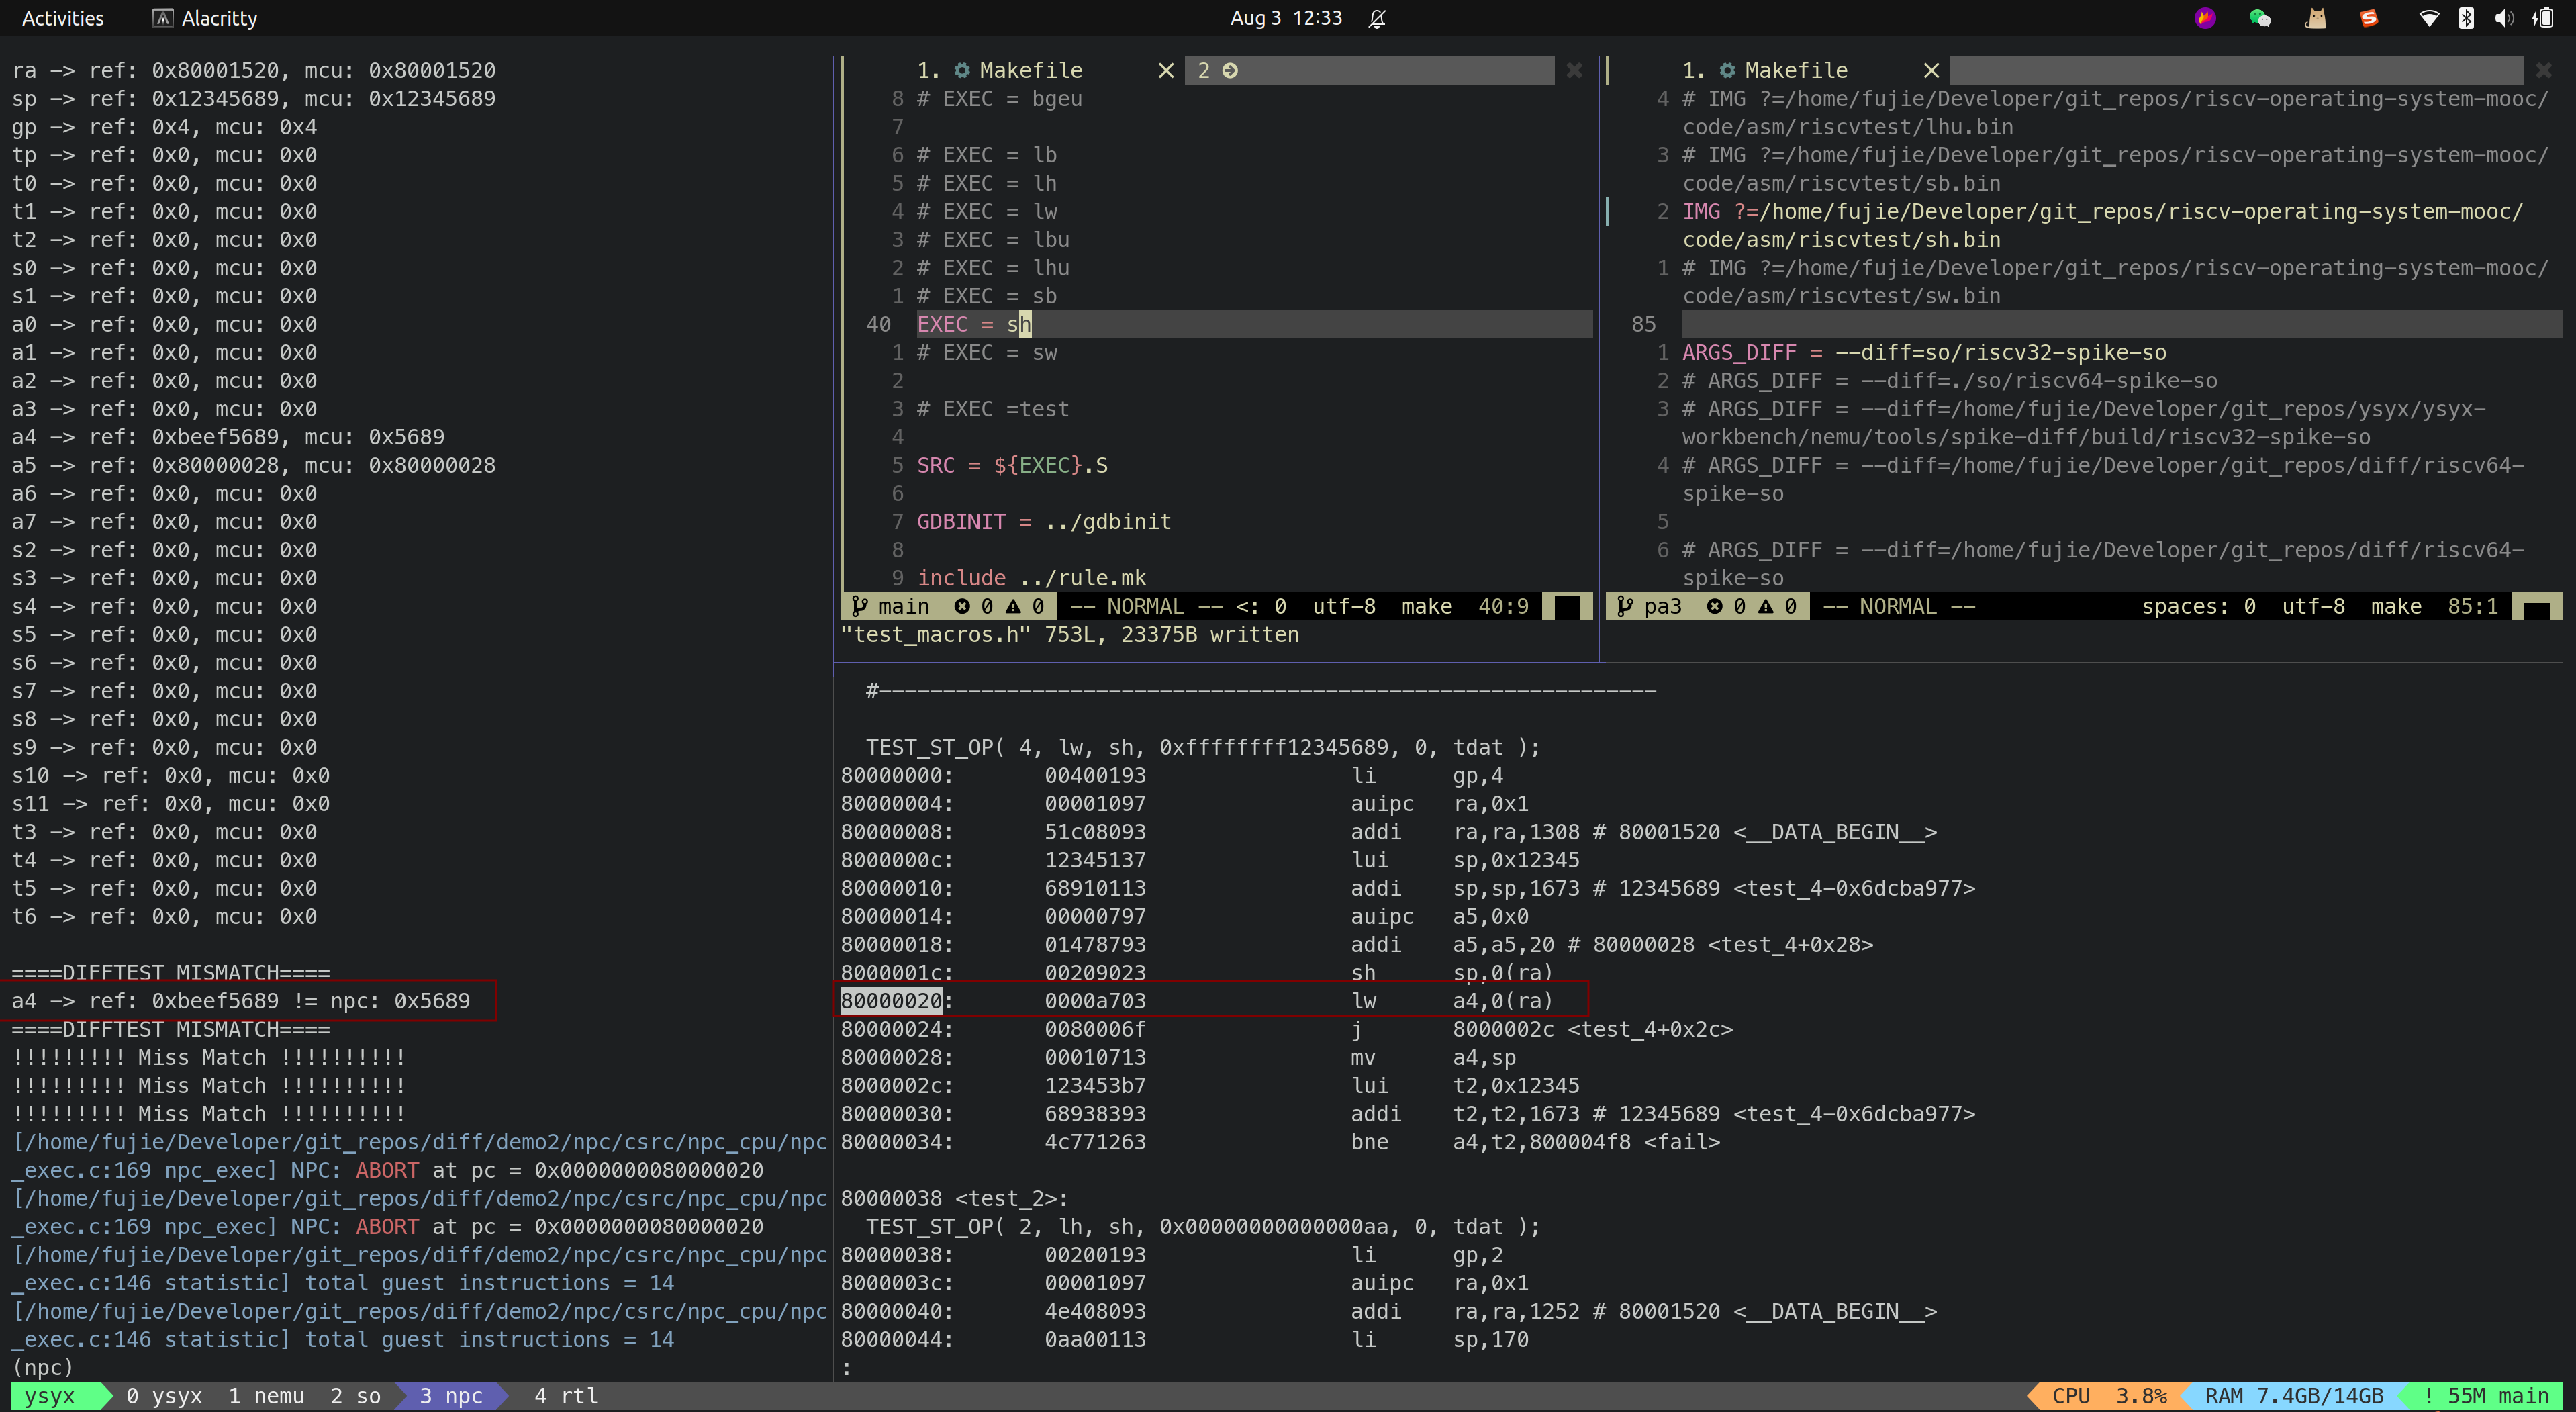
问题描述:spike初始化的时候,其Data Memory不是初始化为0,因此在测试
SH,SB等riscv-tests测试集的时候,会出错,如下所示: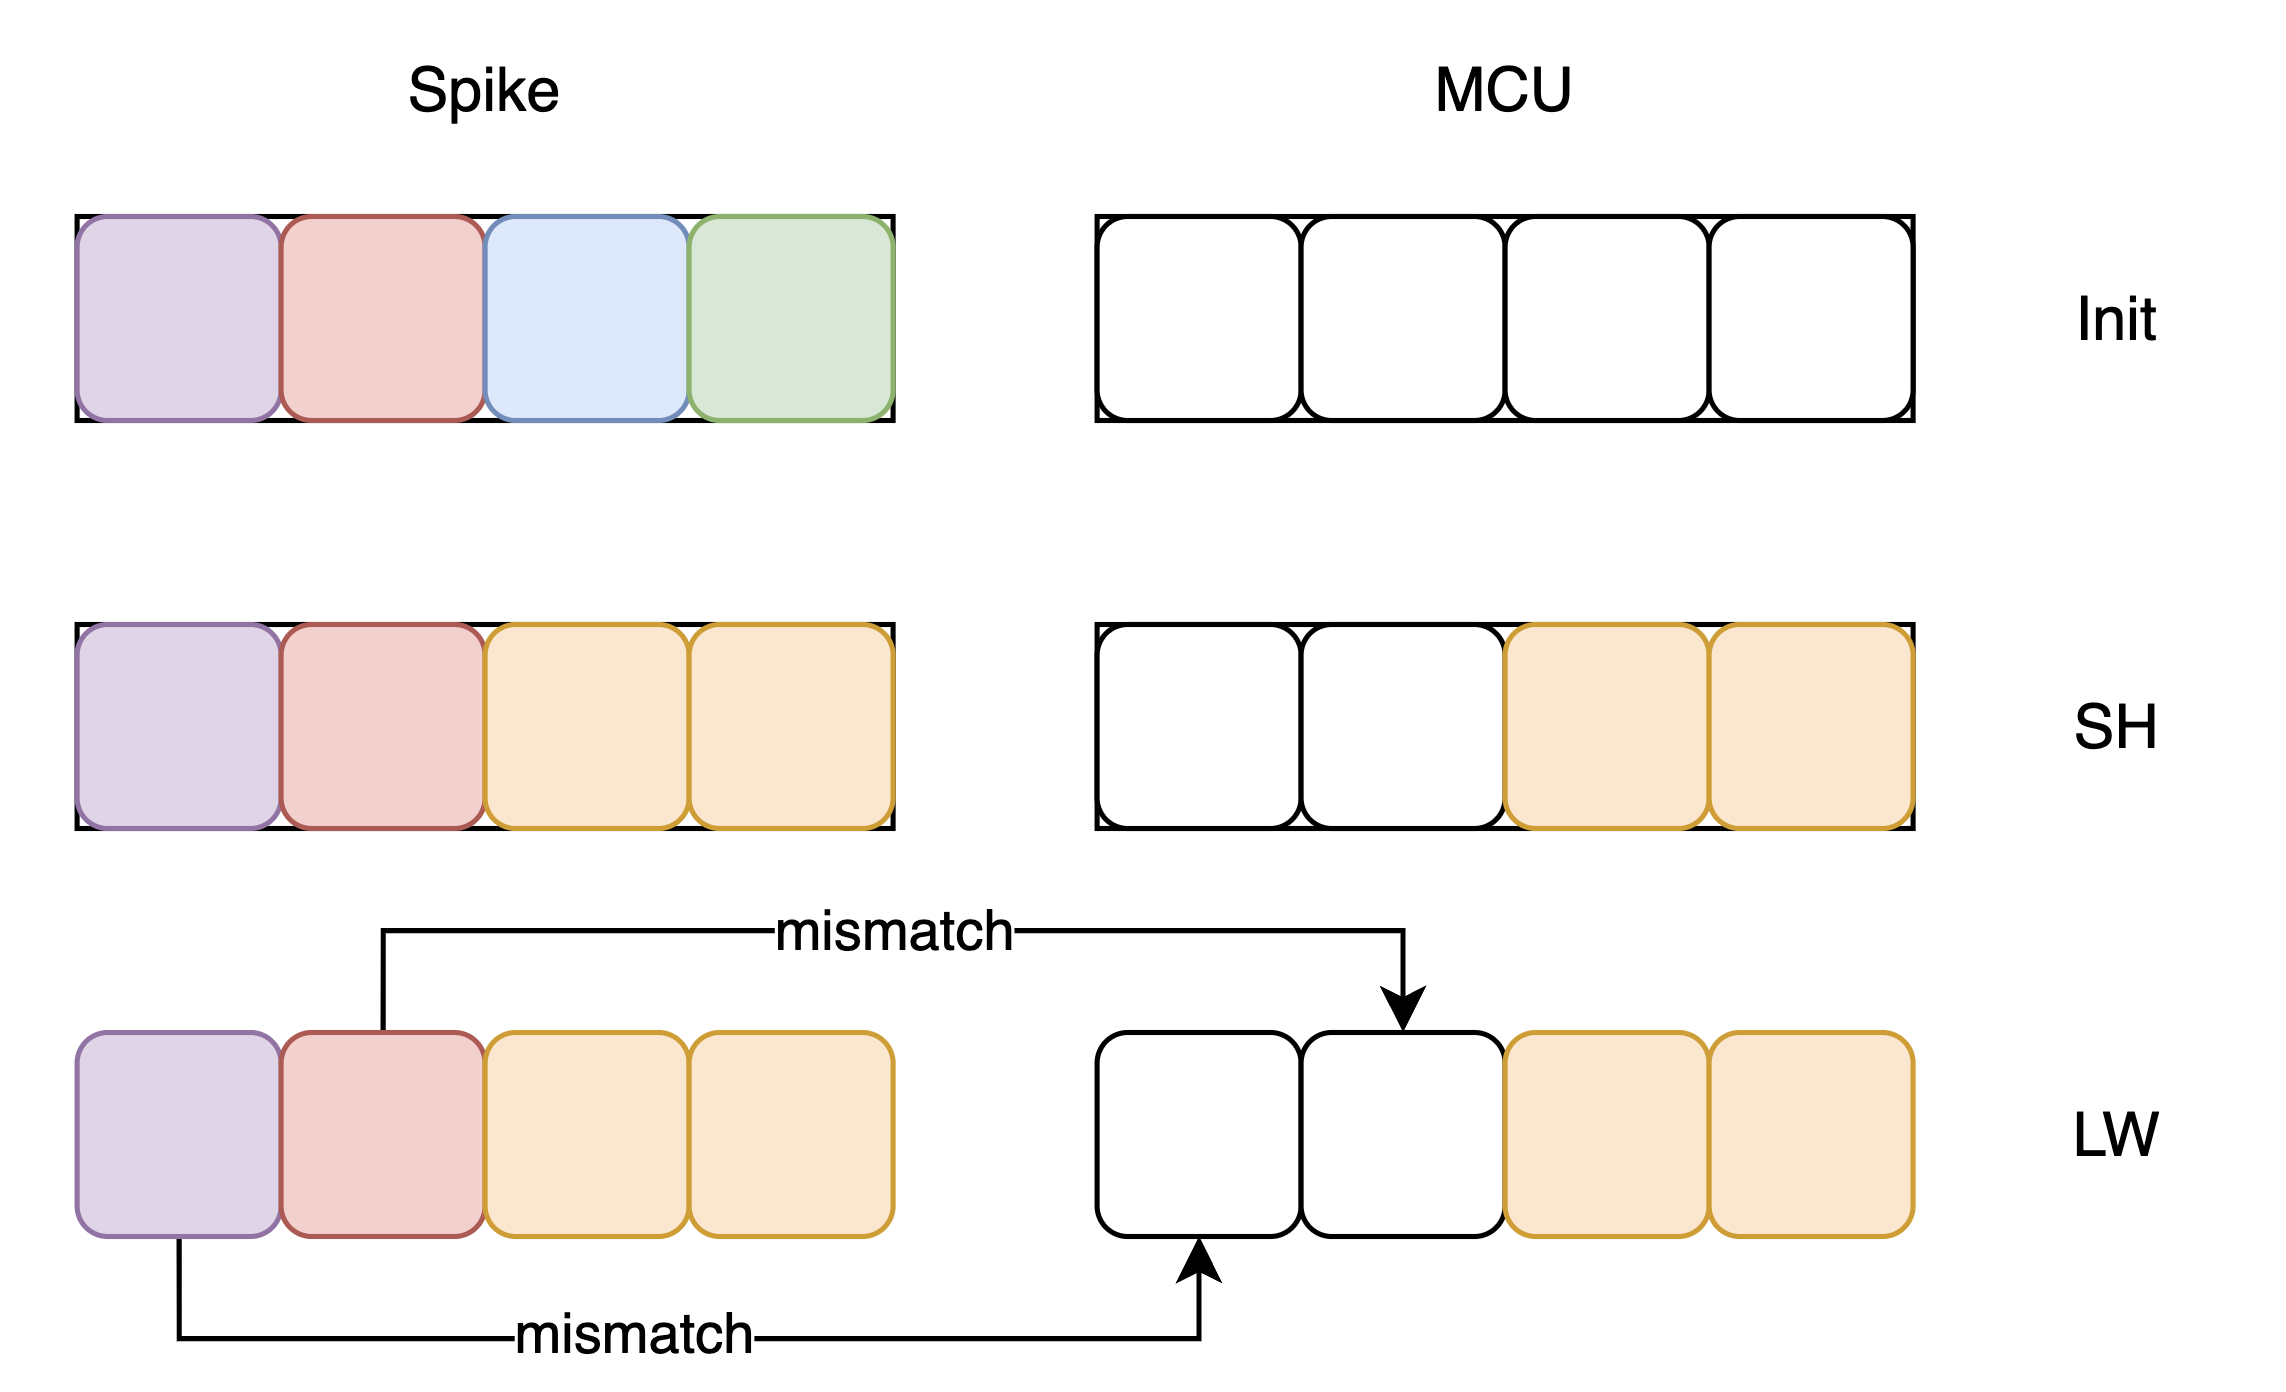
问题解决:修改riscv-tests测试集,在执行
SH,SB之前,将0x00000000通过SW写入到Data Memory对应行,避免spike初始化跟MCU初始化不同,导致LW读出的结果不同1
2
3
4
5
6
7
8
9
10
11
12
13
14#define TEST_ST_OP( testnum, load_inst, store_inst, result, offset, base ) \
TEST_CASE( testnum, x14, result, \
la x1, base; \
li x2, result; \
la x15, 7f; /* Tell the exception handler how to skip this test. */ \
sw x0, 0(x1); /*write 0 to target location first*/ \
store_inst x2, offset(x1); \
load_inst x14, offset(x1); \
j 8f; \
7: \
/* Set up the correct result for TEST_CASE(). */ \
mv x14, x2; \
8: \
)
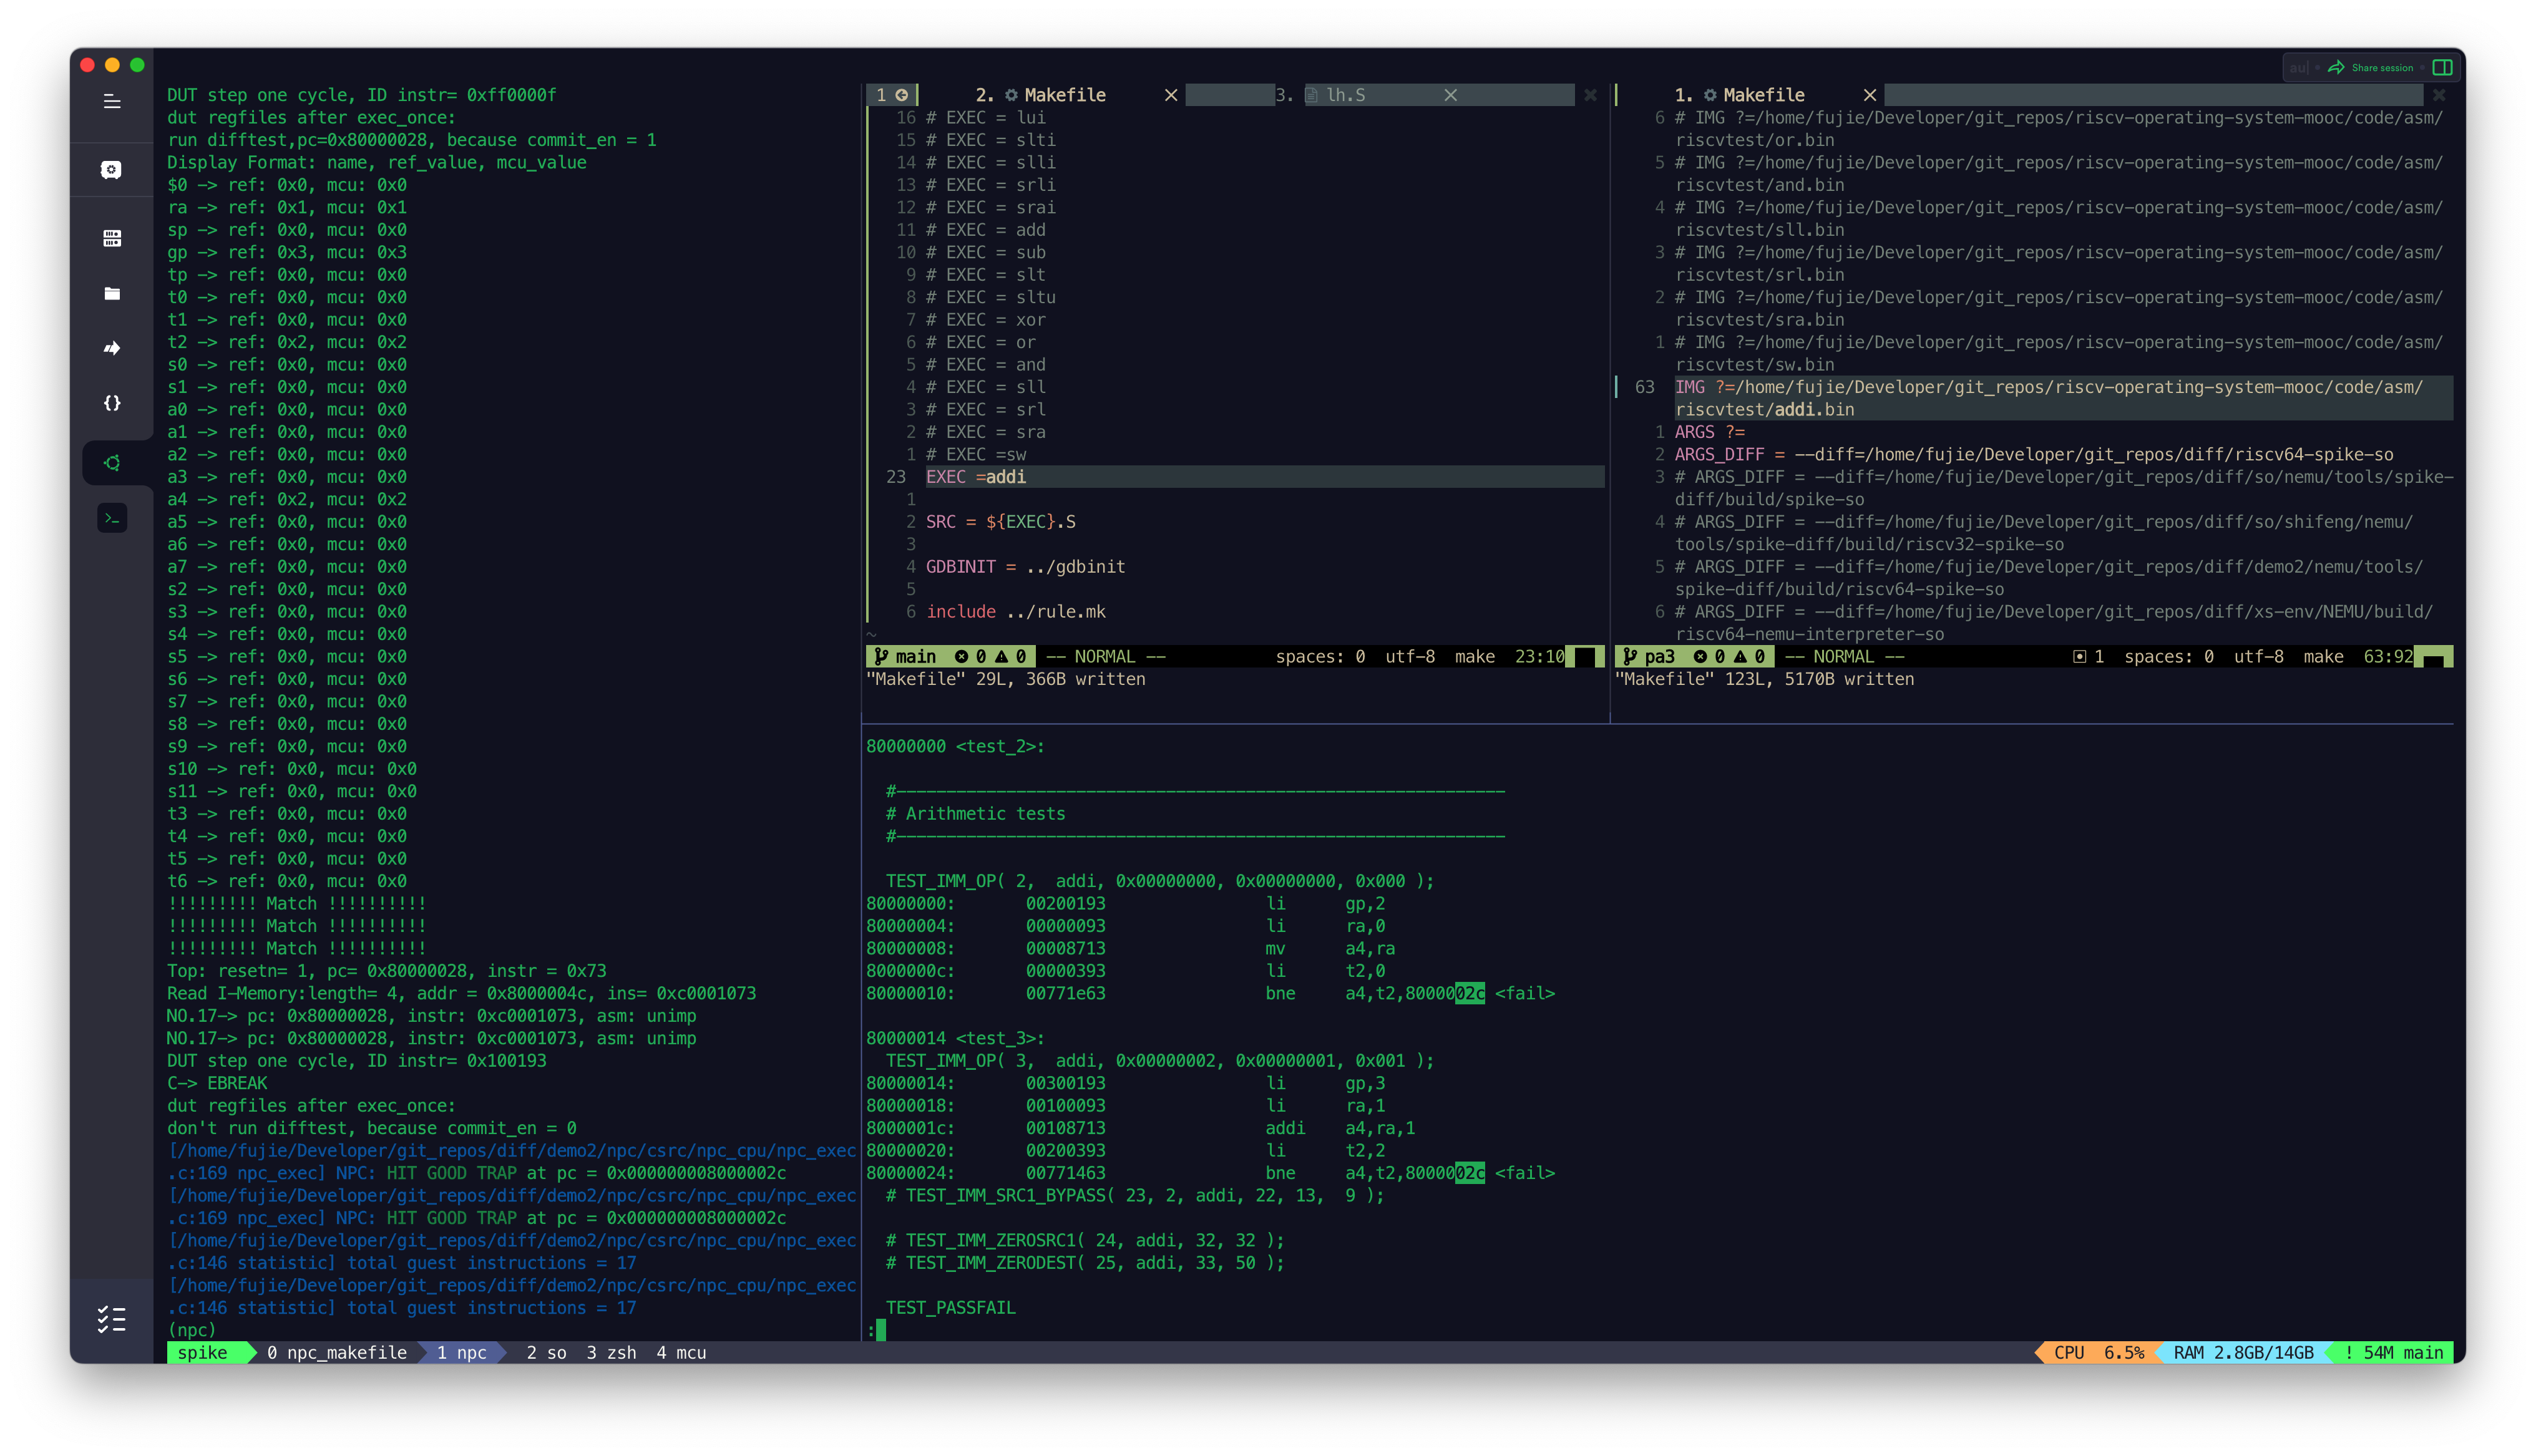
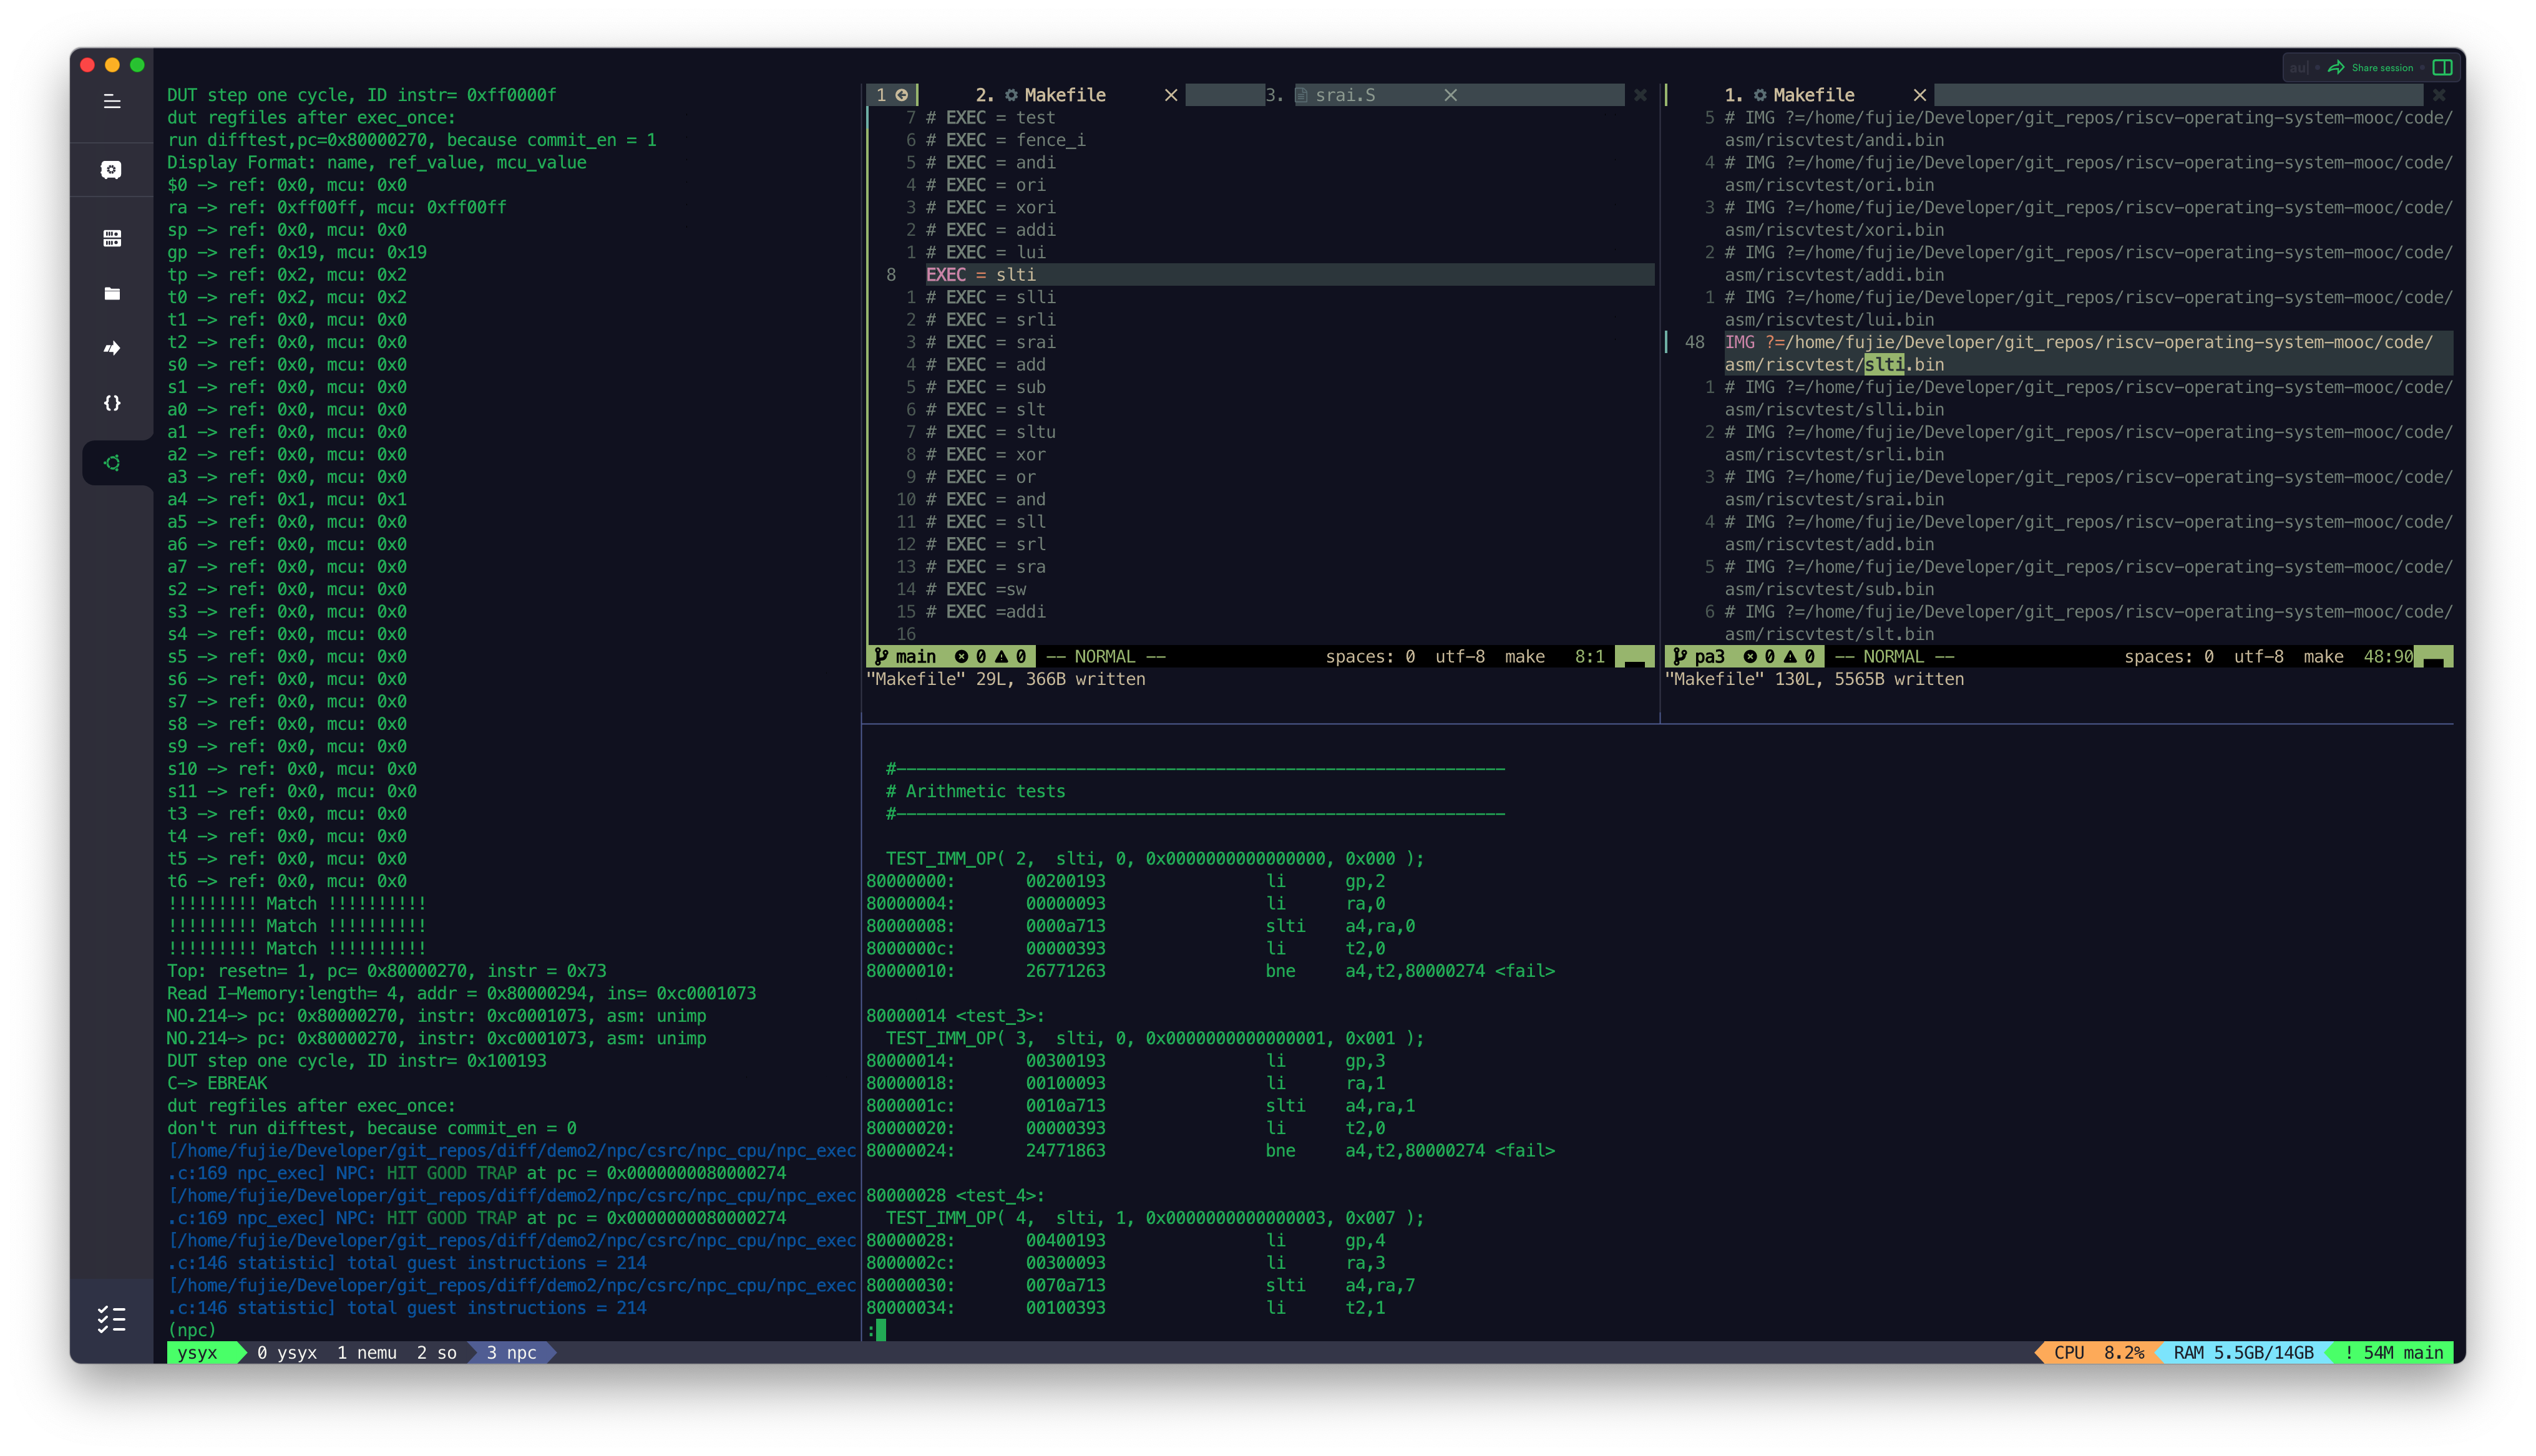
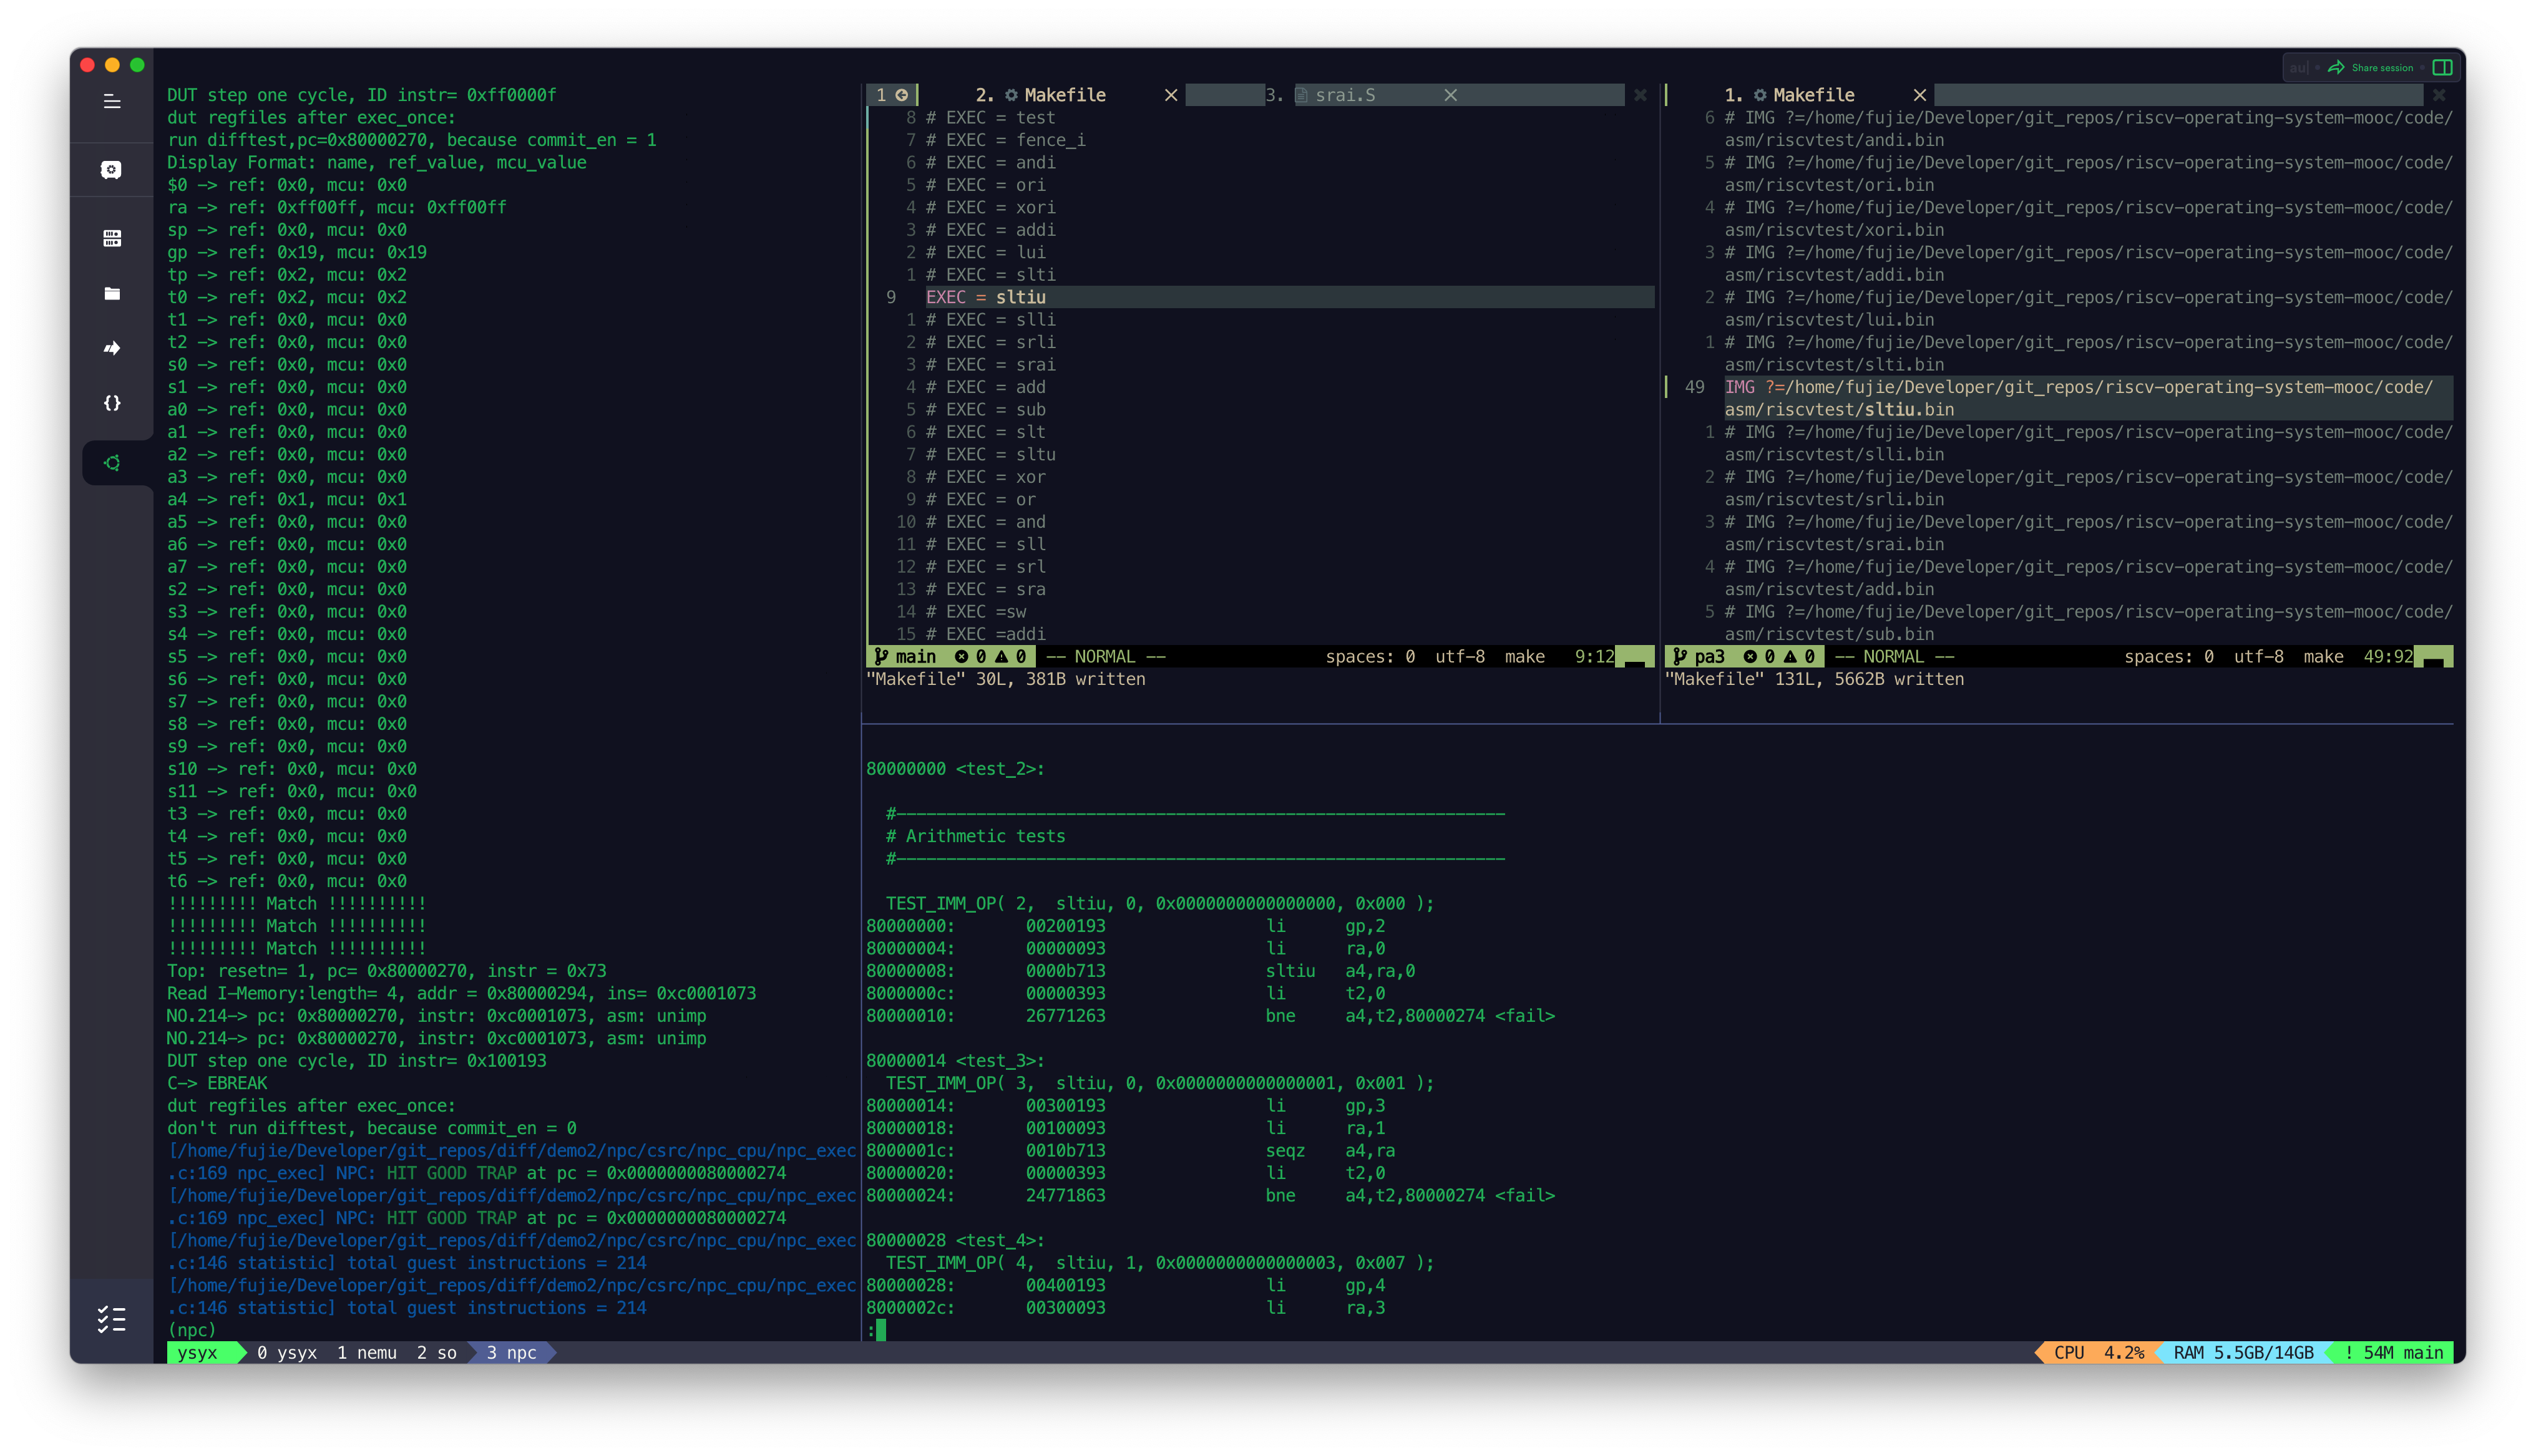
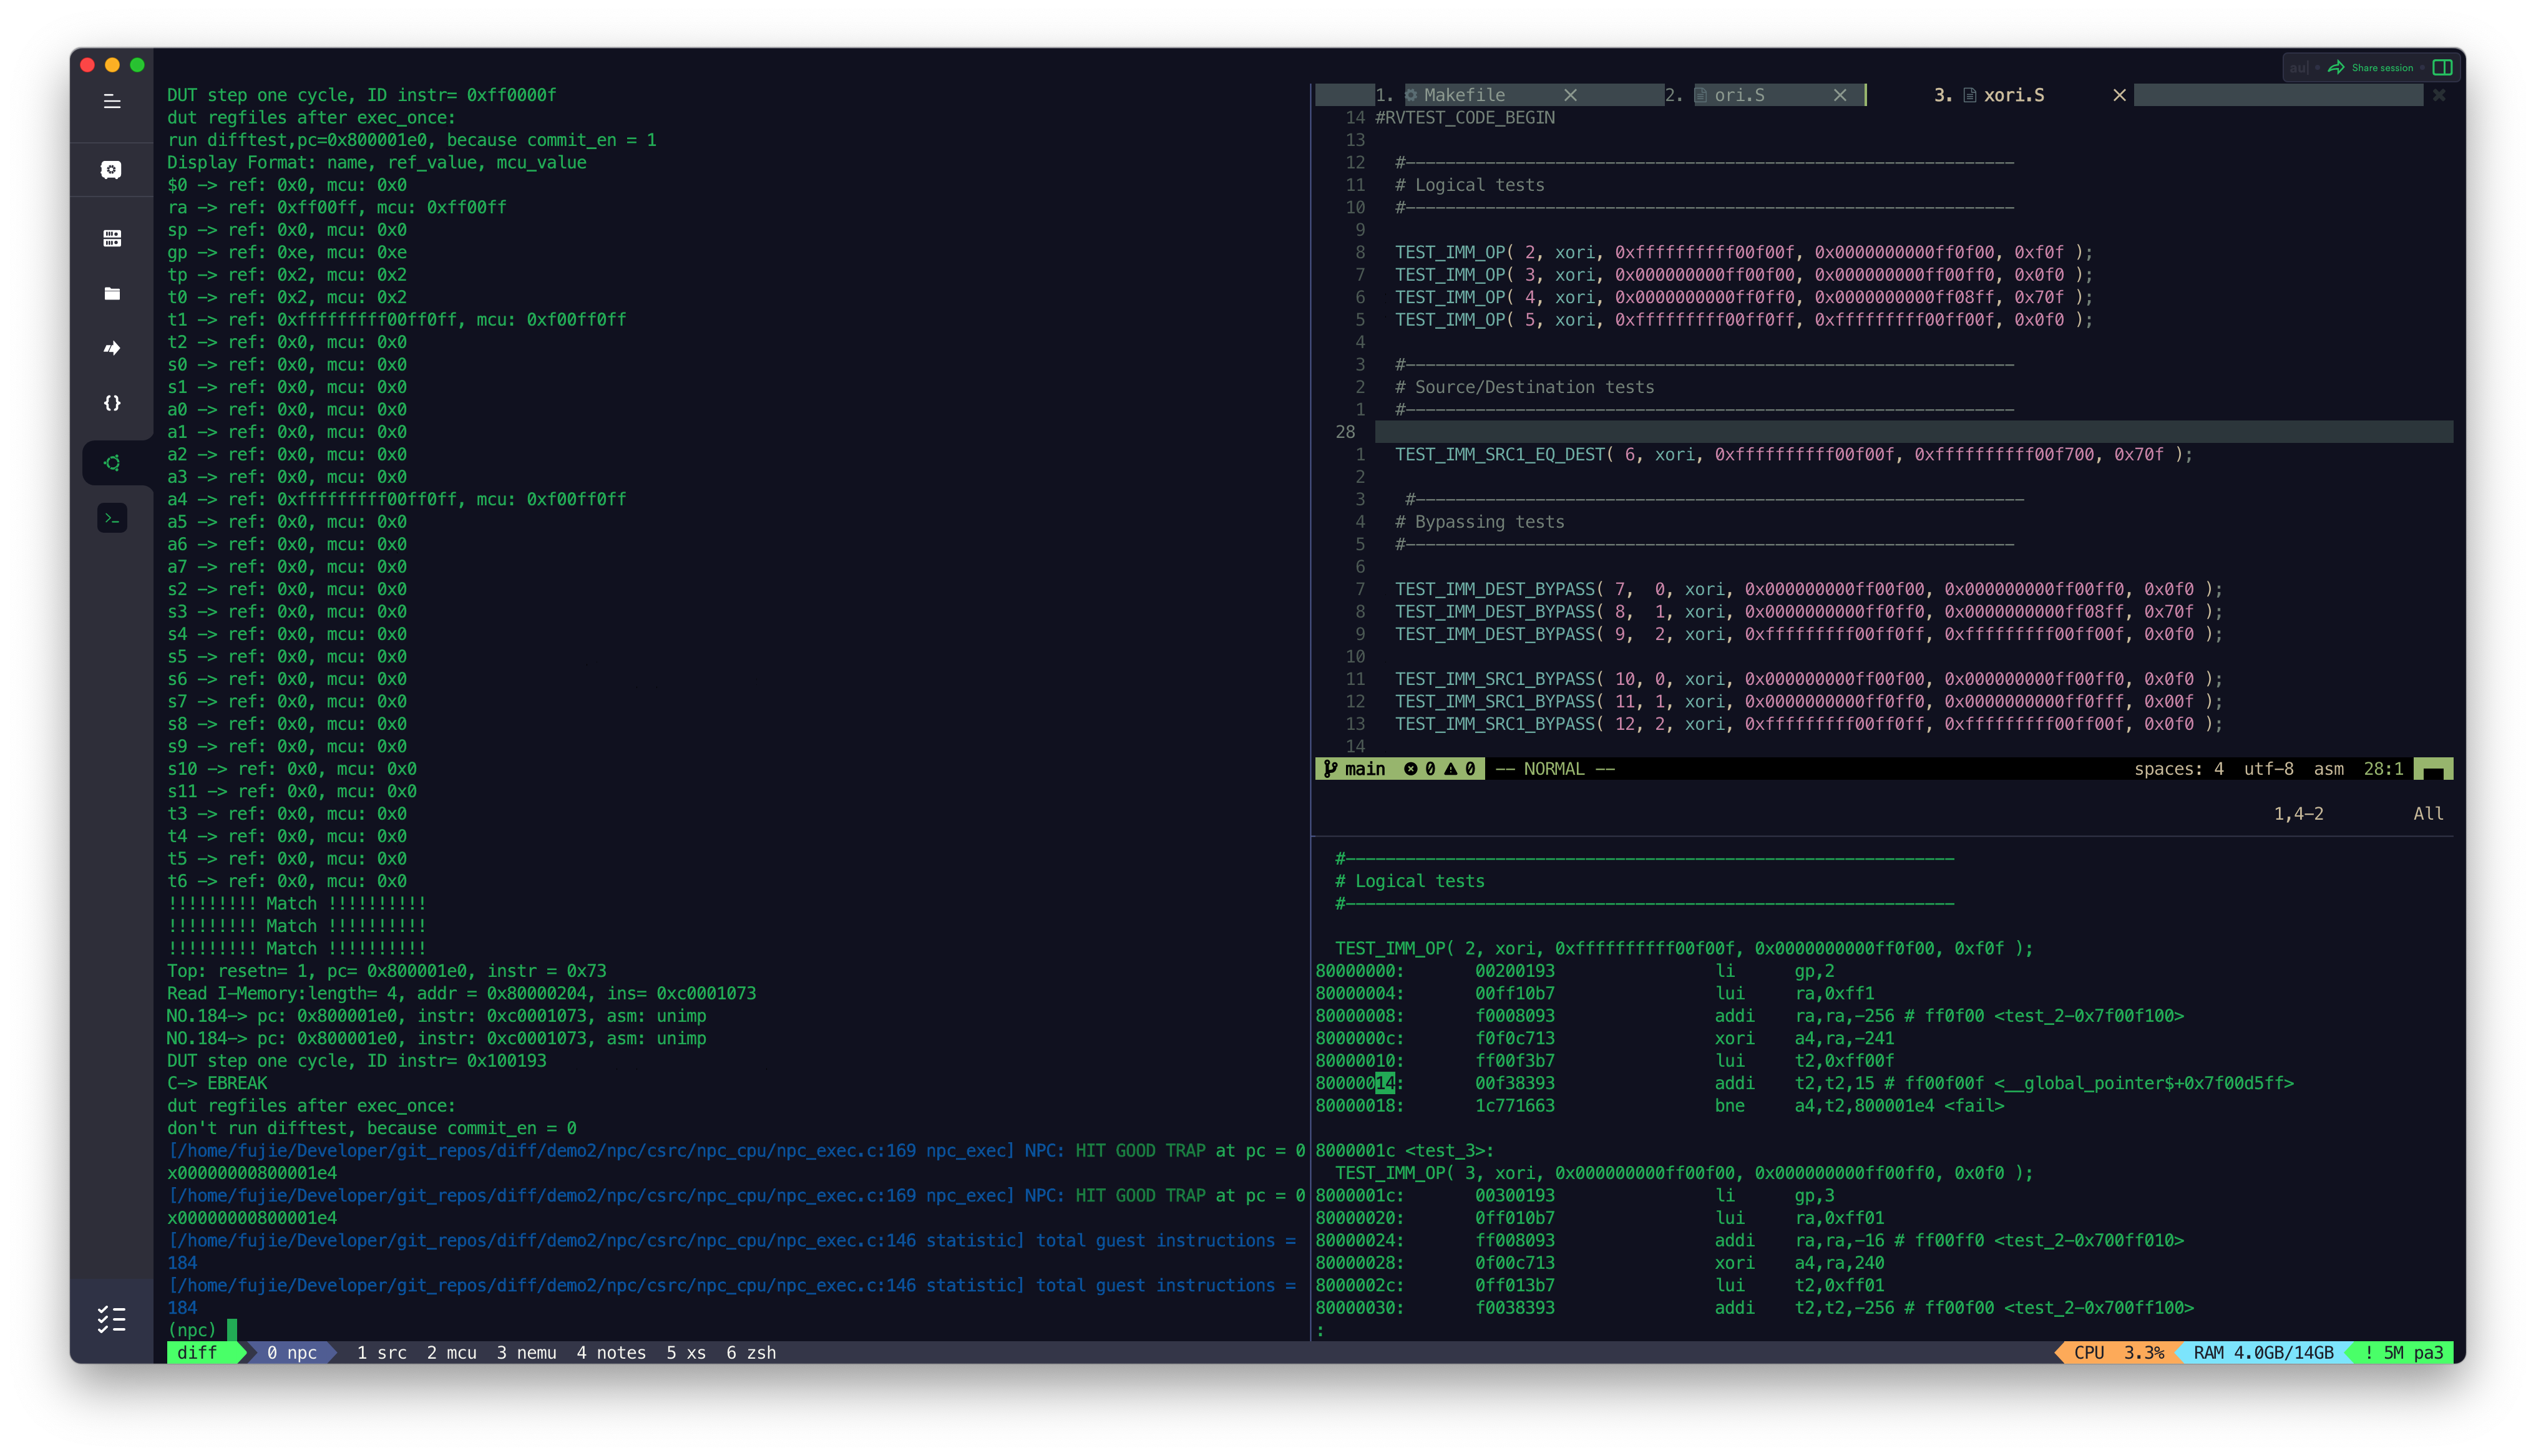
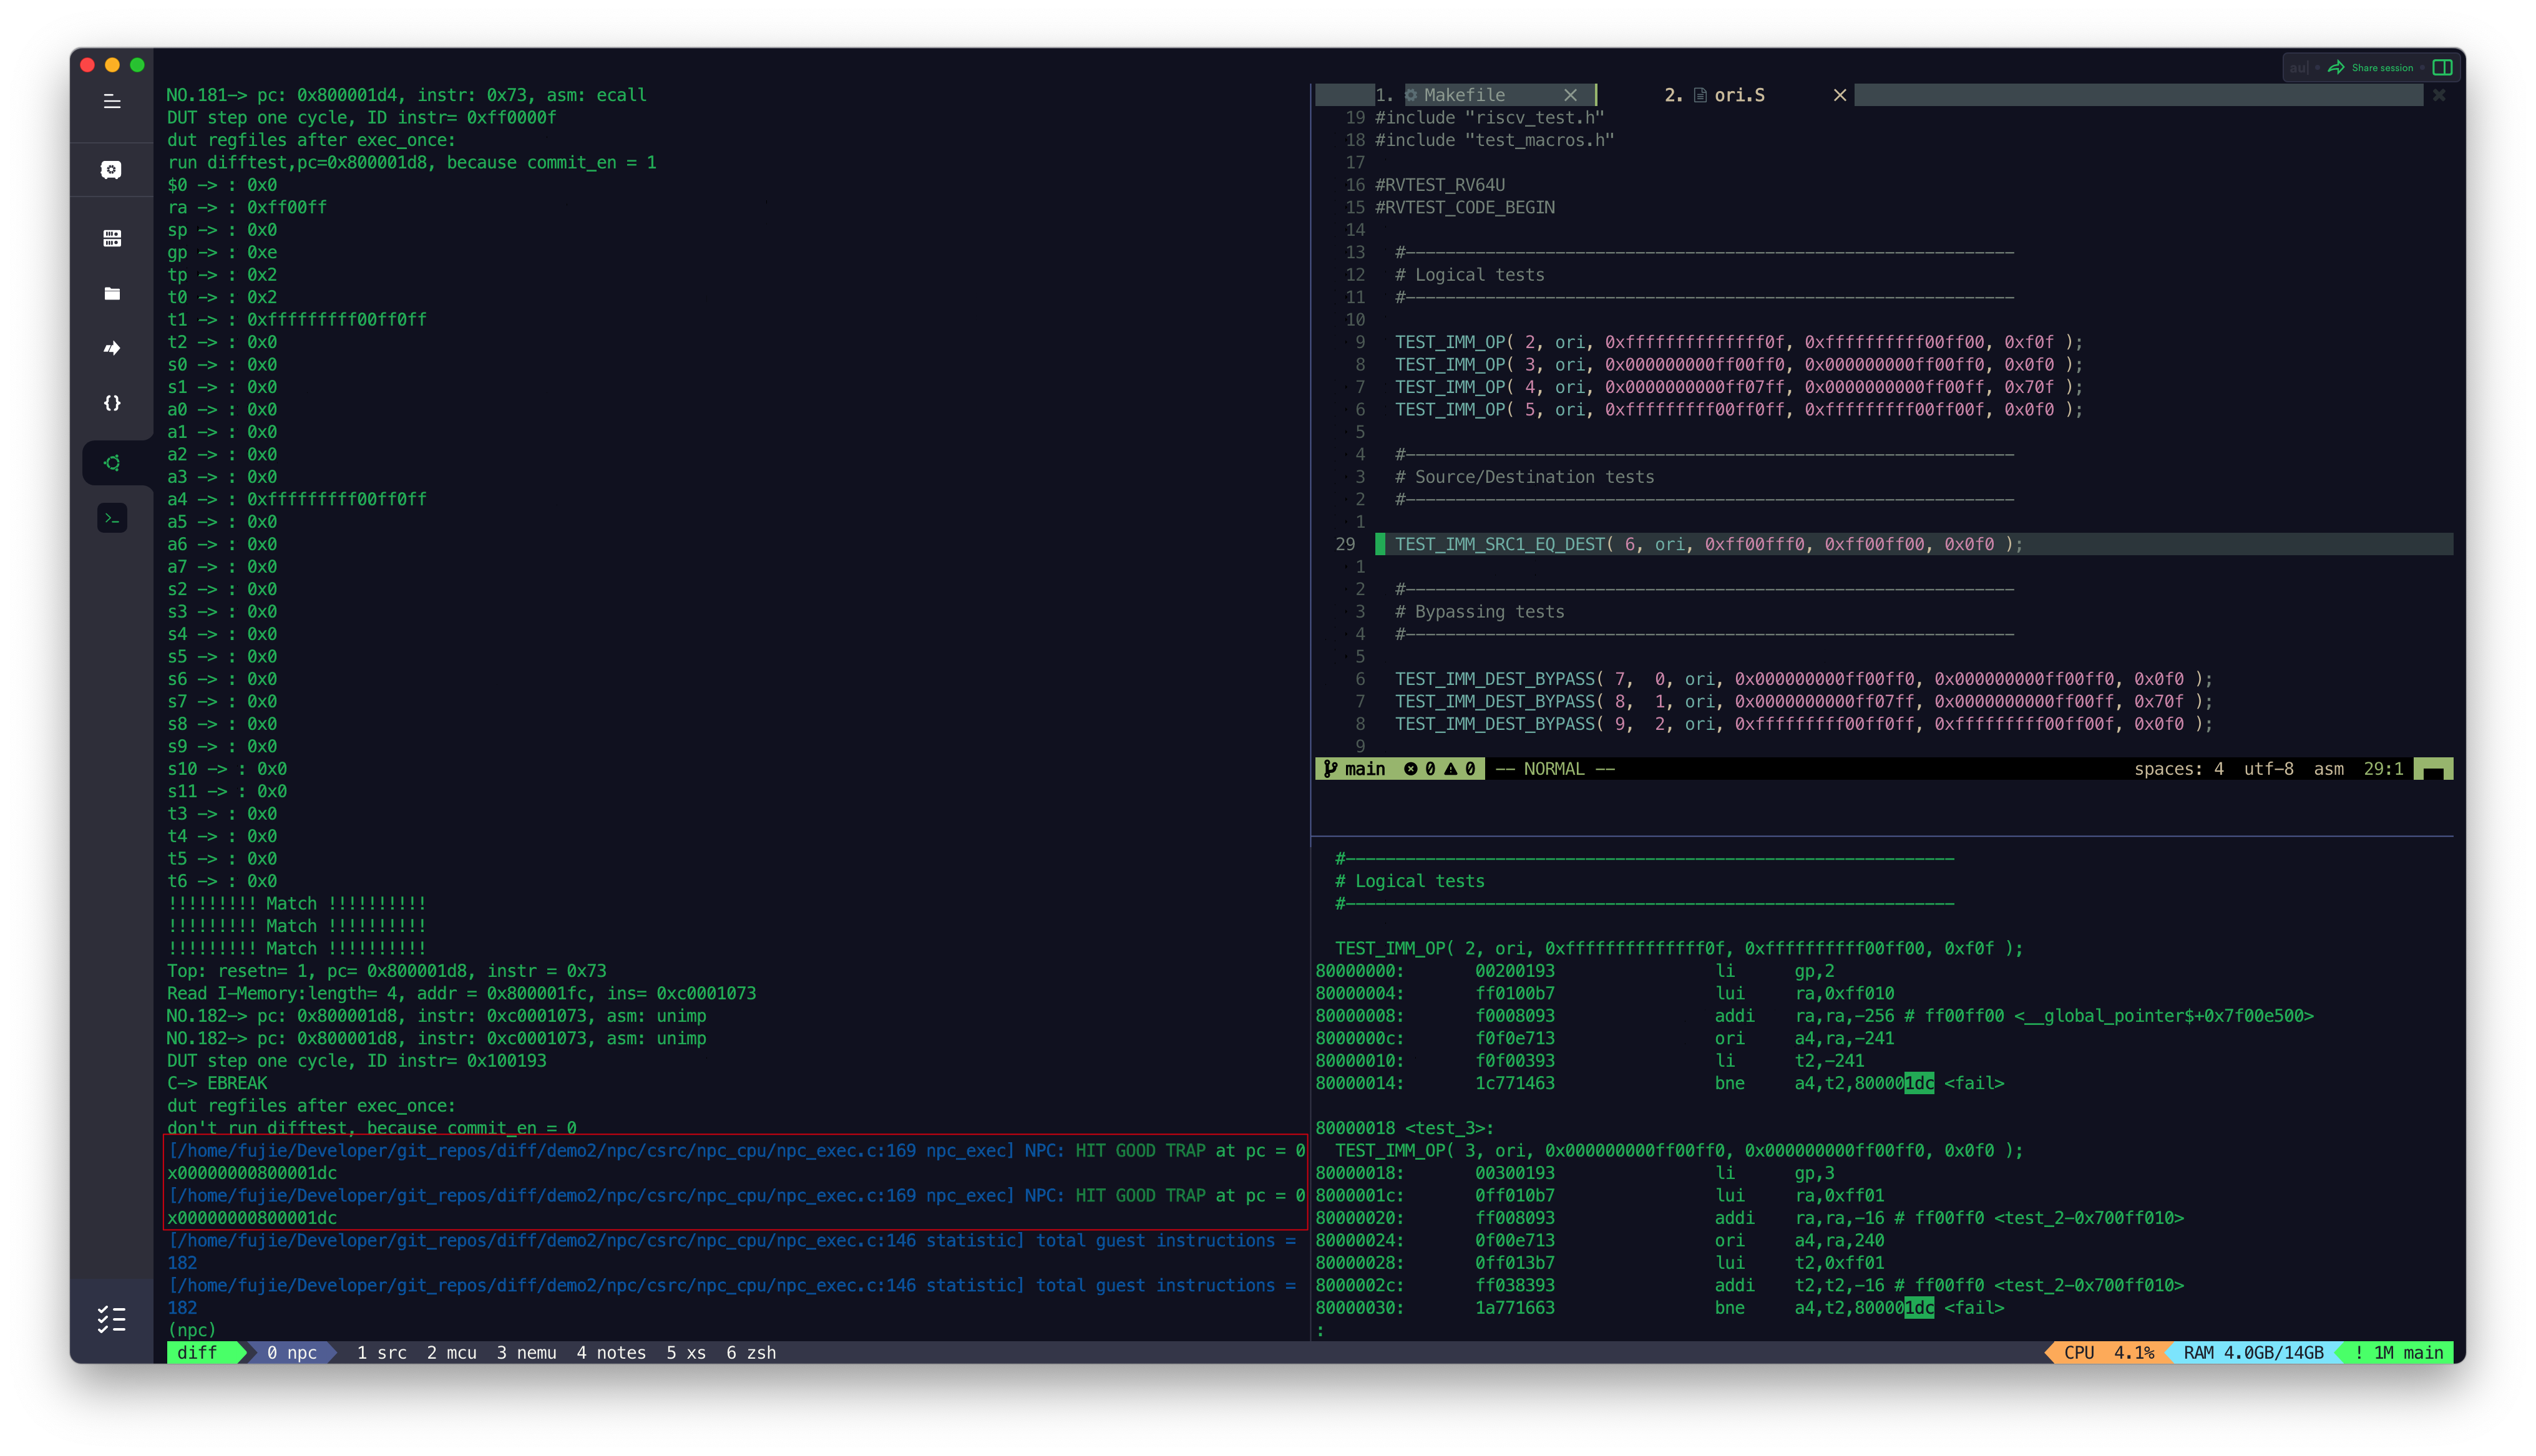
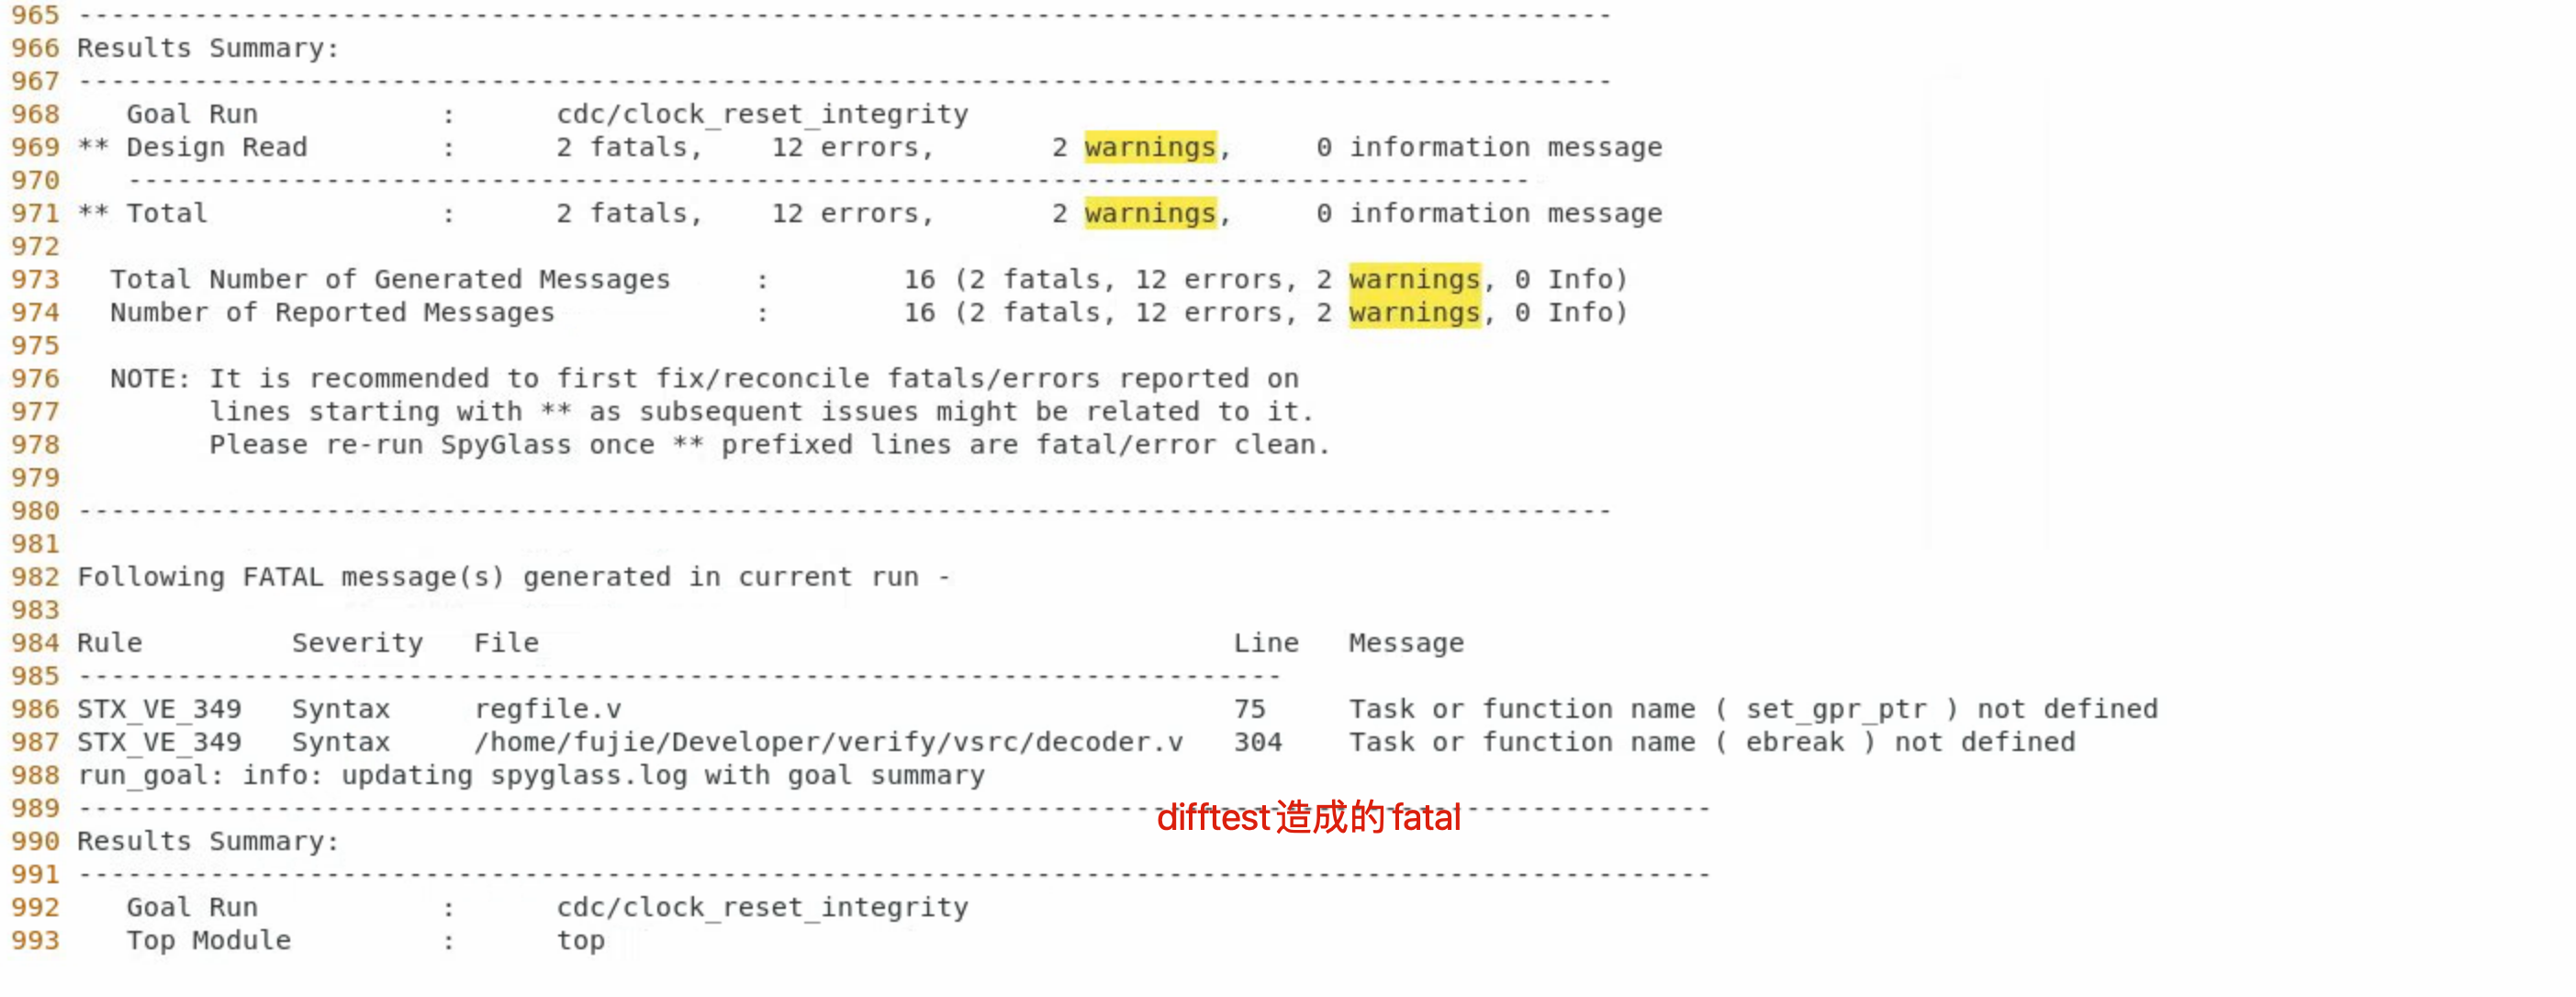
MCU_Core 接入 Difftest 结果

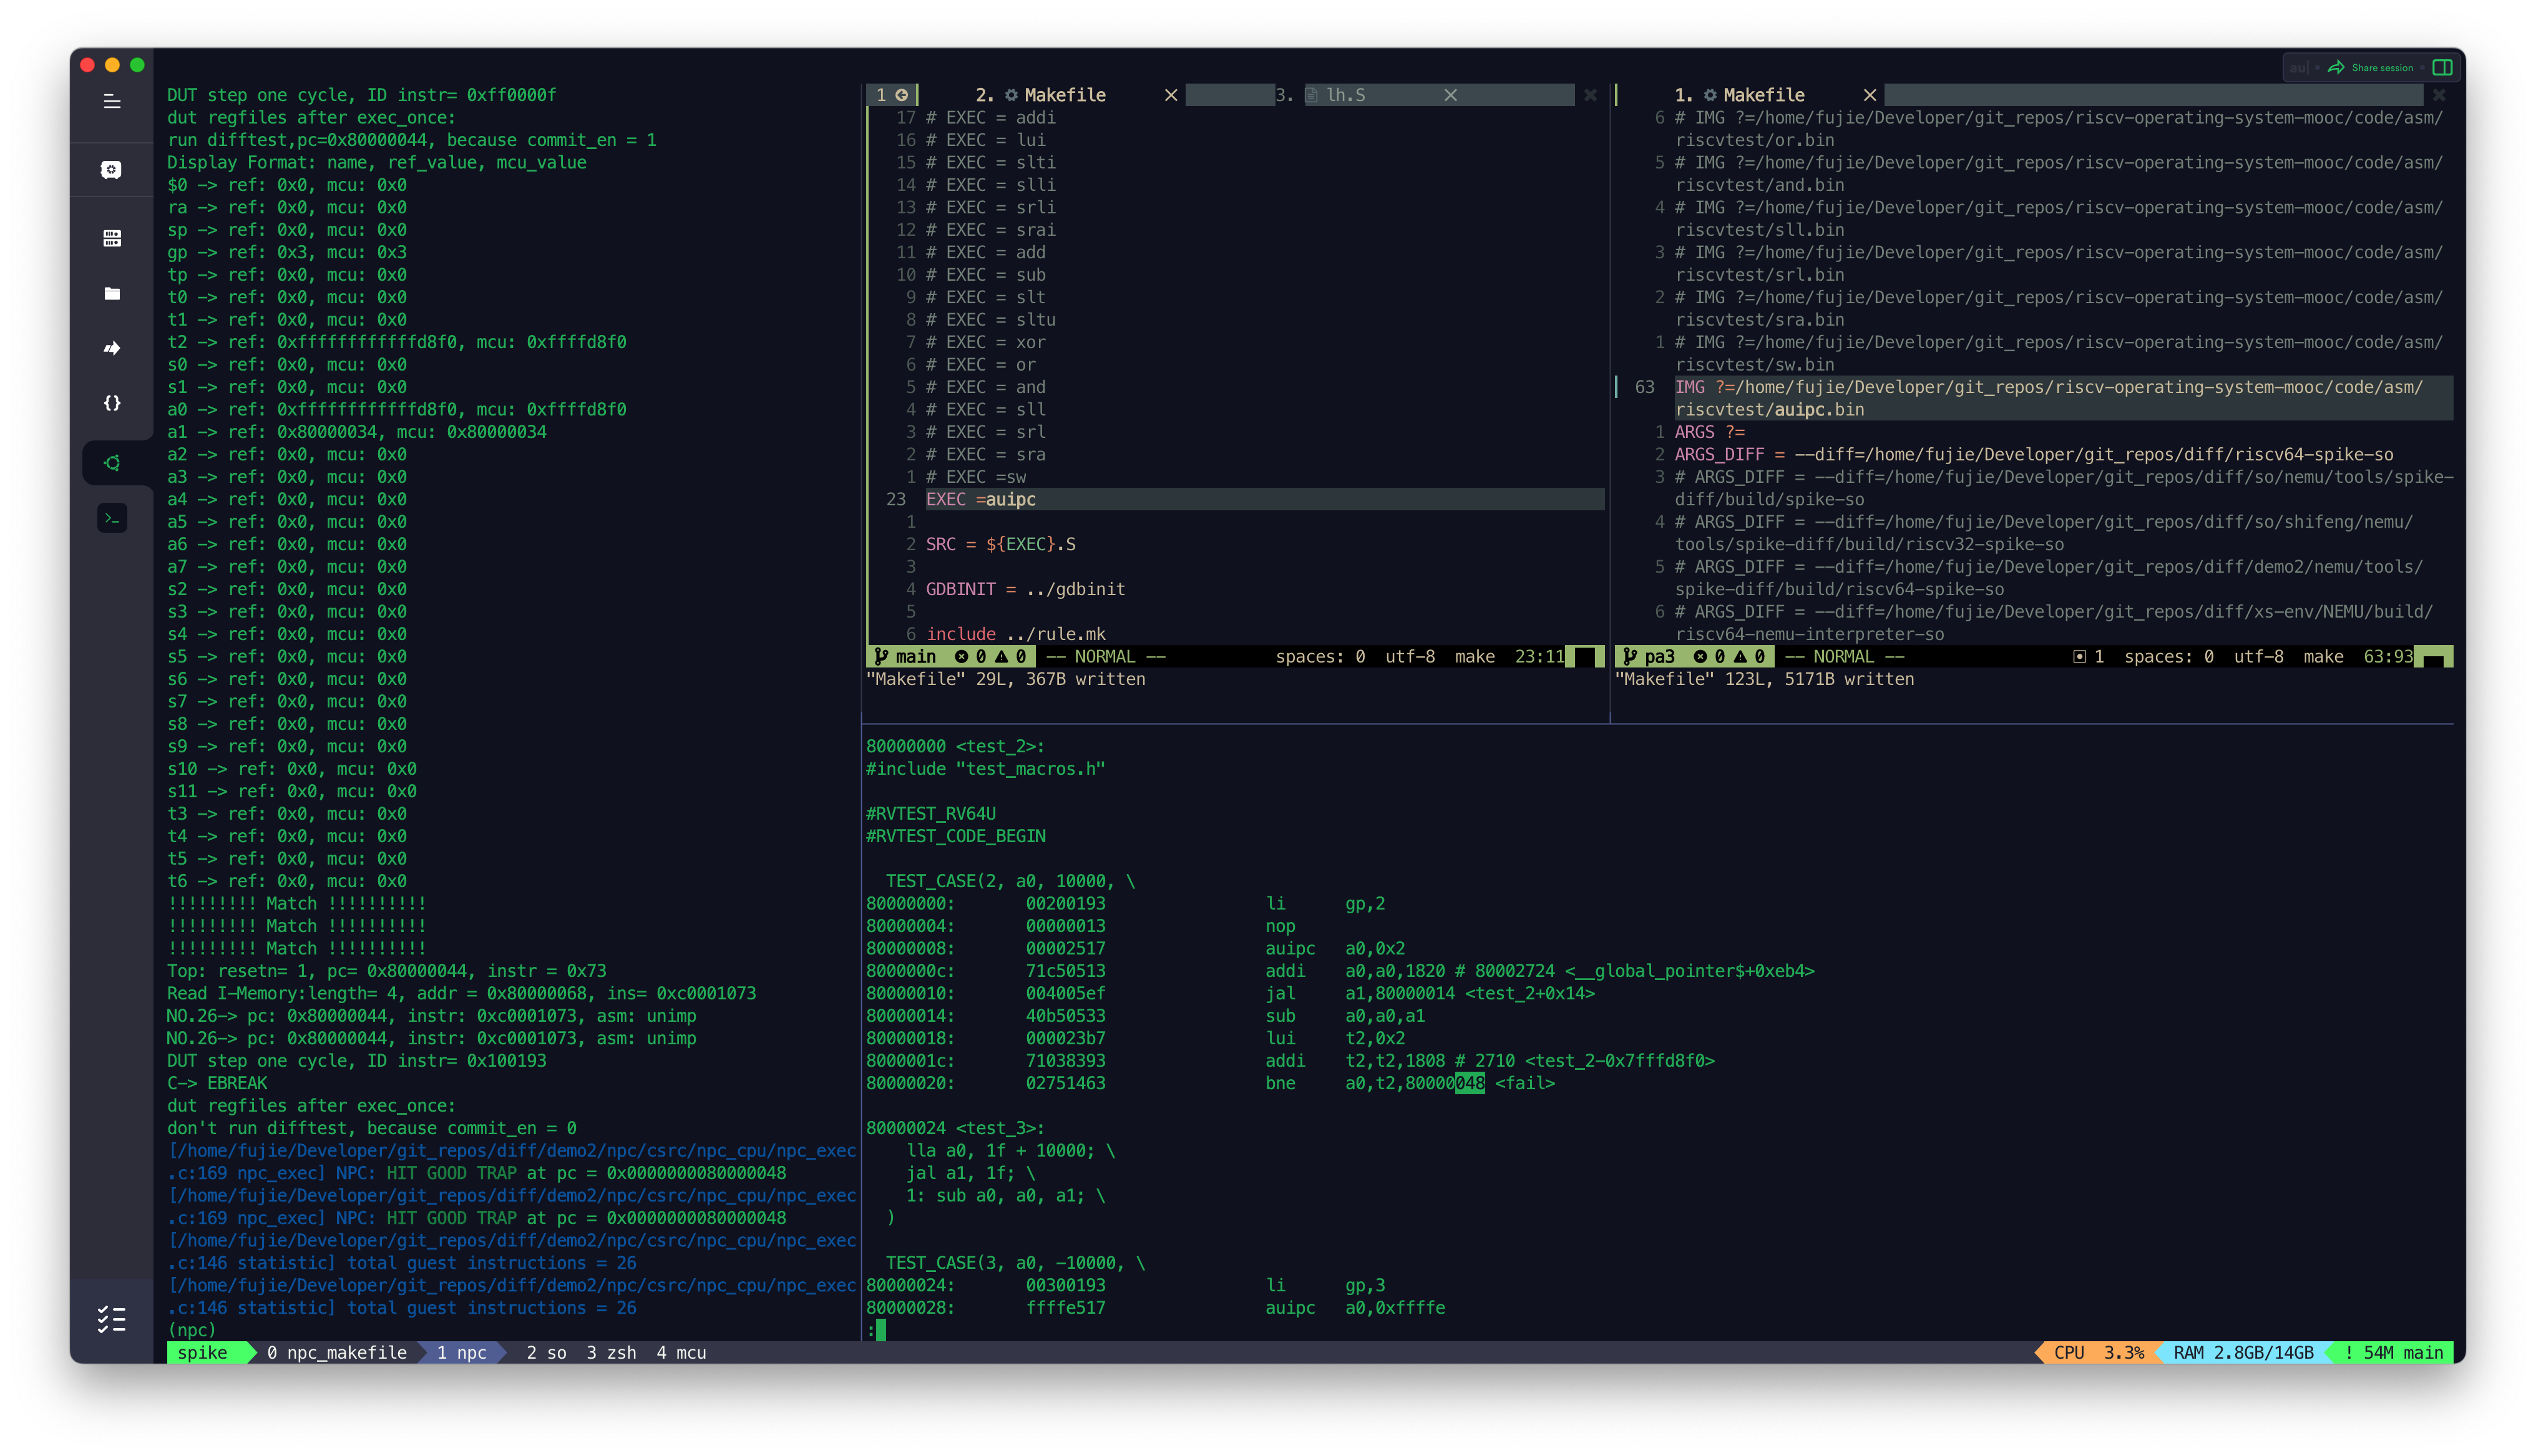
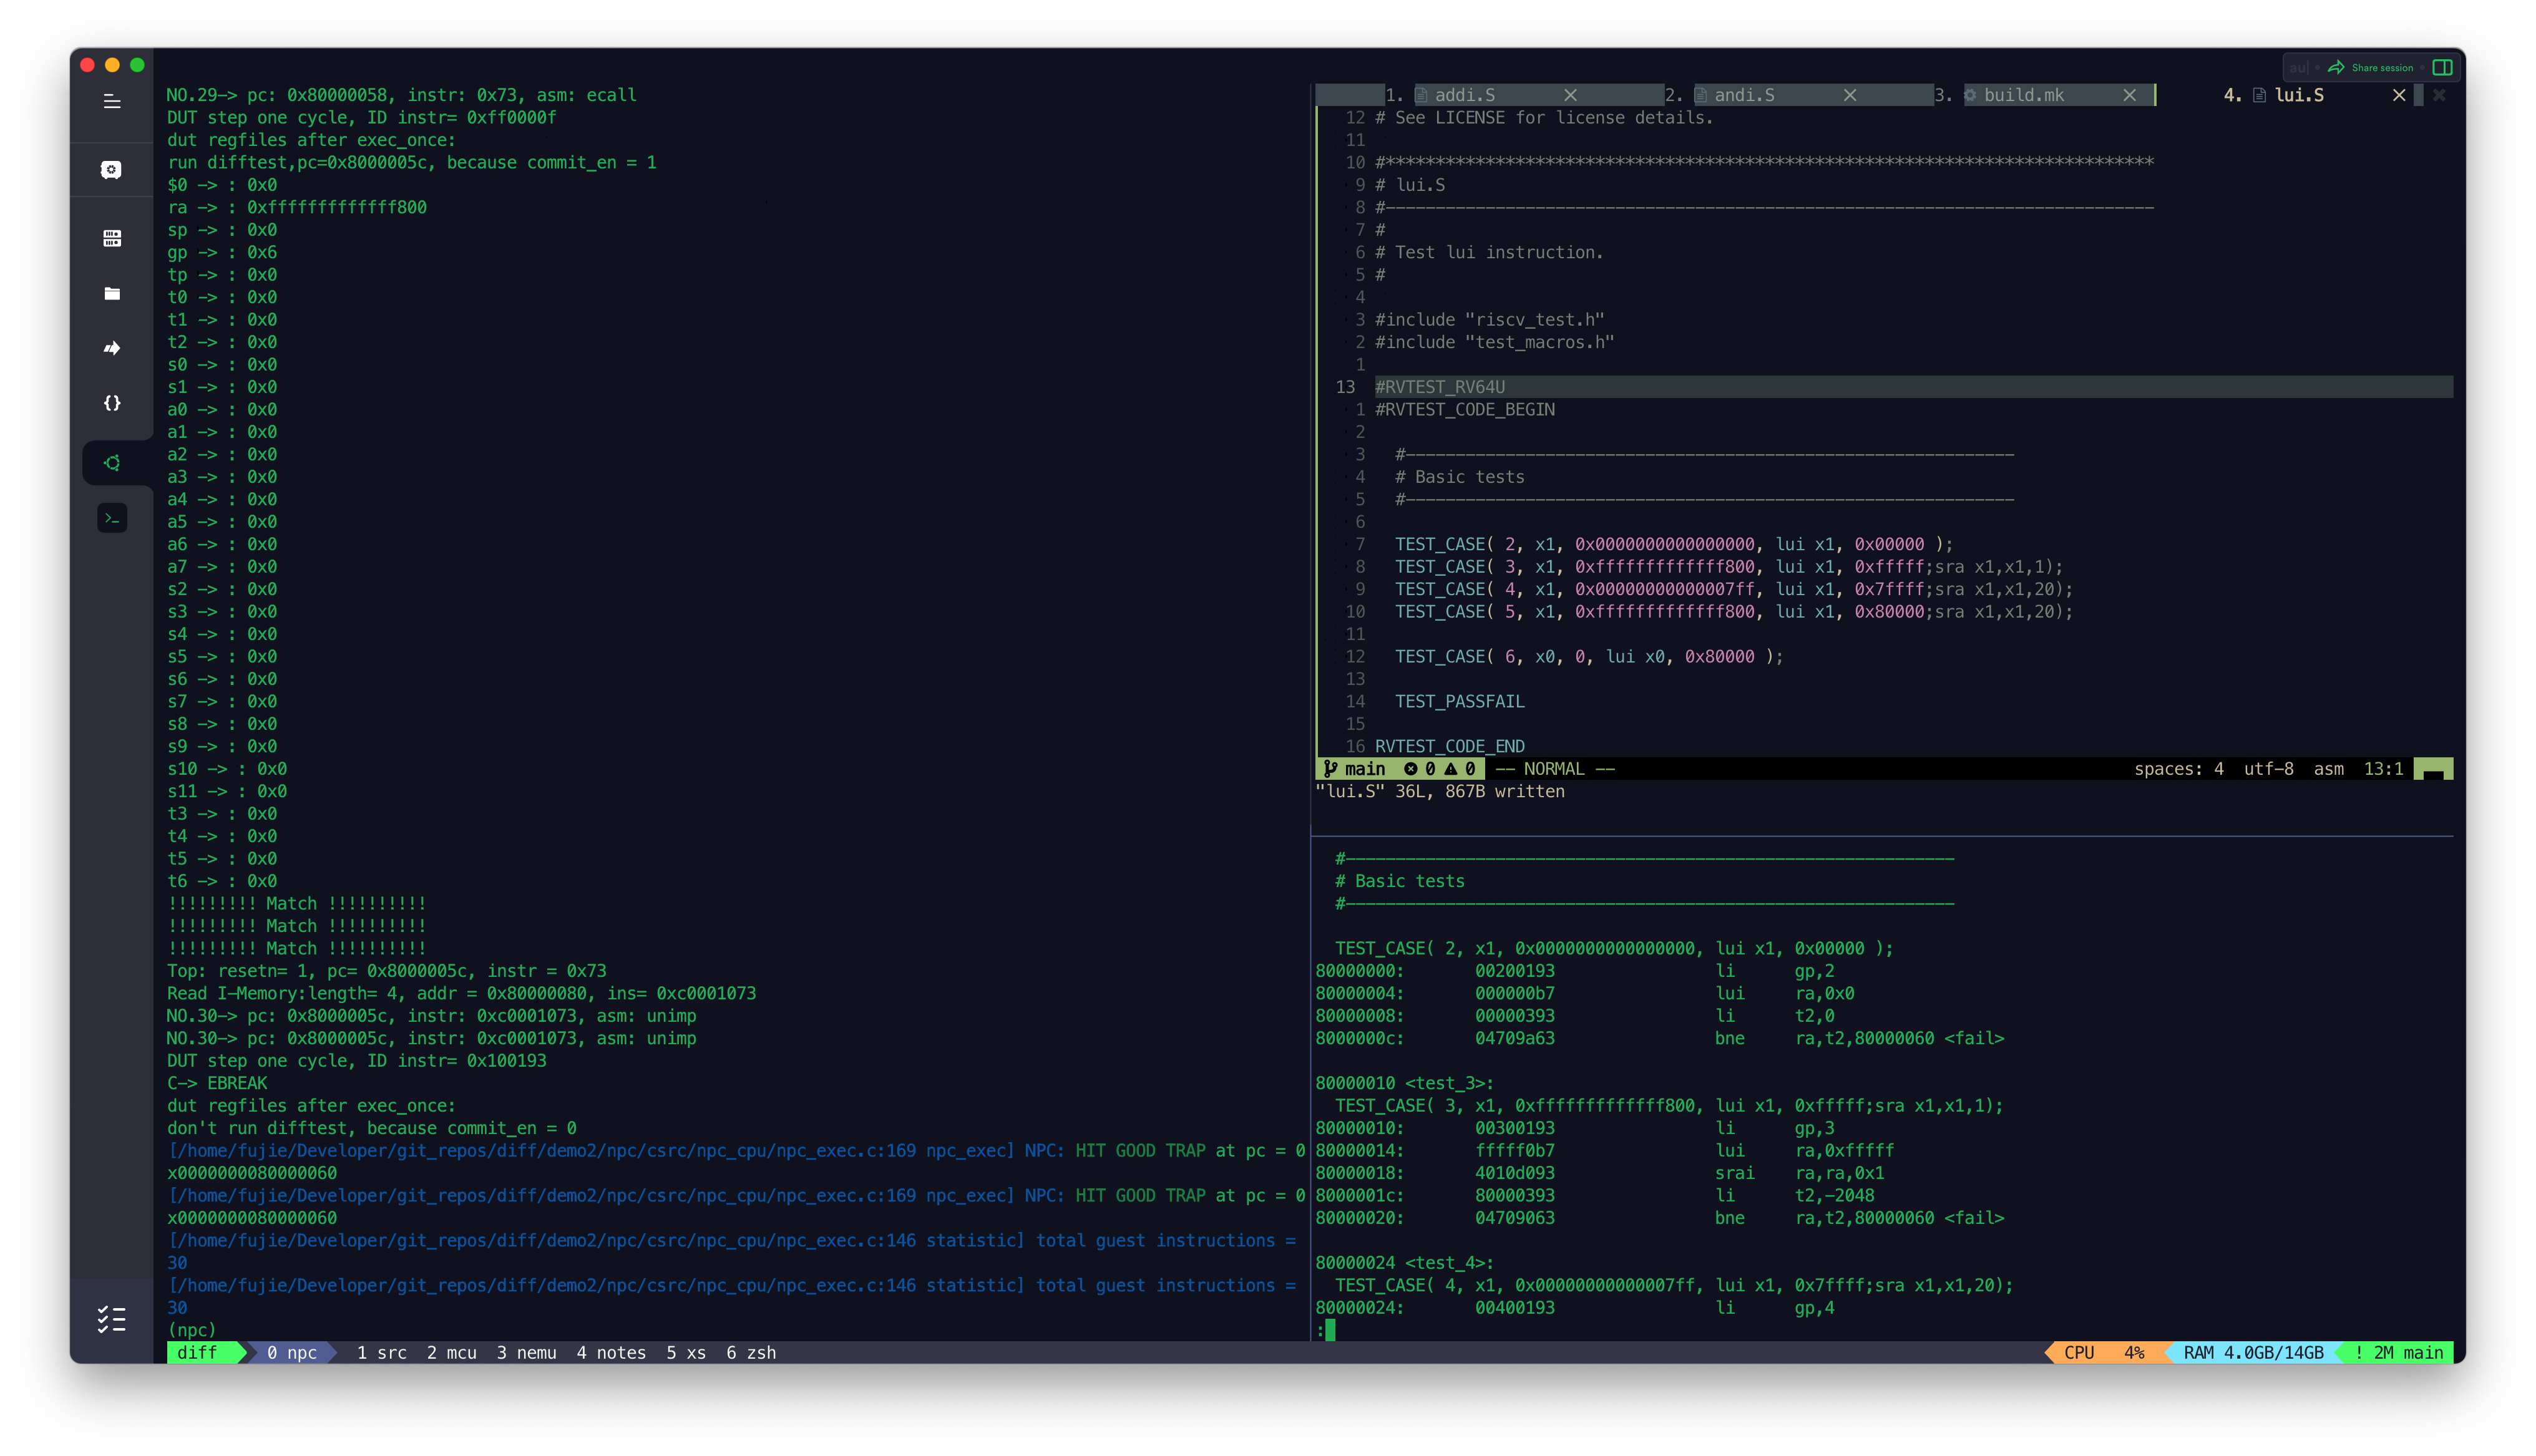
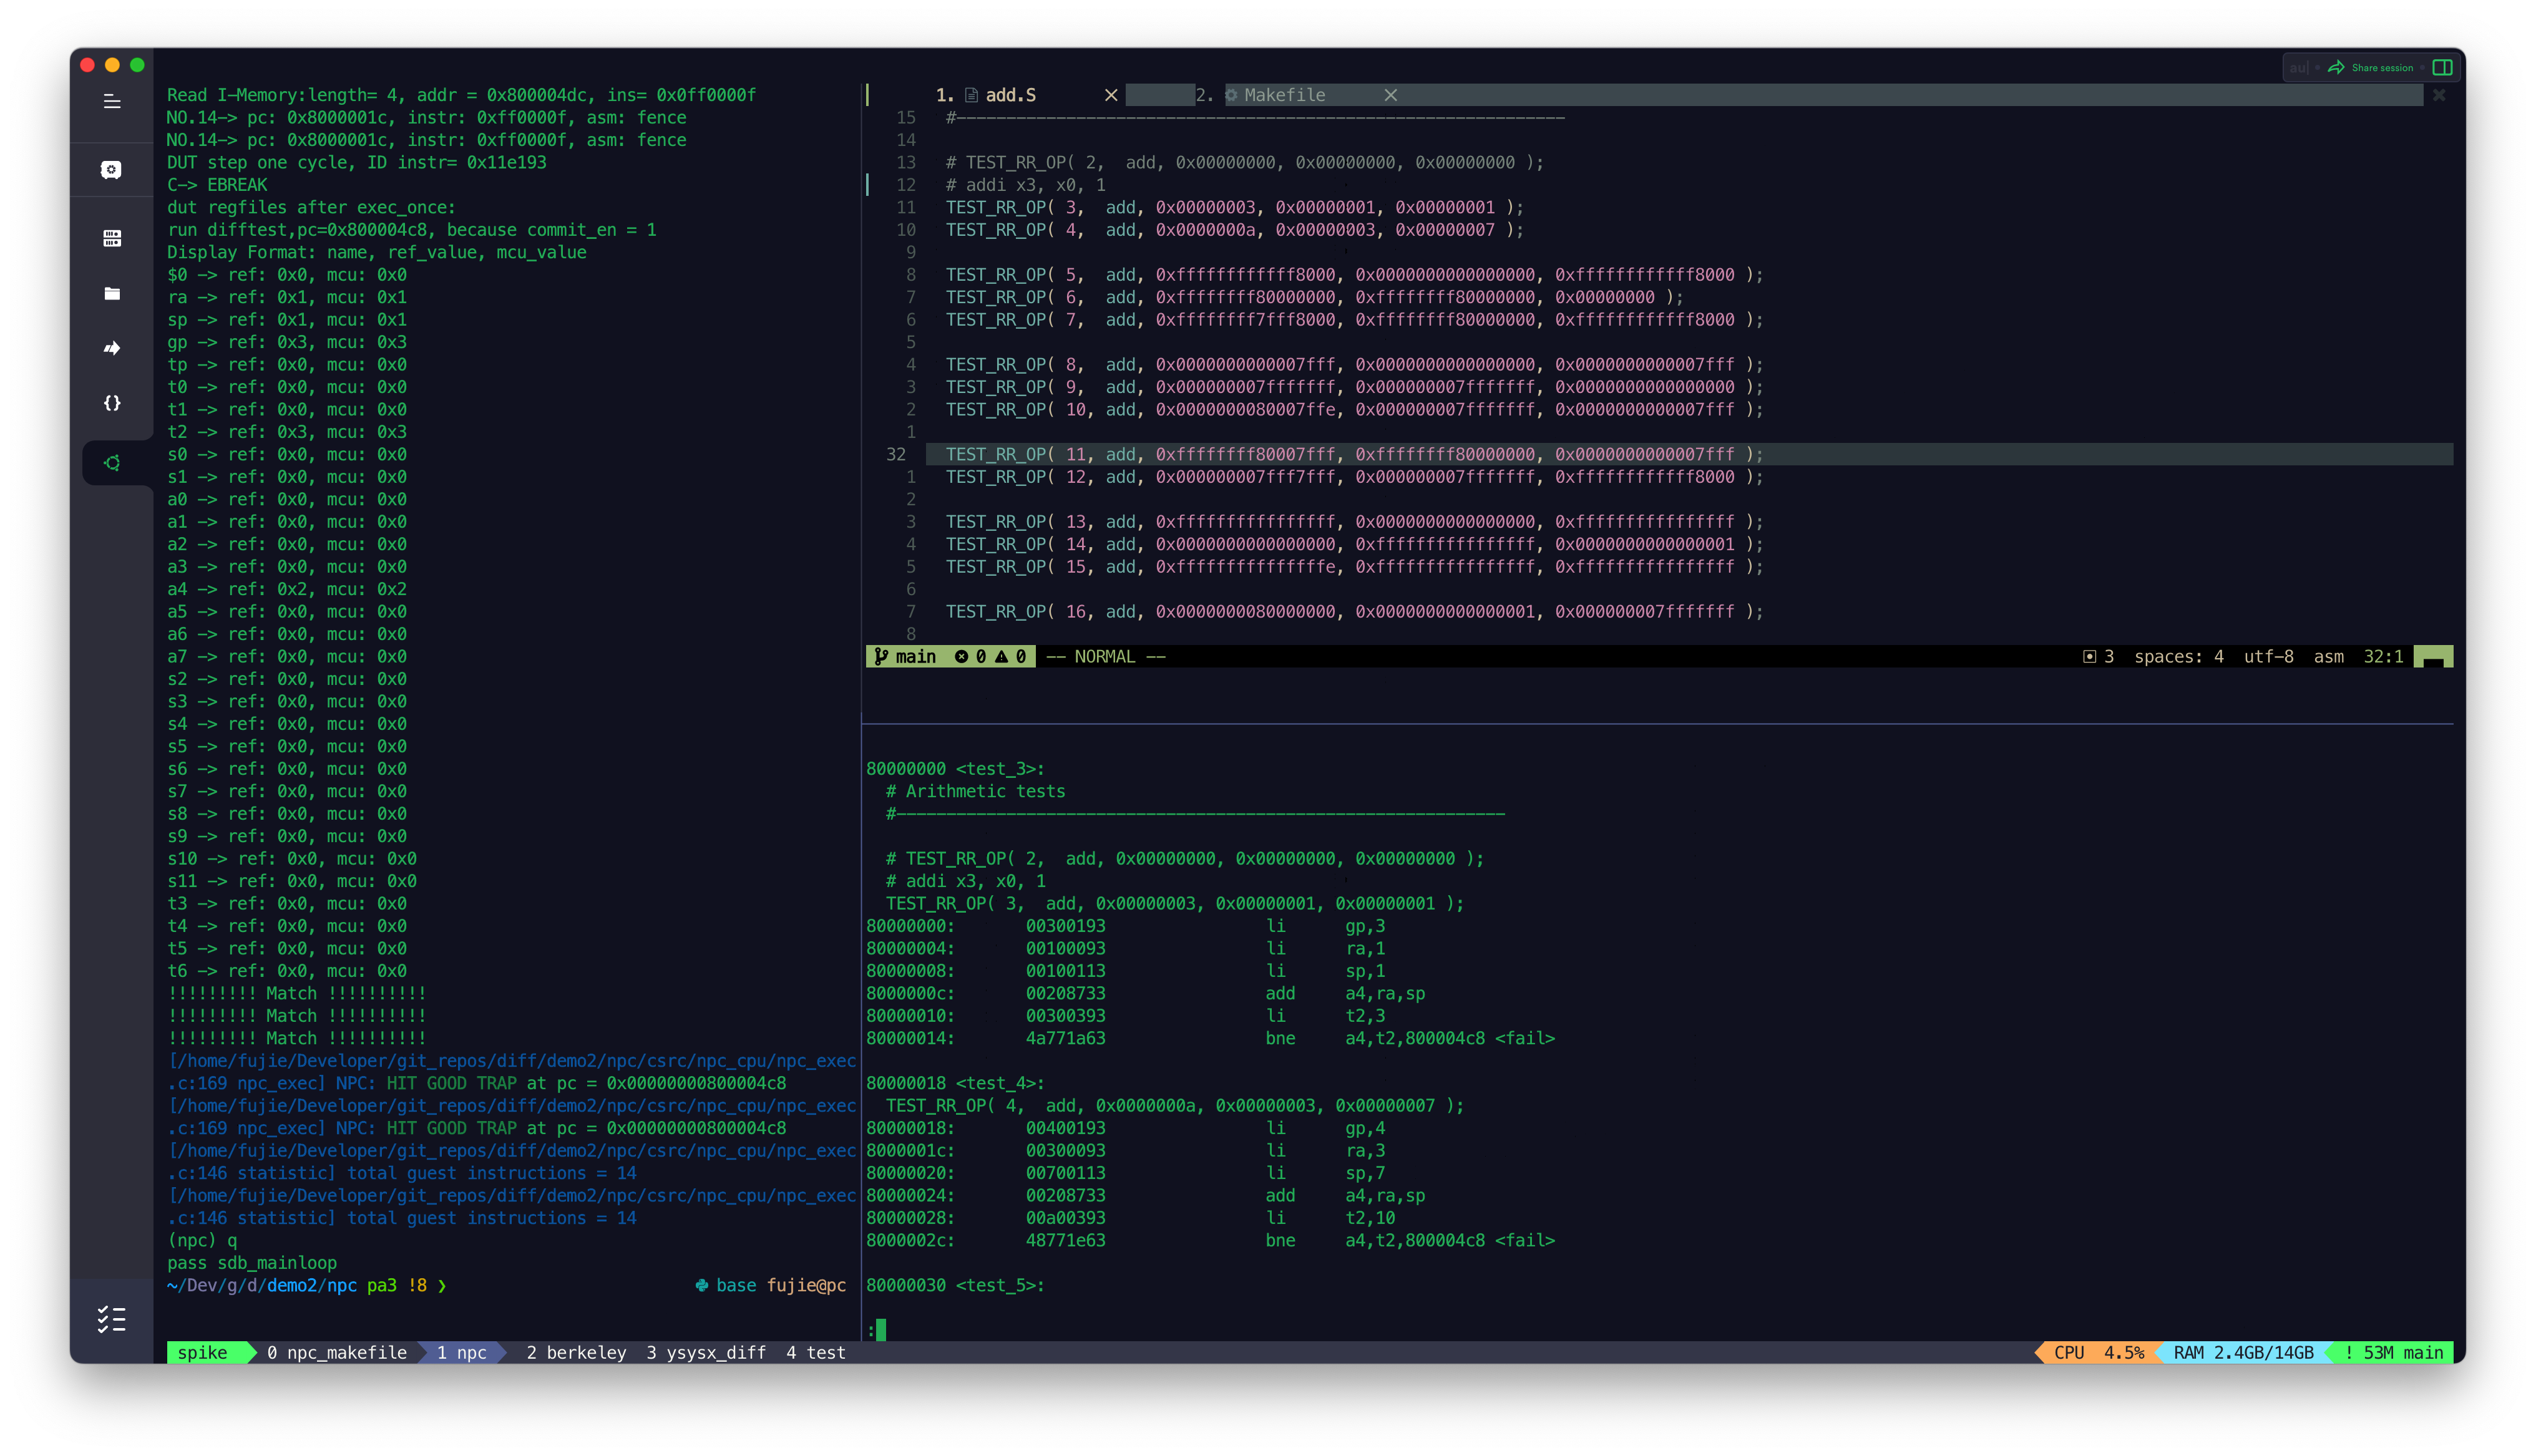
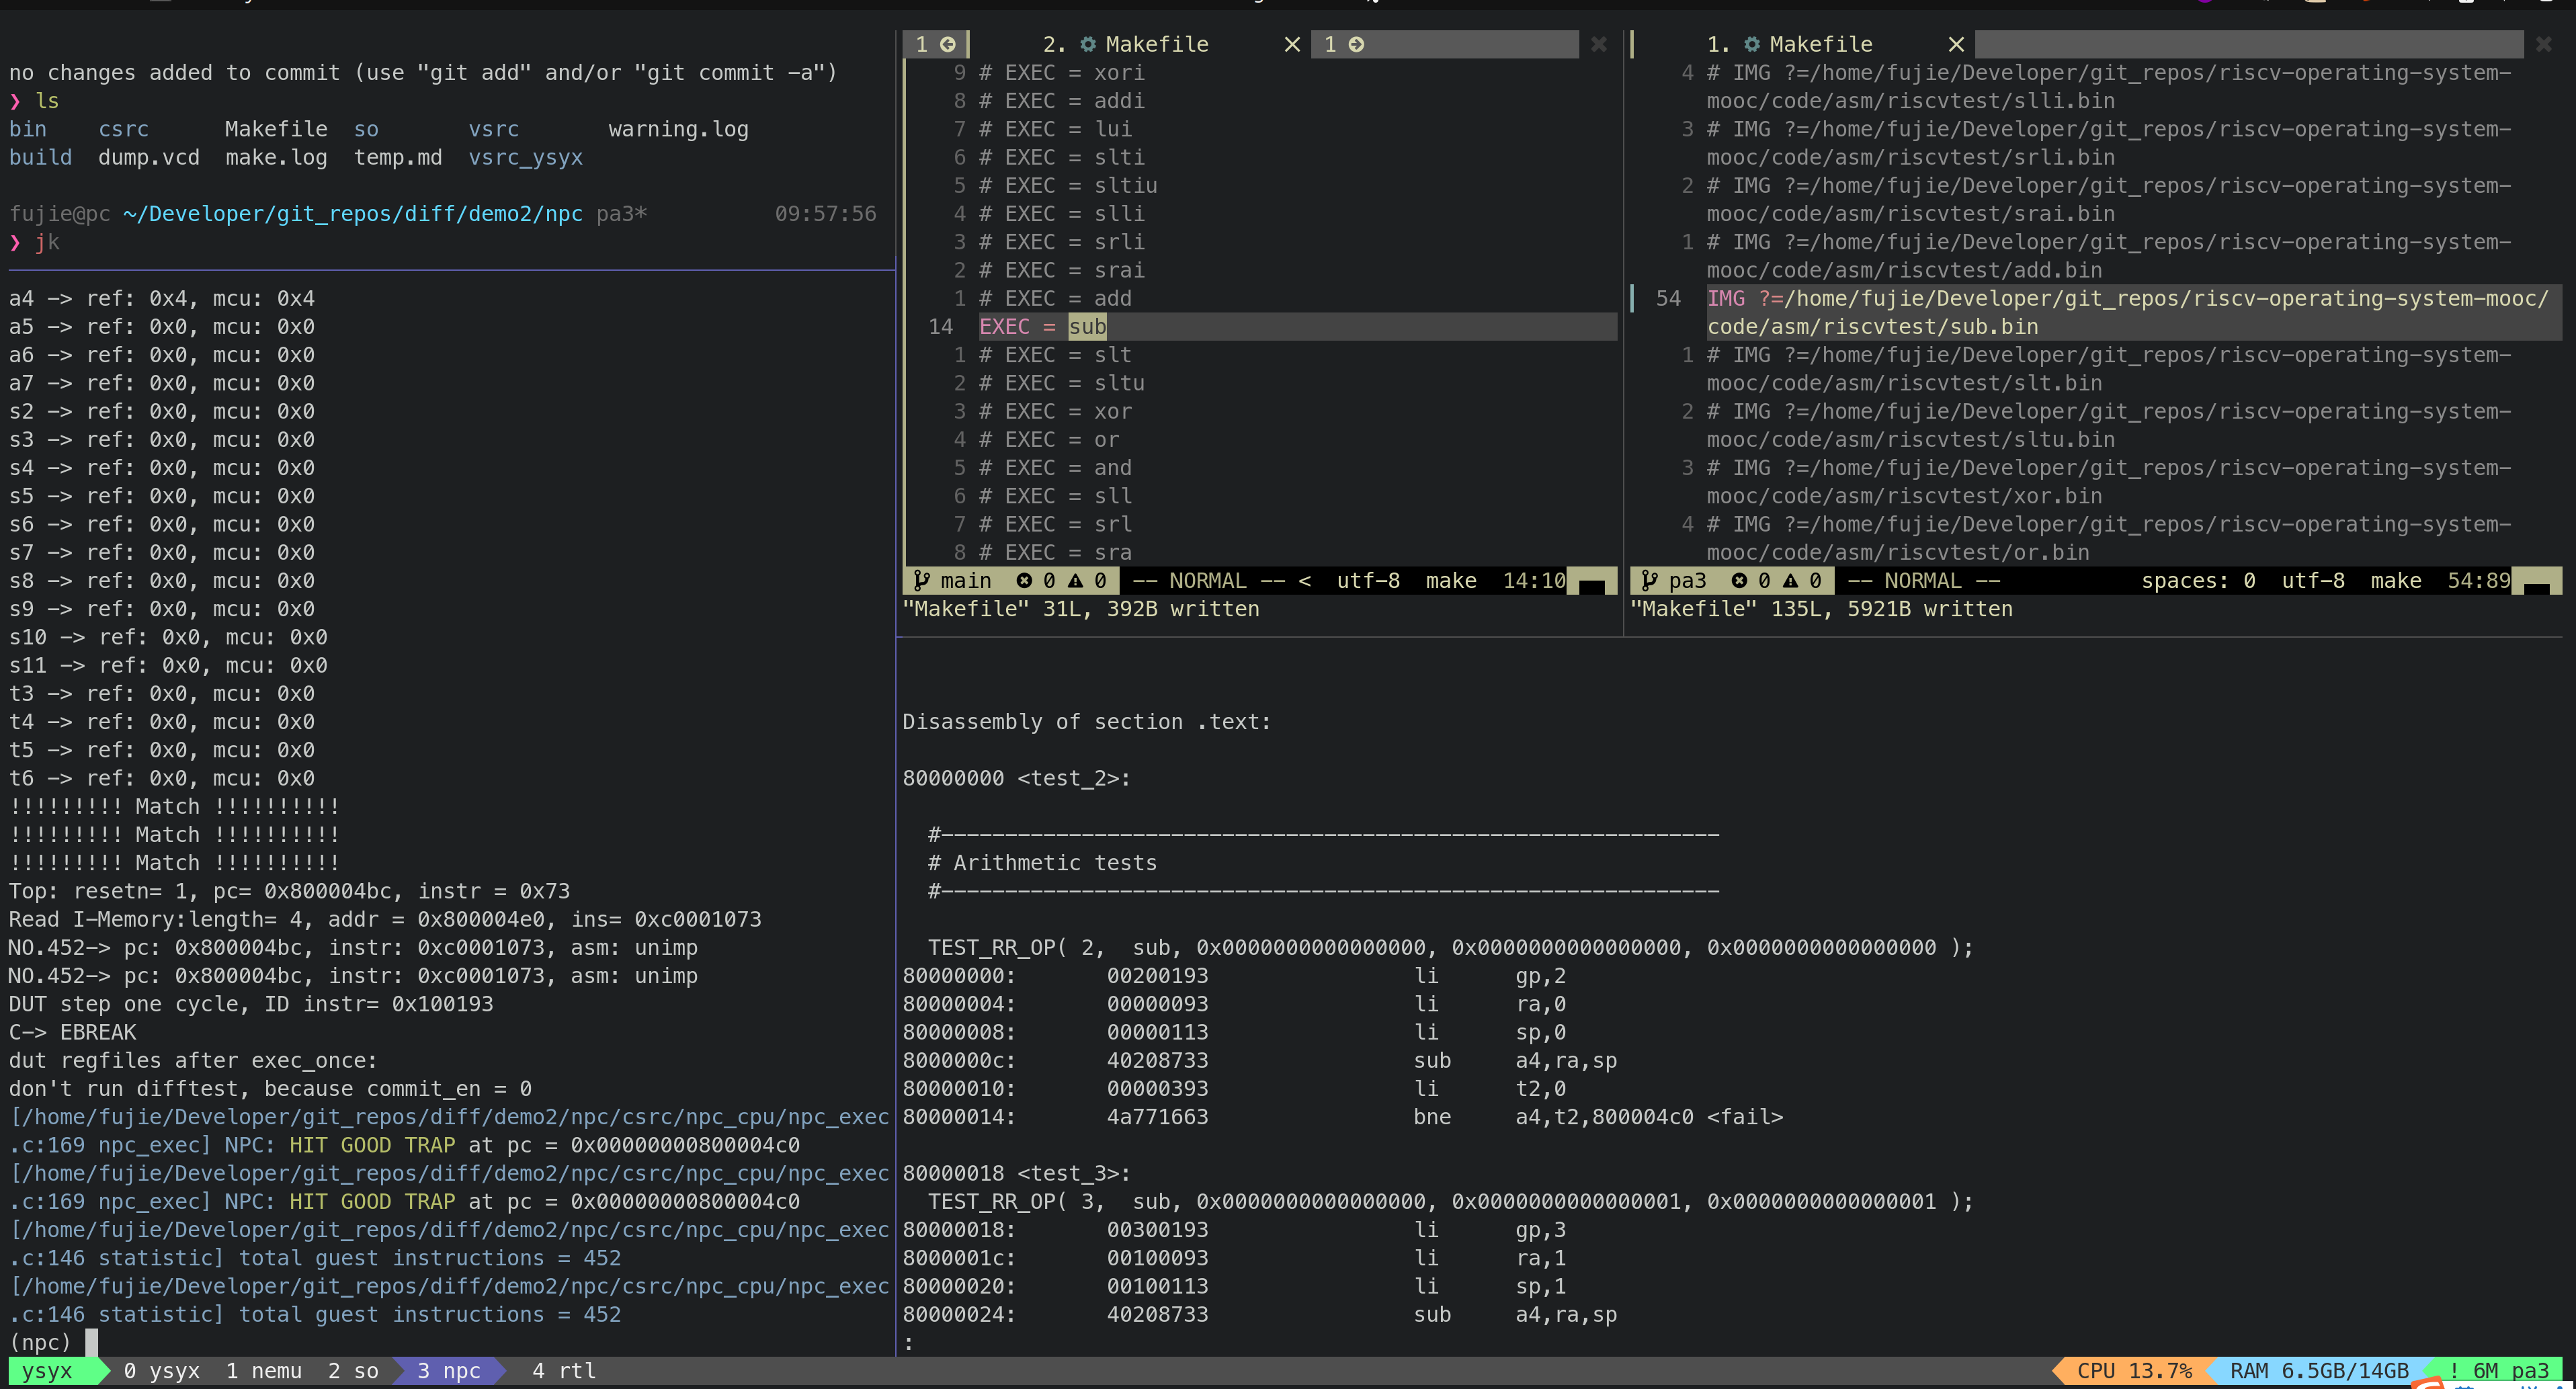
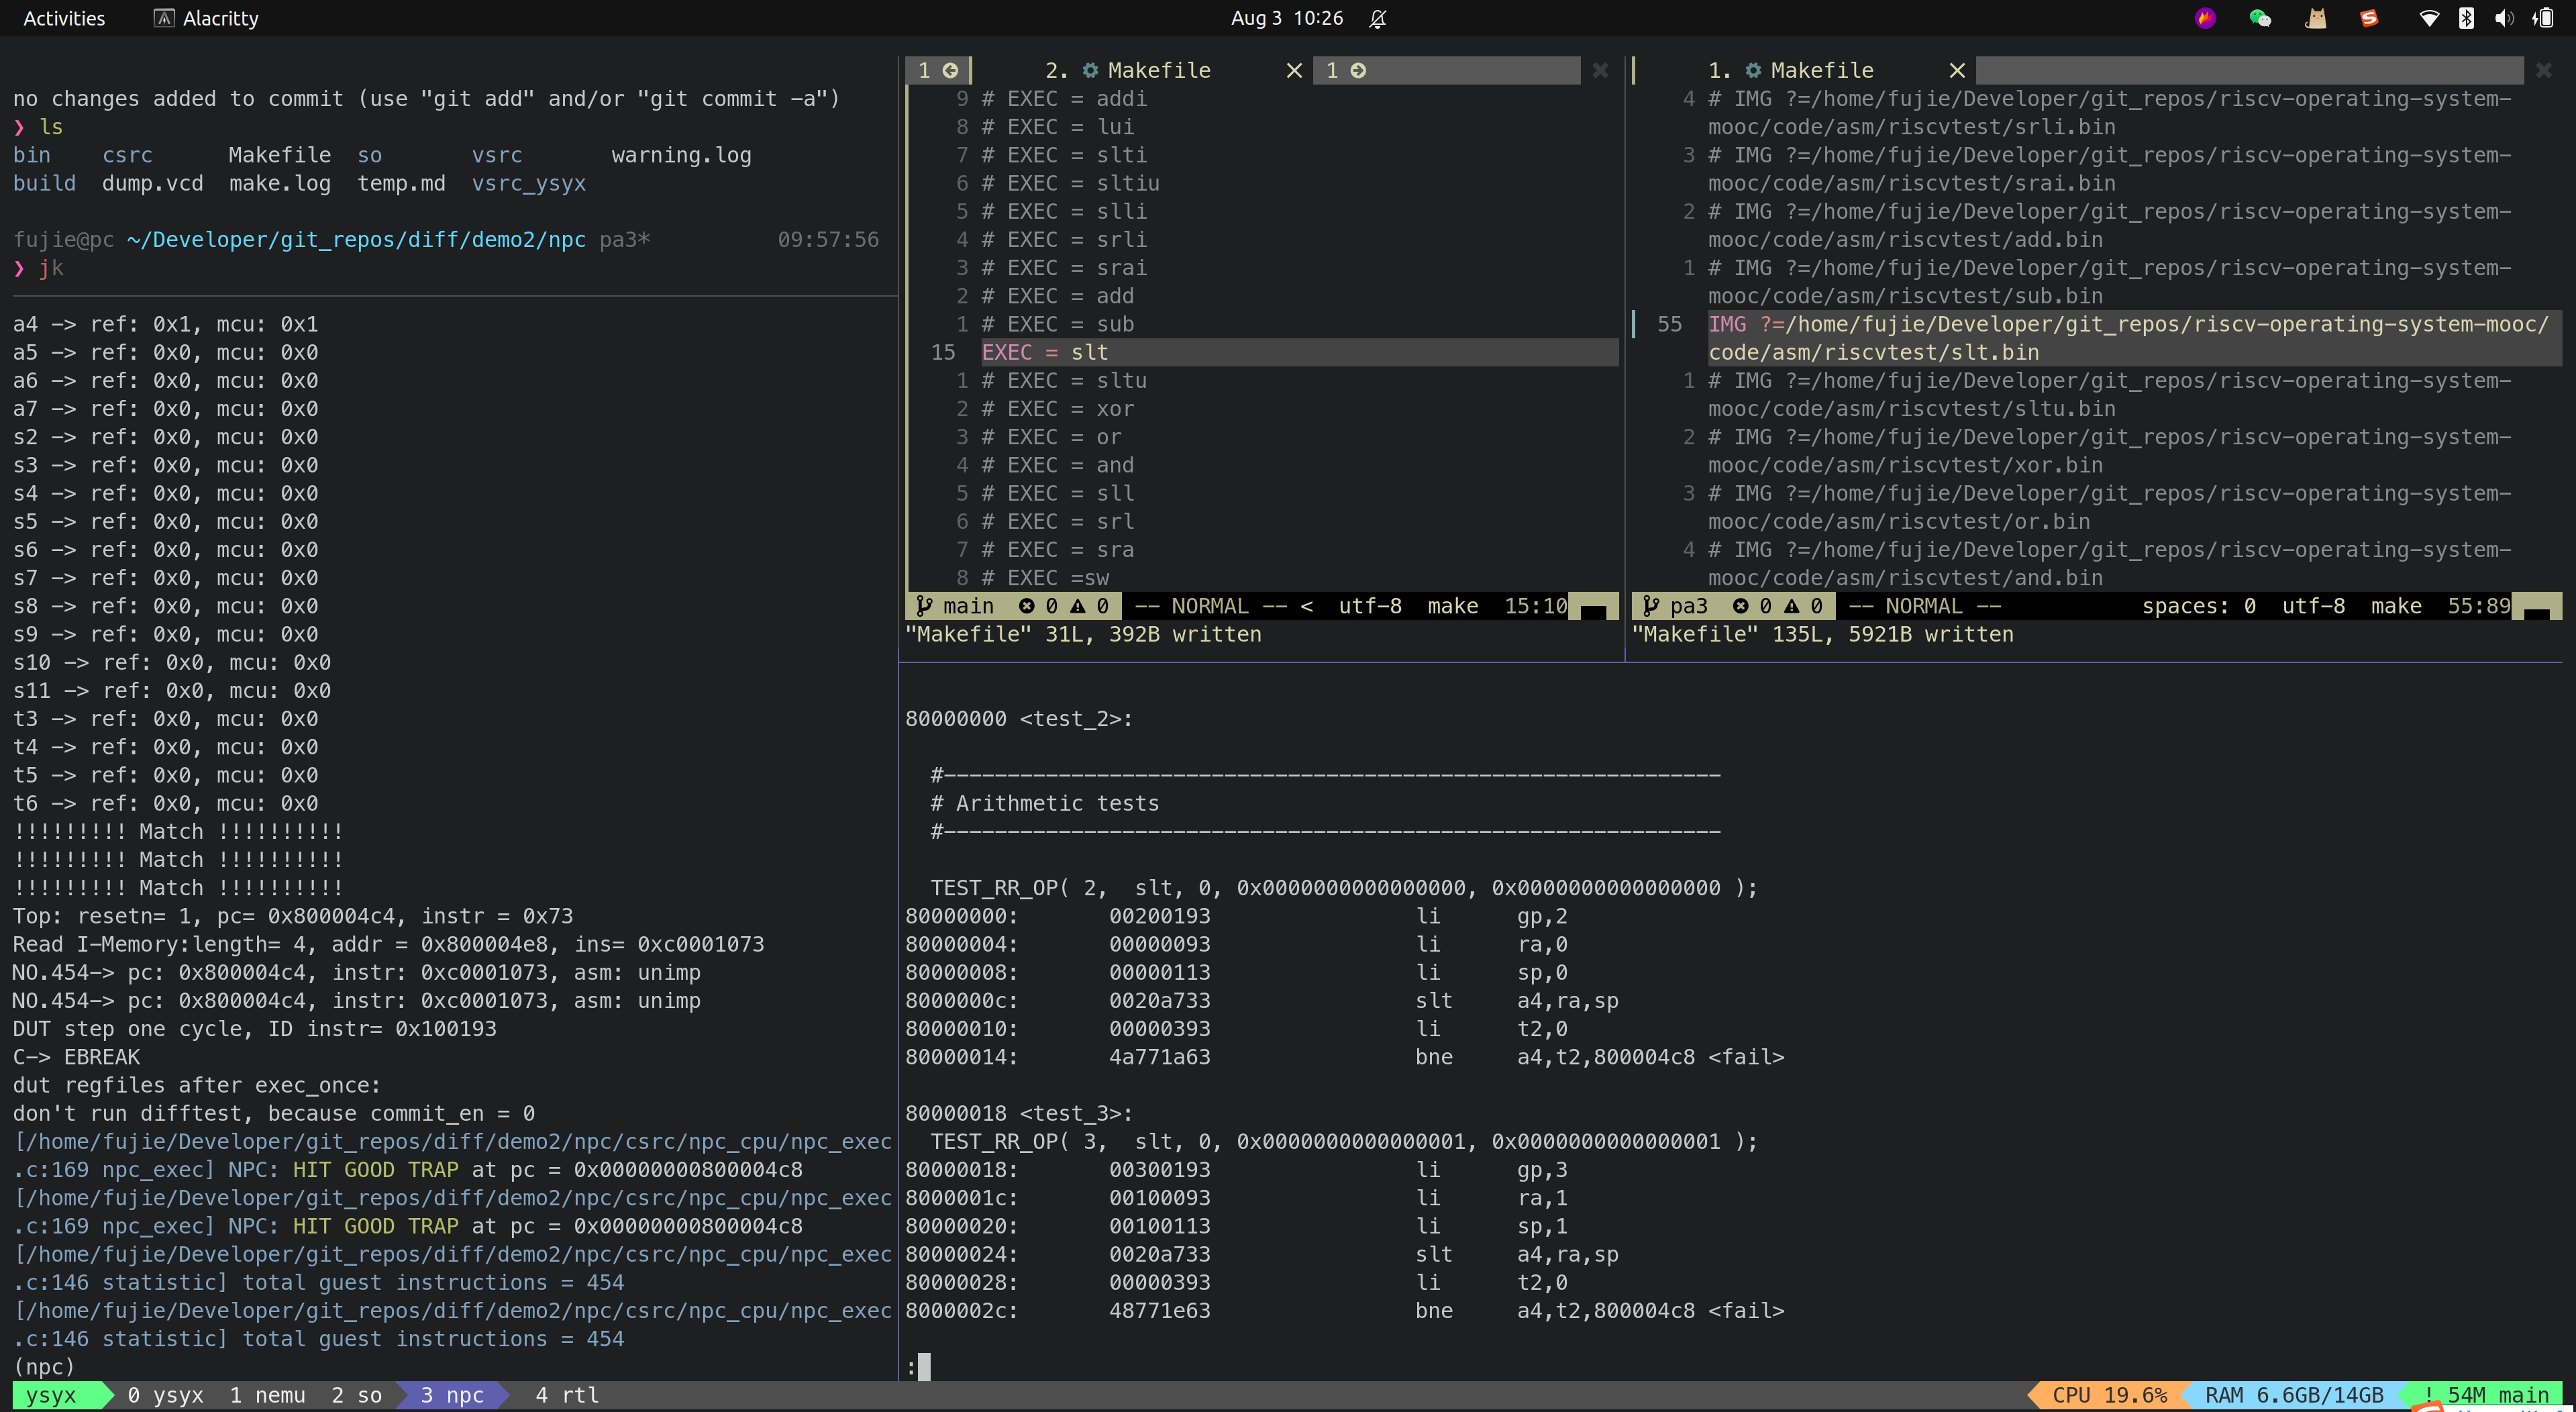
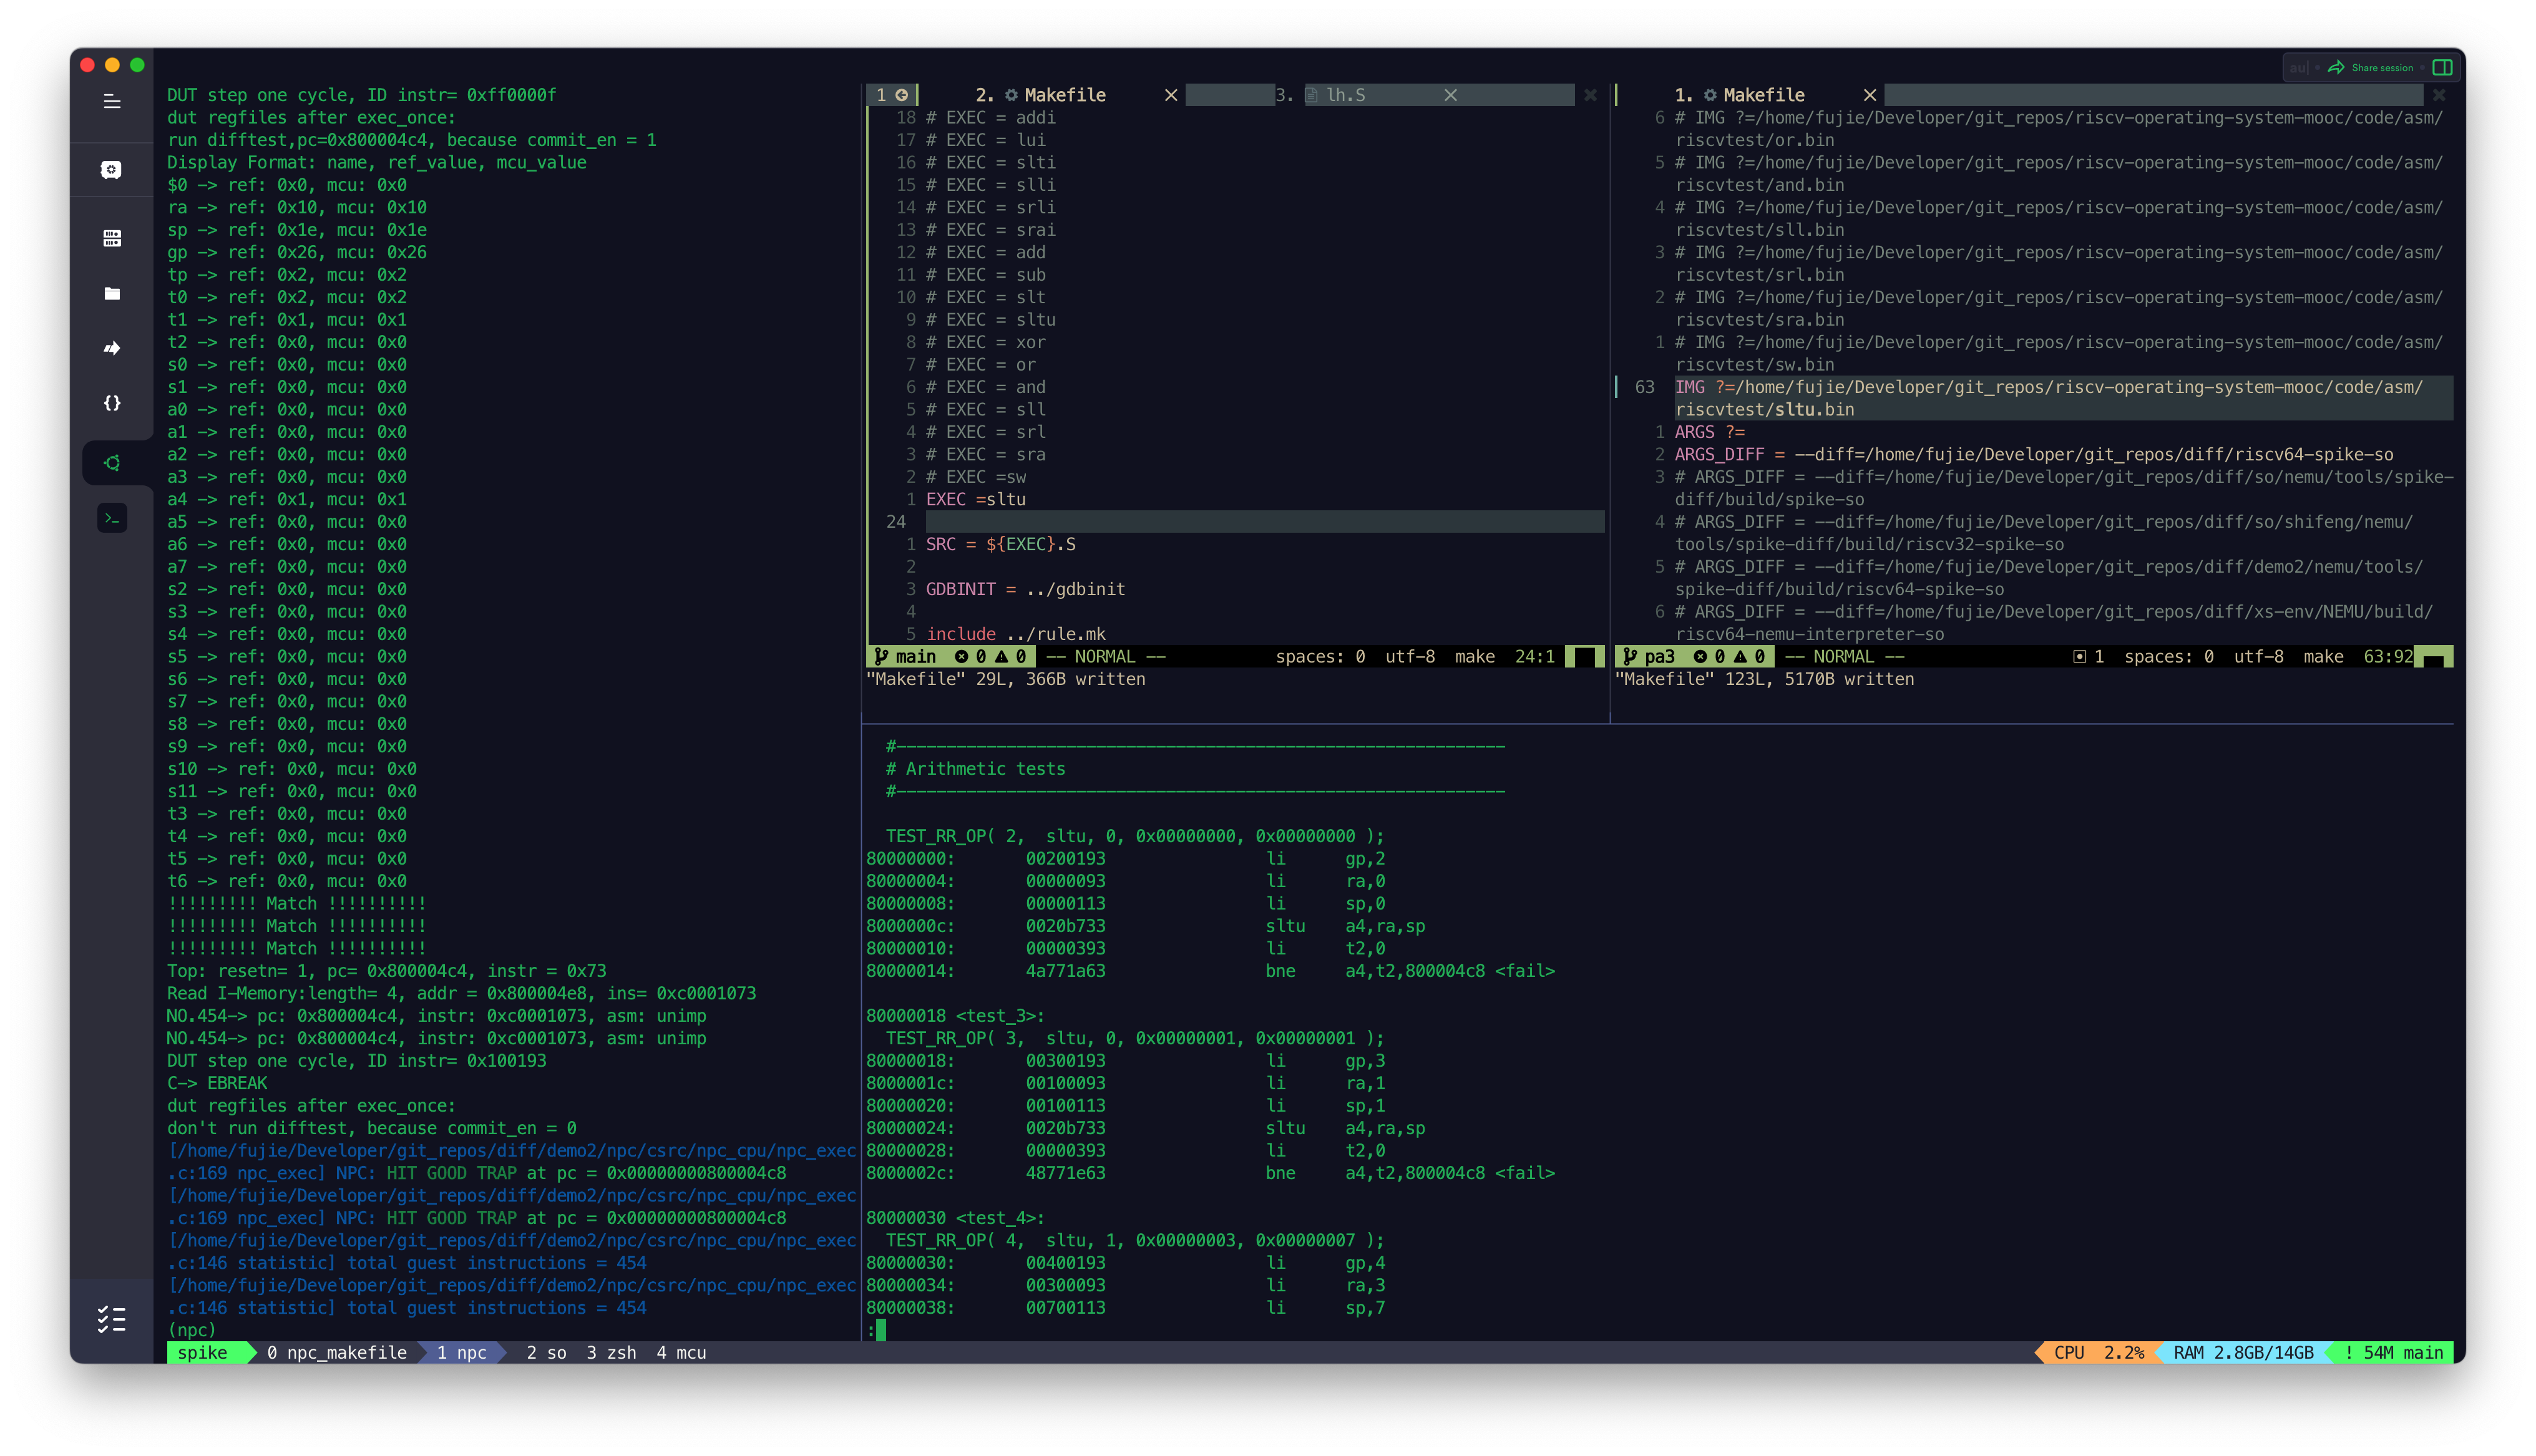
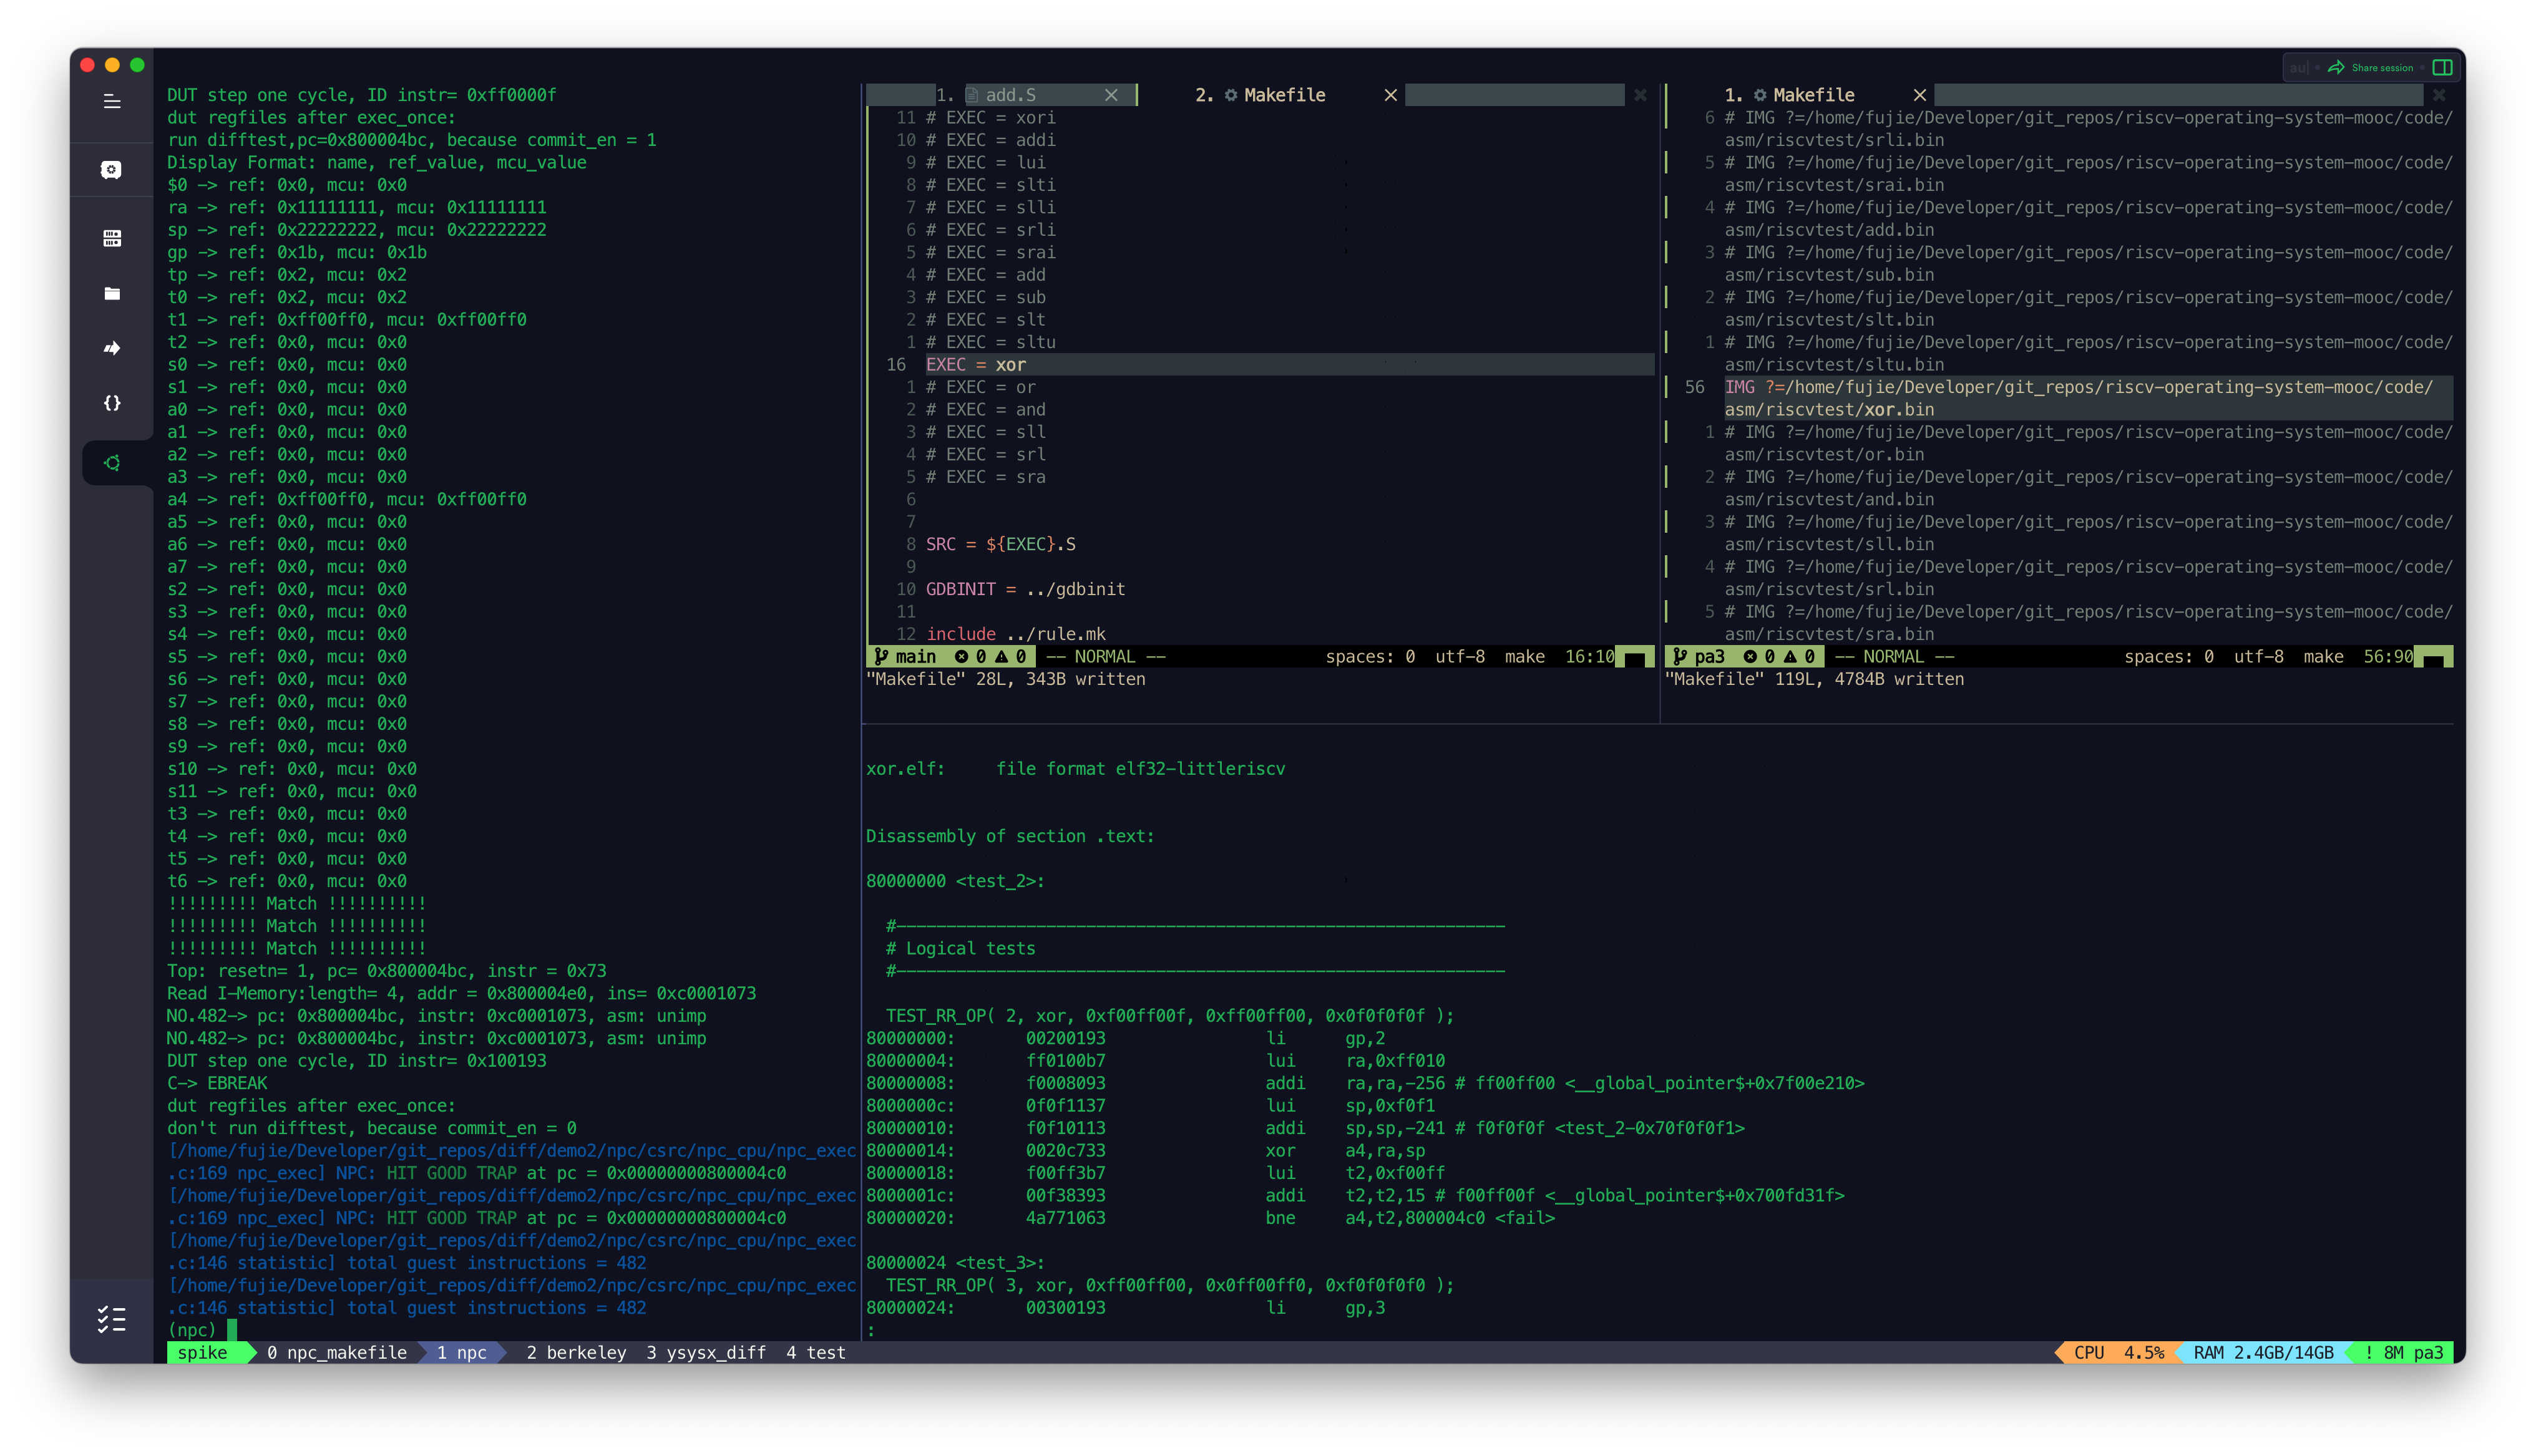
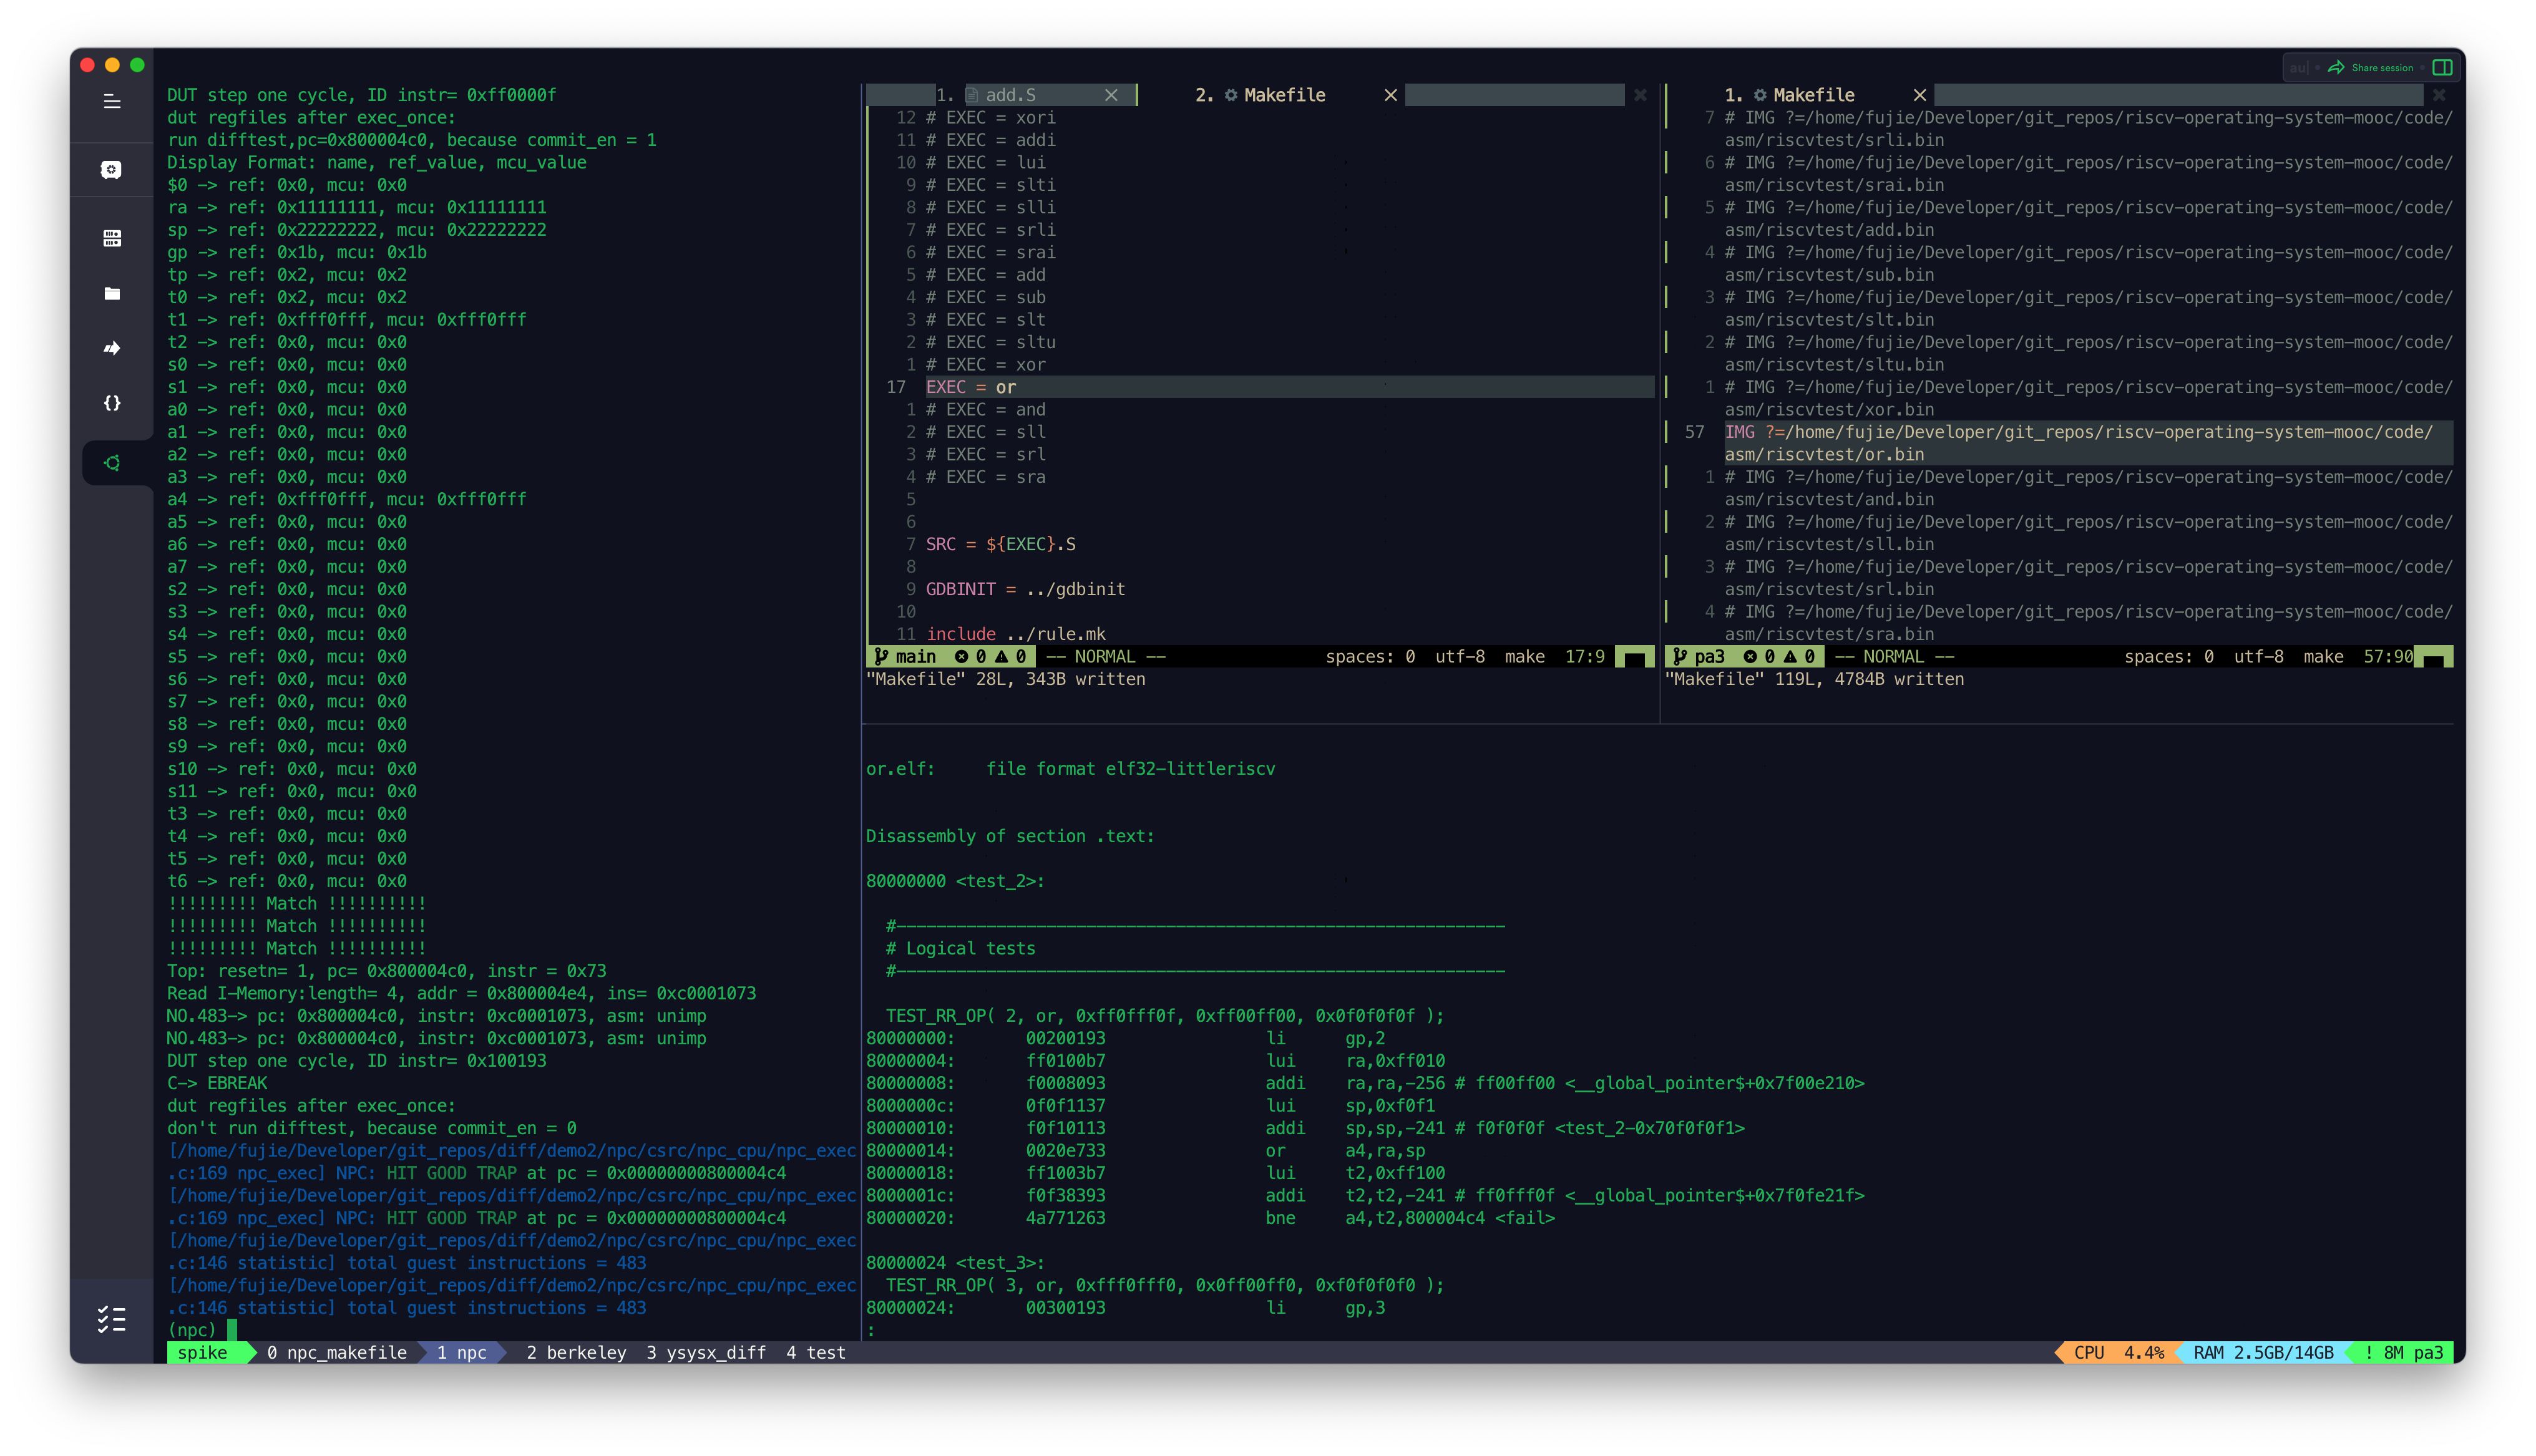
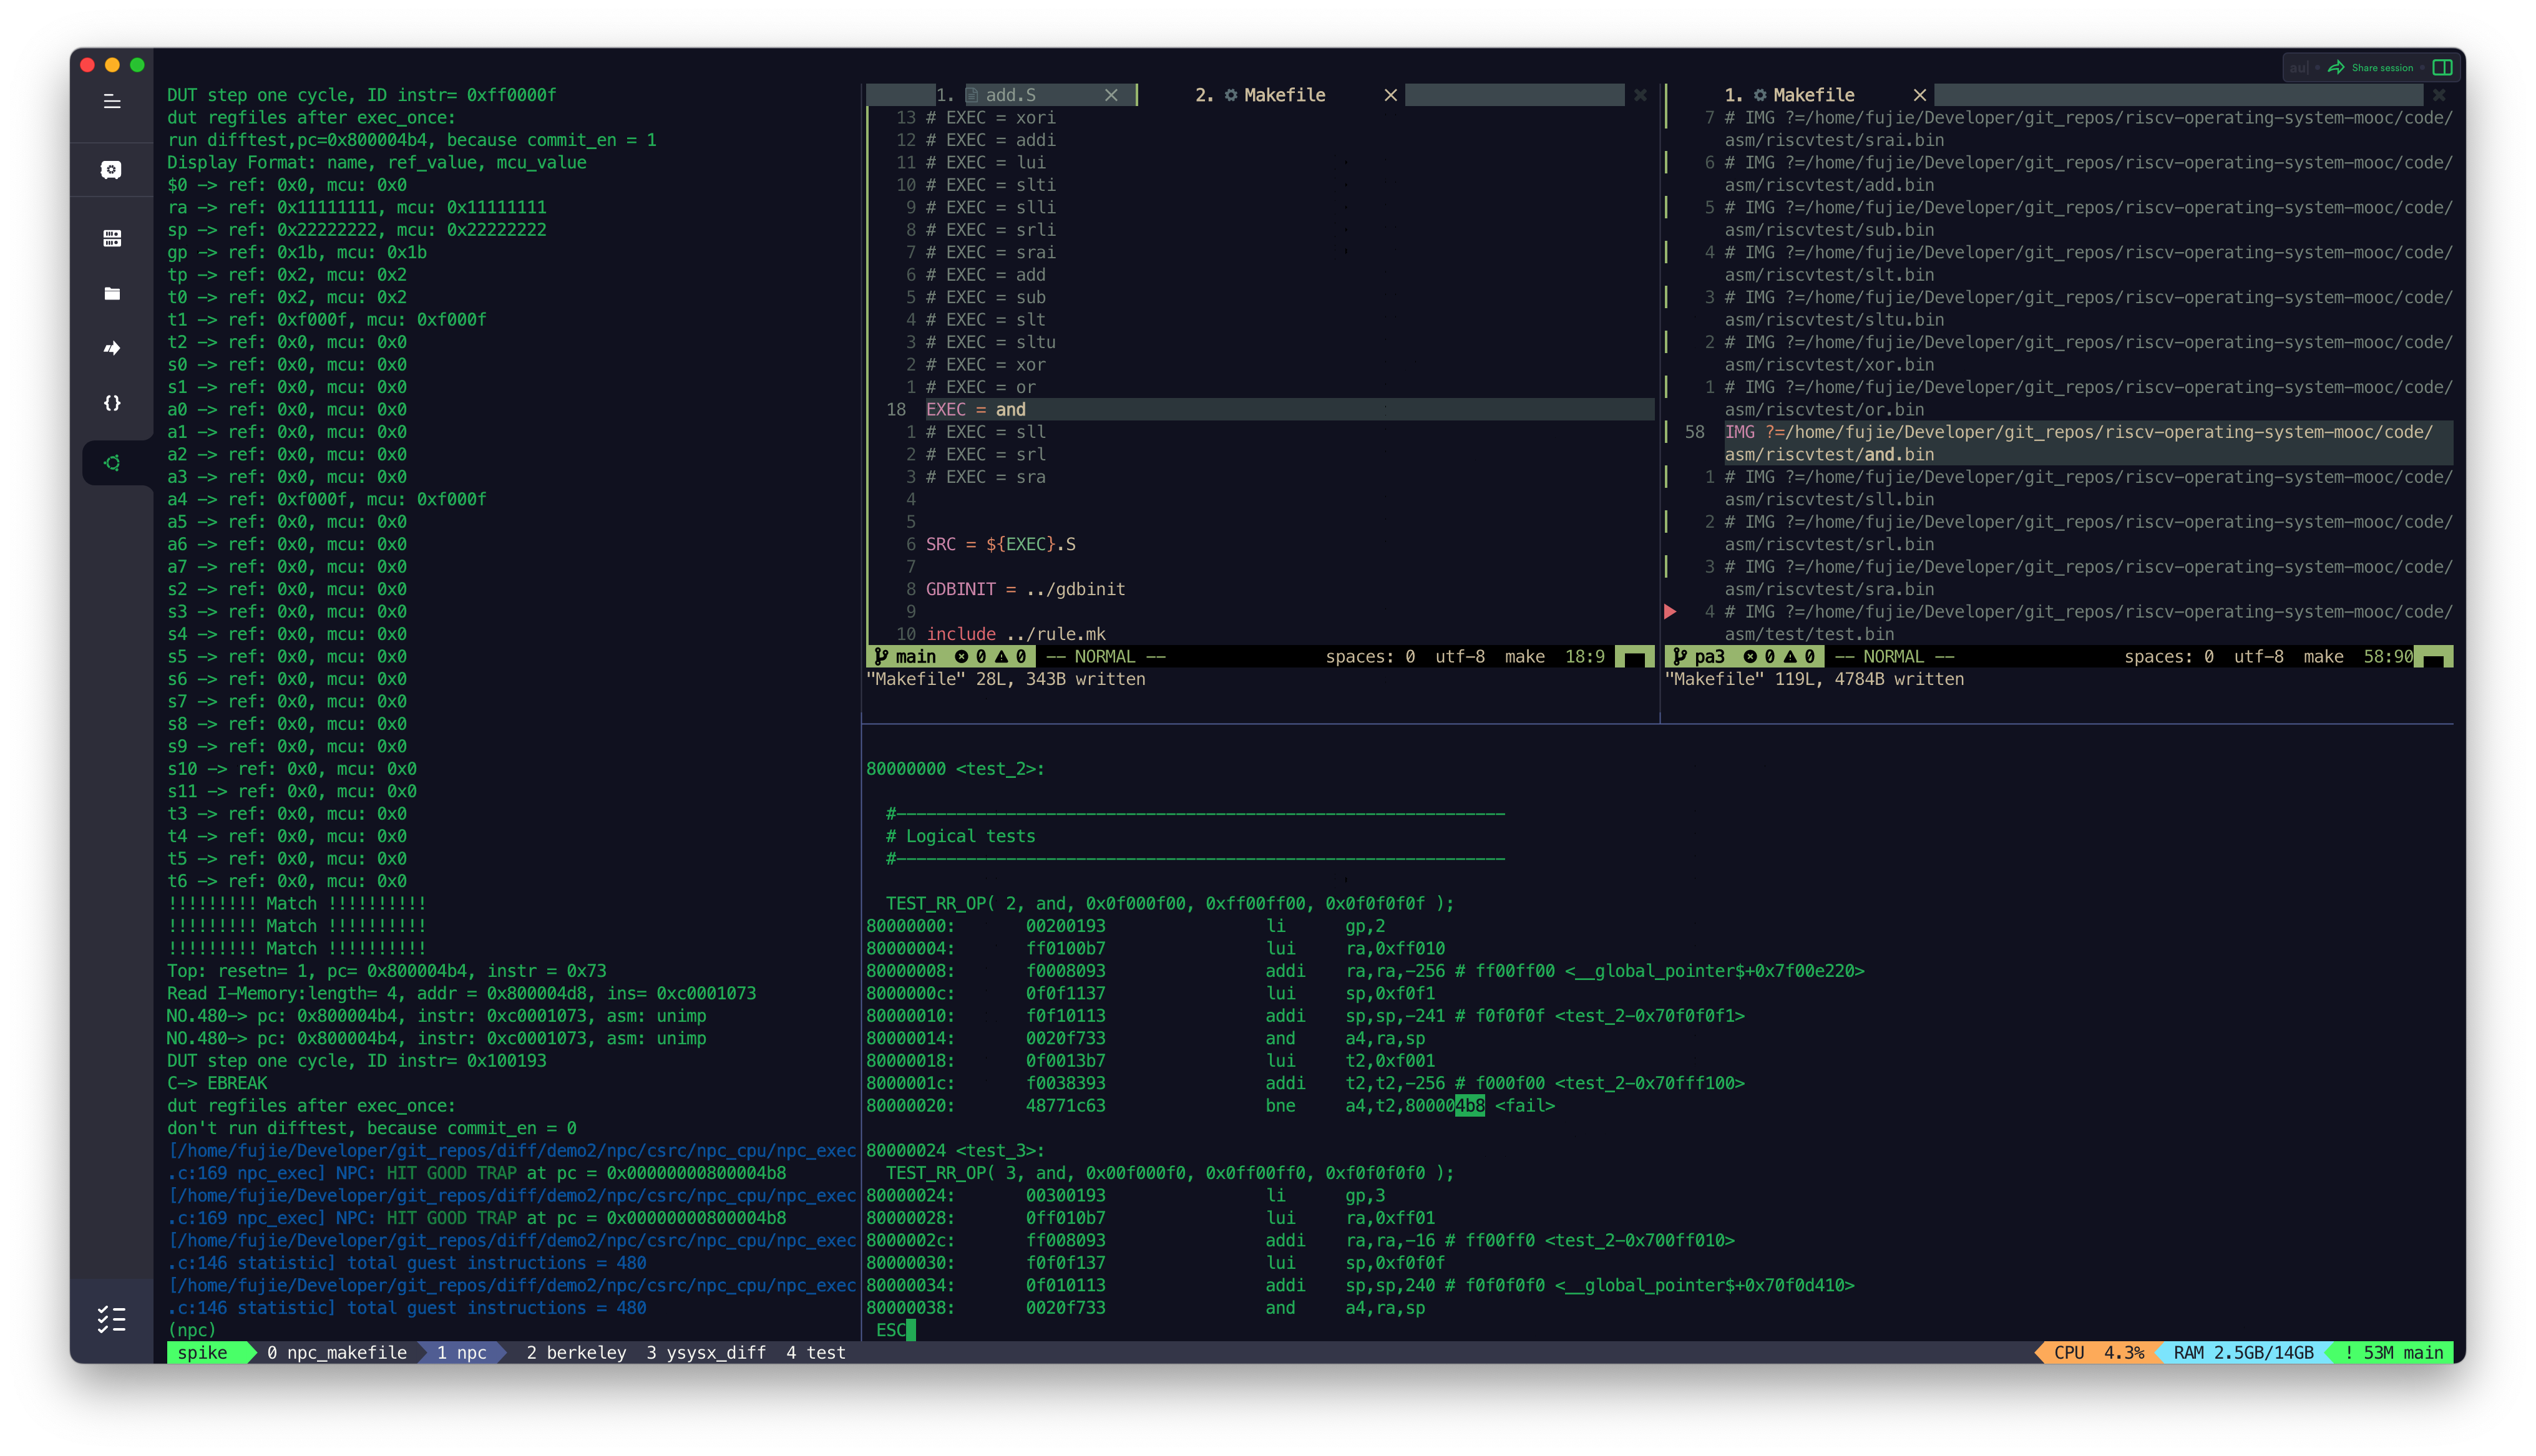
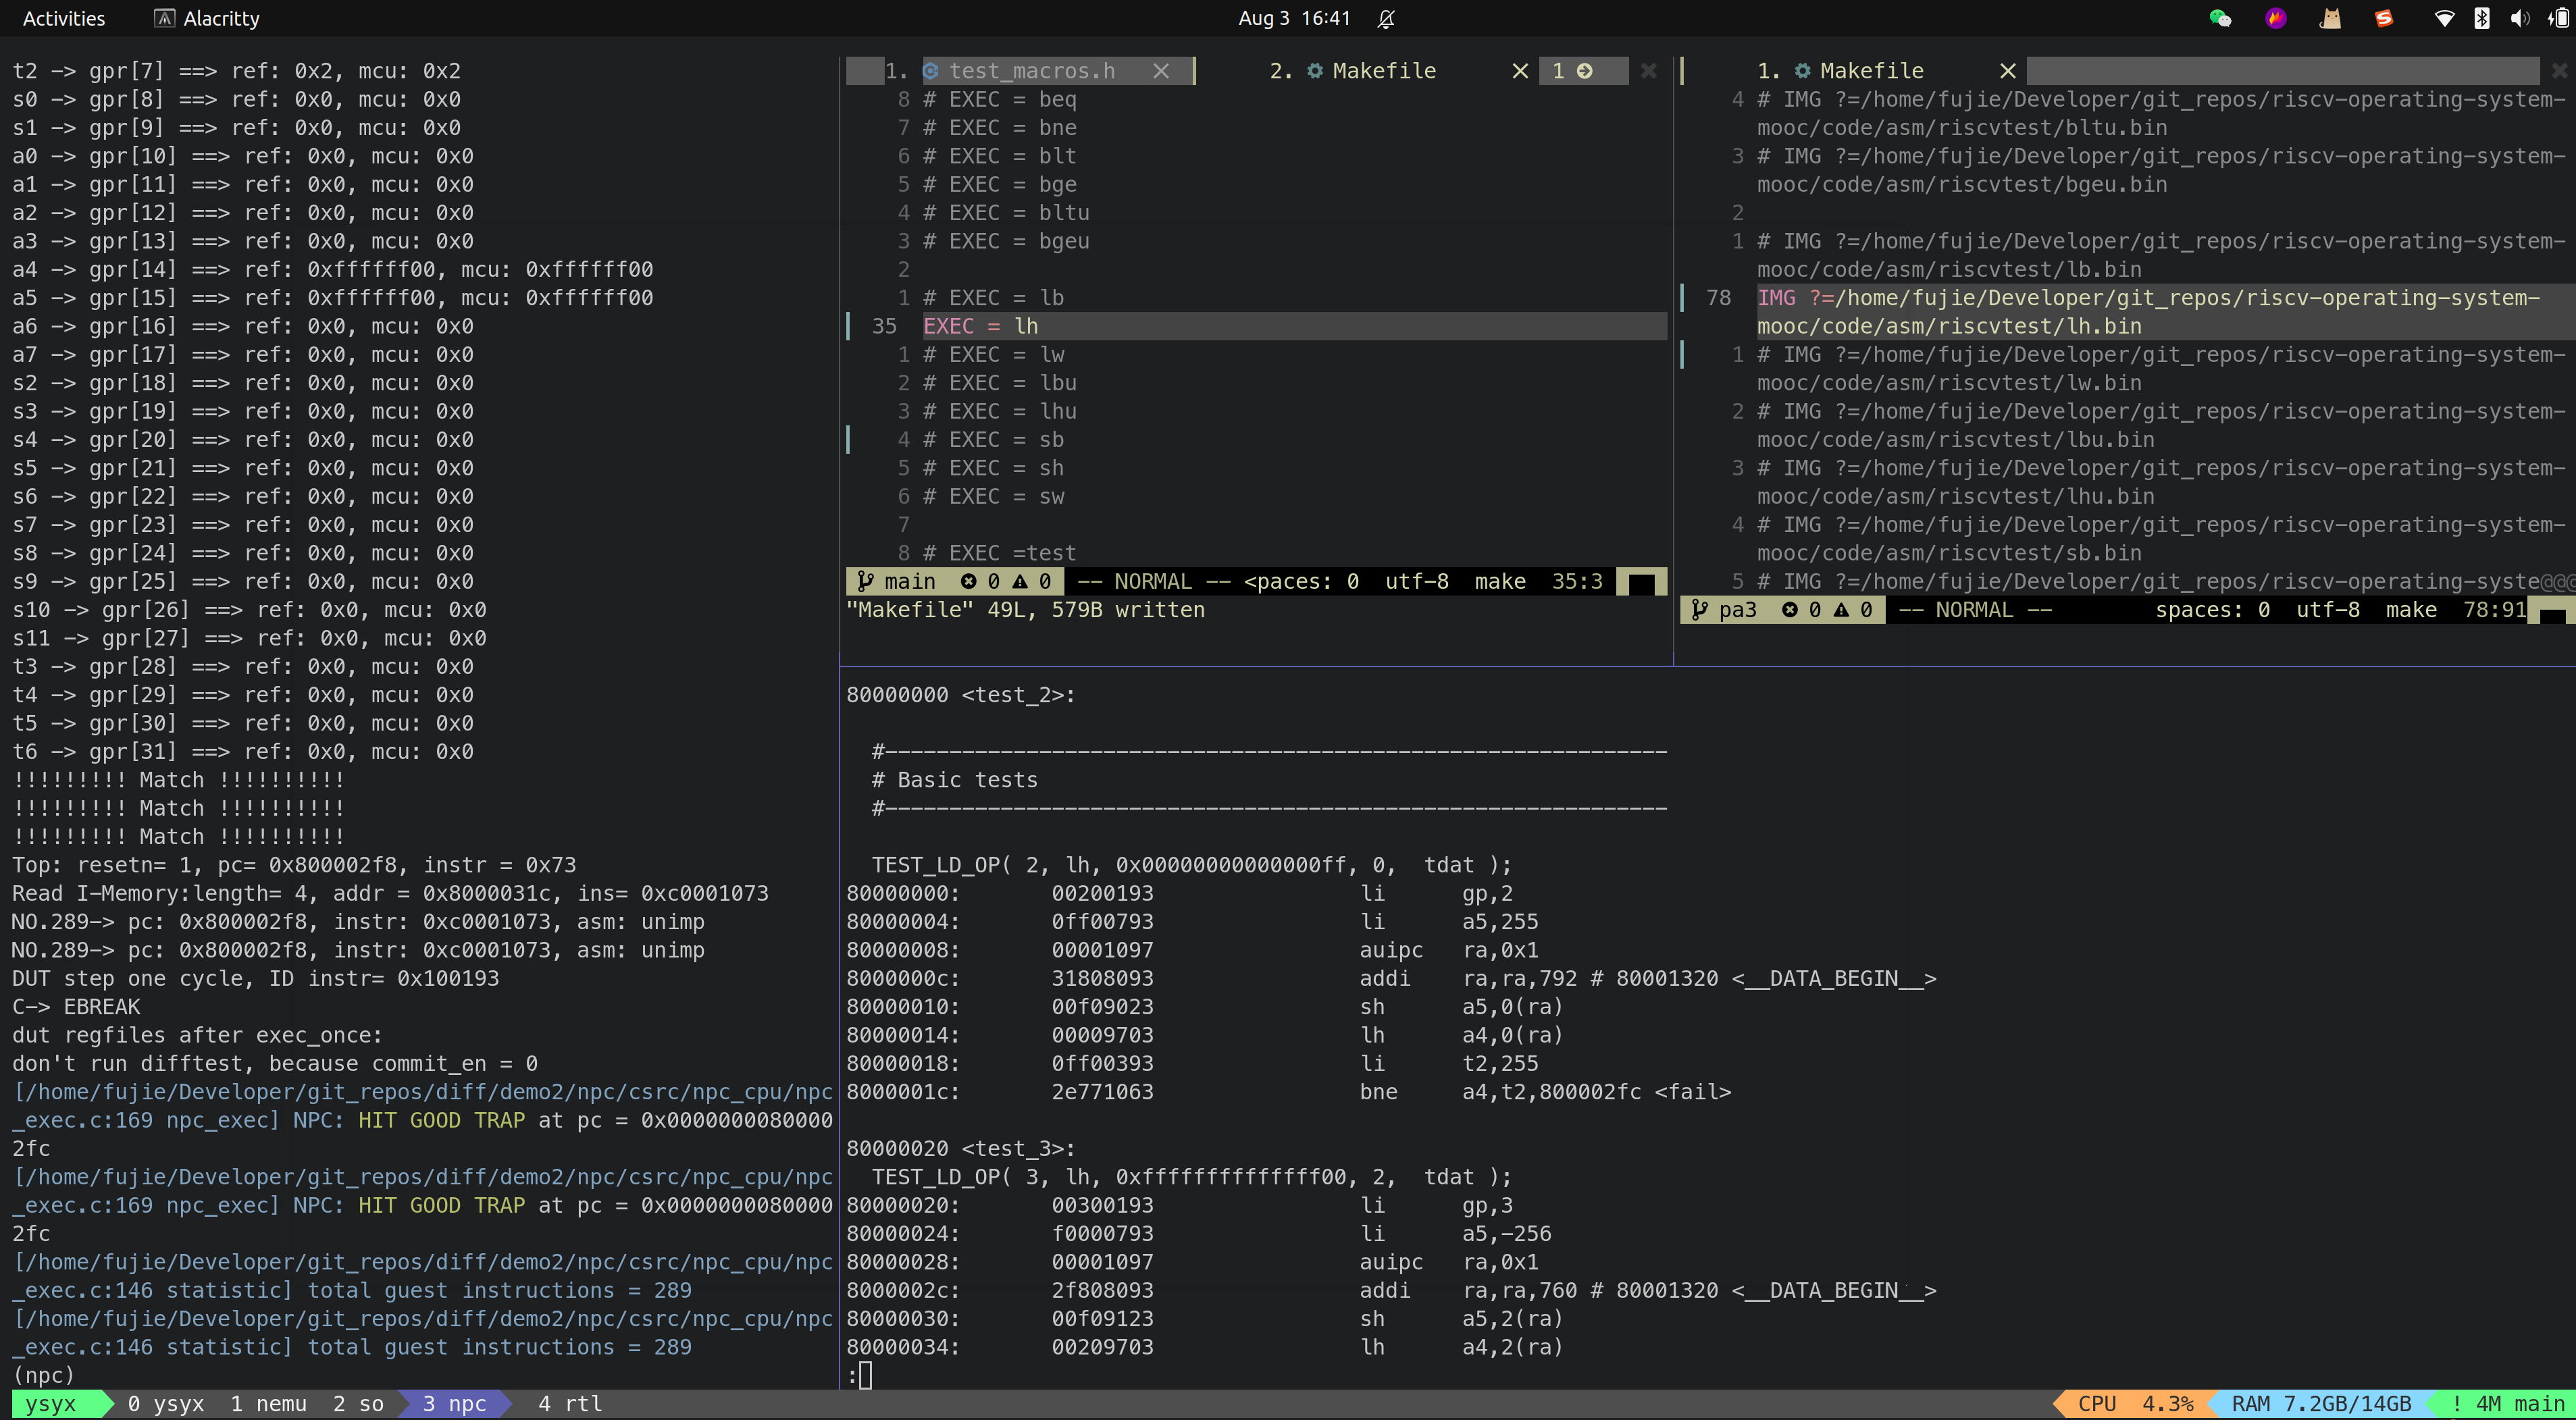
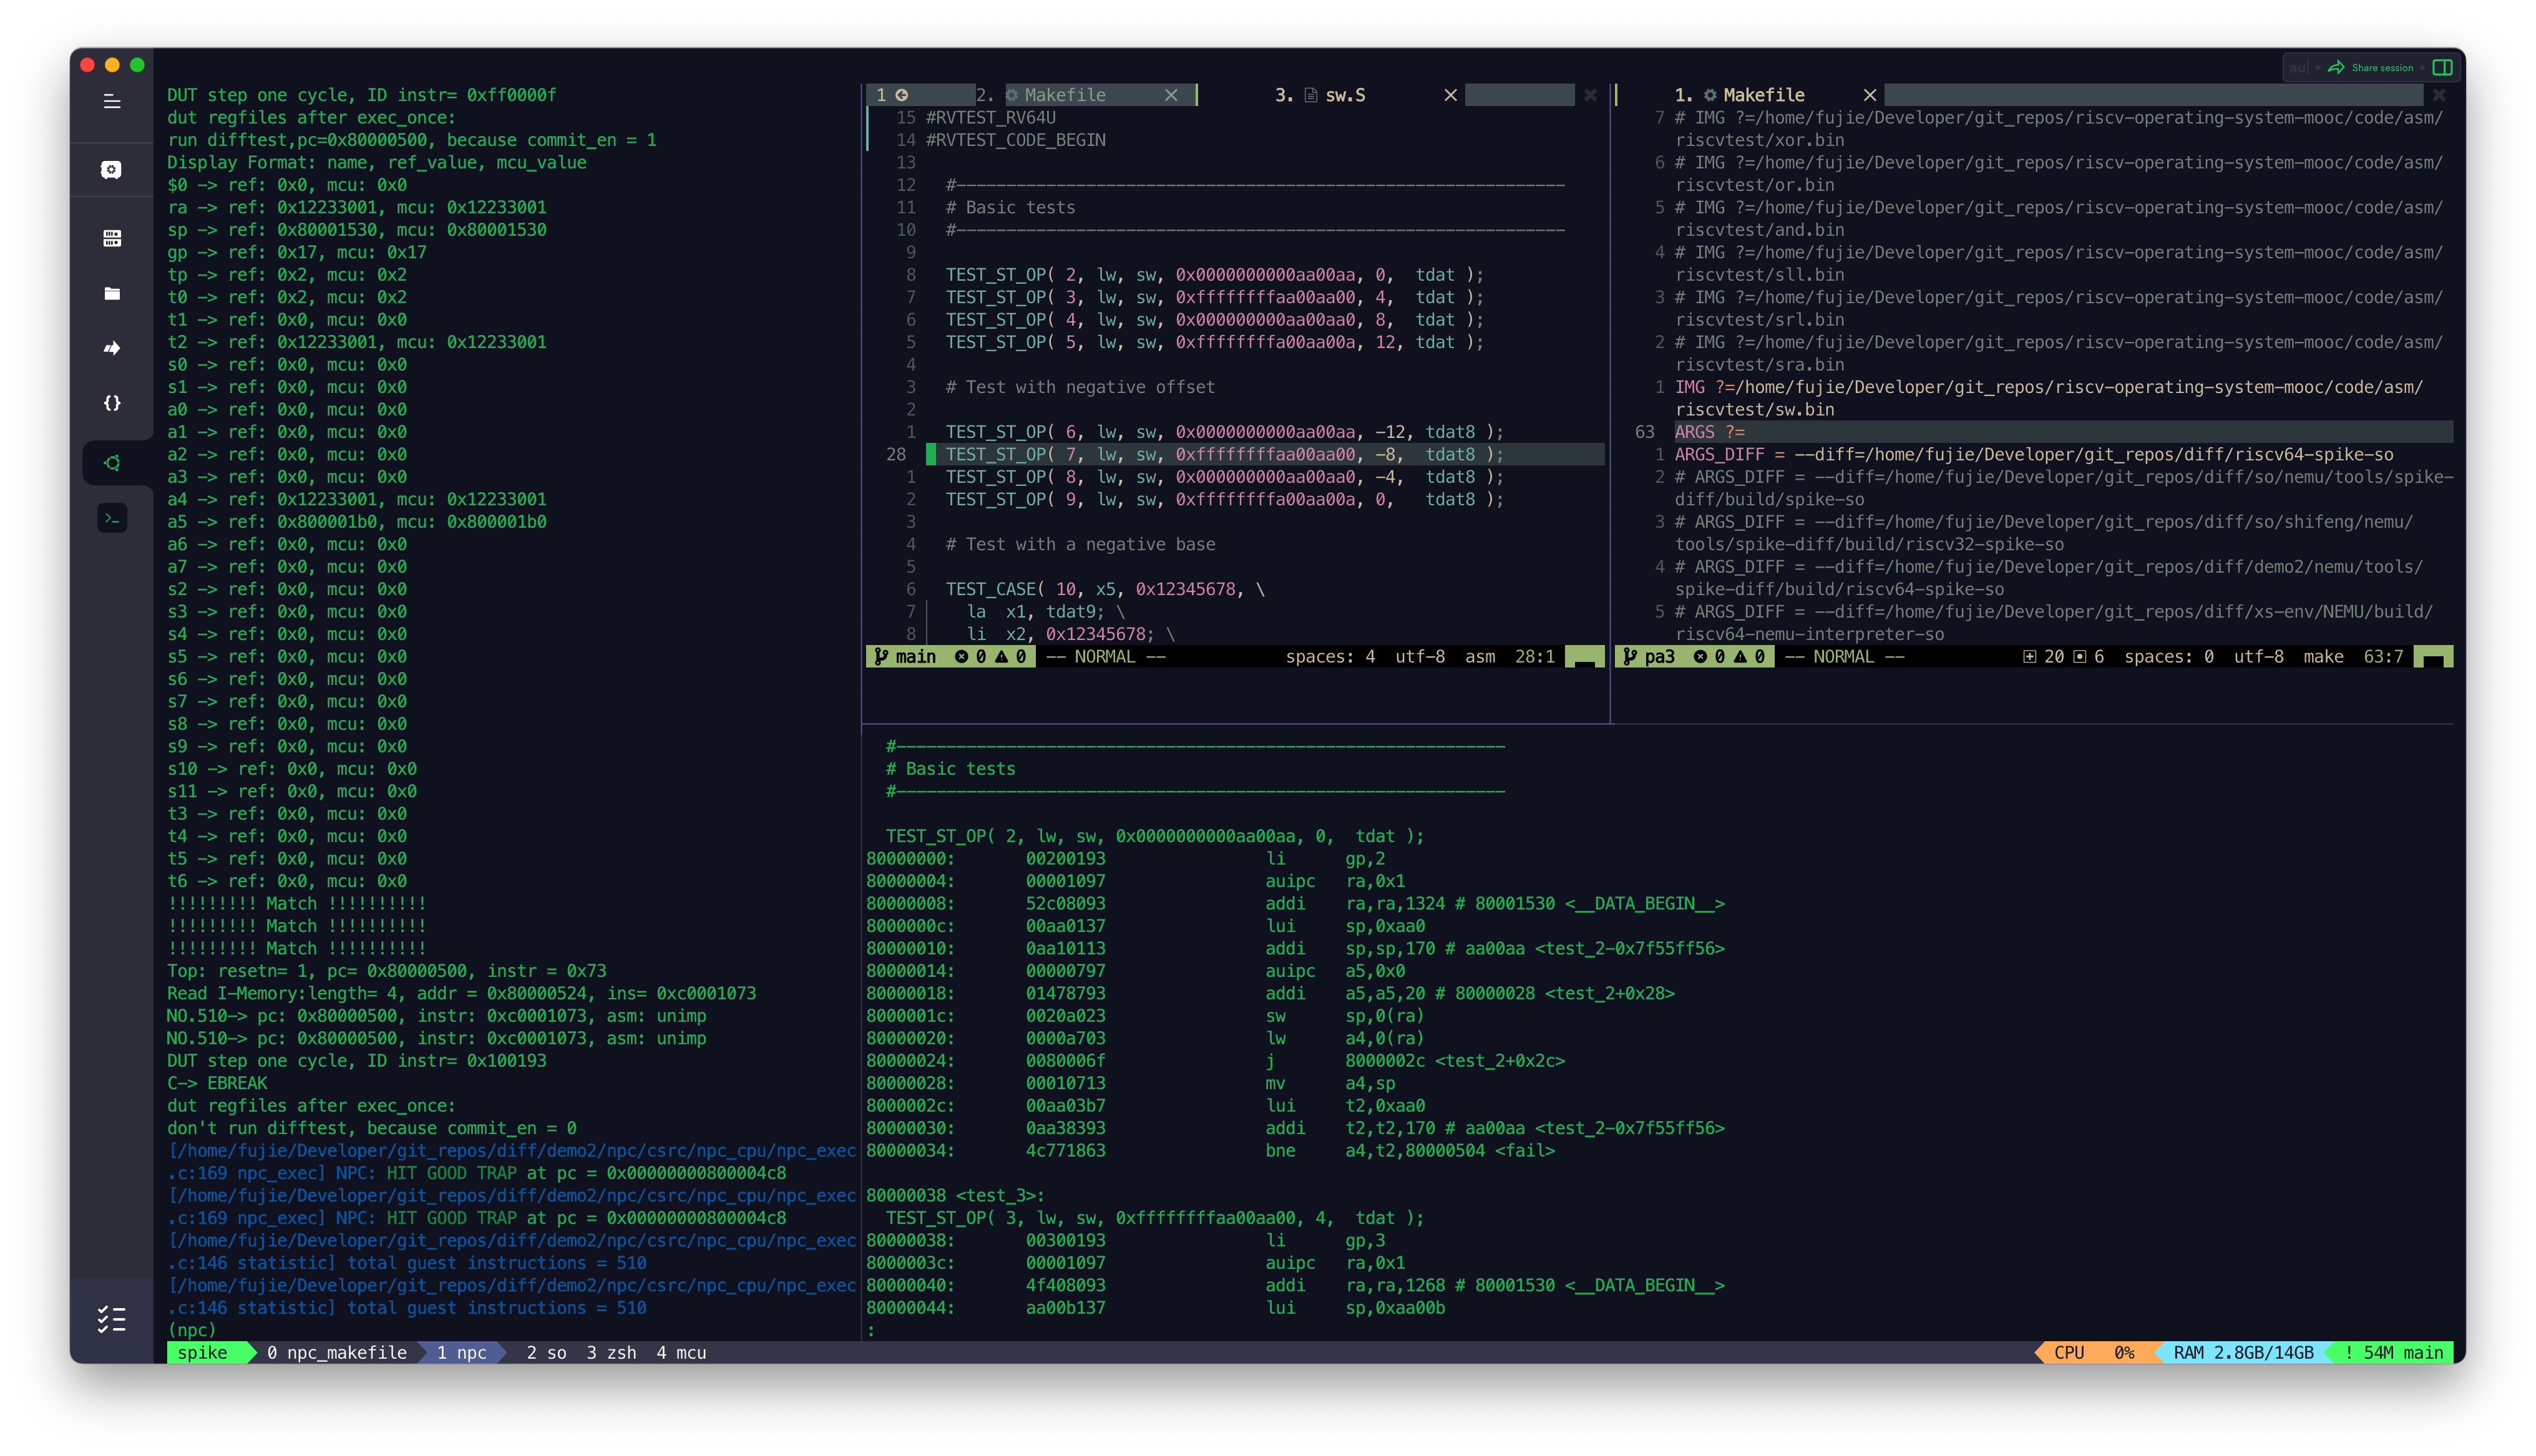
目前 MCU_Core 已经接入到了 Difftest 框架,Difftest 检测到 MCU_Core 运行的结果跟 Reference Model 的结果不同,会报错,并且给出报错的信息,如上图所示。
后续会陆续根据 Difftest 的提示,陆续修改 MCU_Core 中的 bug,直到通过所有的测试,达到如下图所示效果,出现
HIT GOOD TRAP字样:
也会预先研究如何在 Difftest 中测试一些复杂事件的比较,例如 Trap、CSR 比较
发现和修复的 bug
每条指令与其对应的 PC 差了 4
bug 描述:由 ID Stage 来保证每一条指令跟其对应的 pc 相匹配,但是当某条指令计算需要用到 pc 的值时,错误的将 next_pc 的值给了源操作数,导致结果大了 4
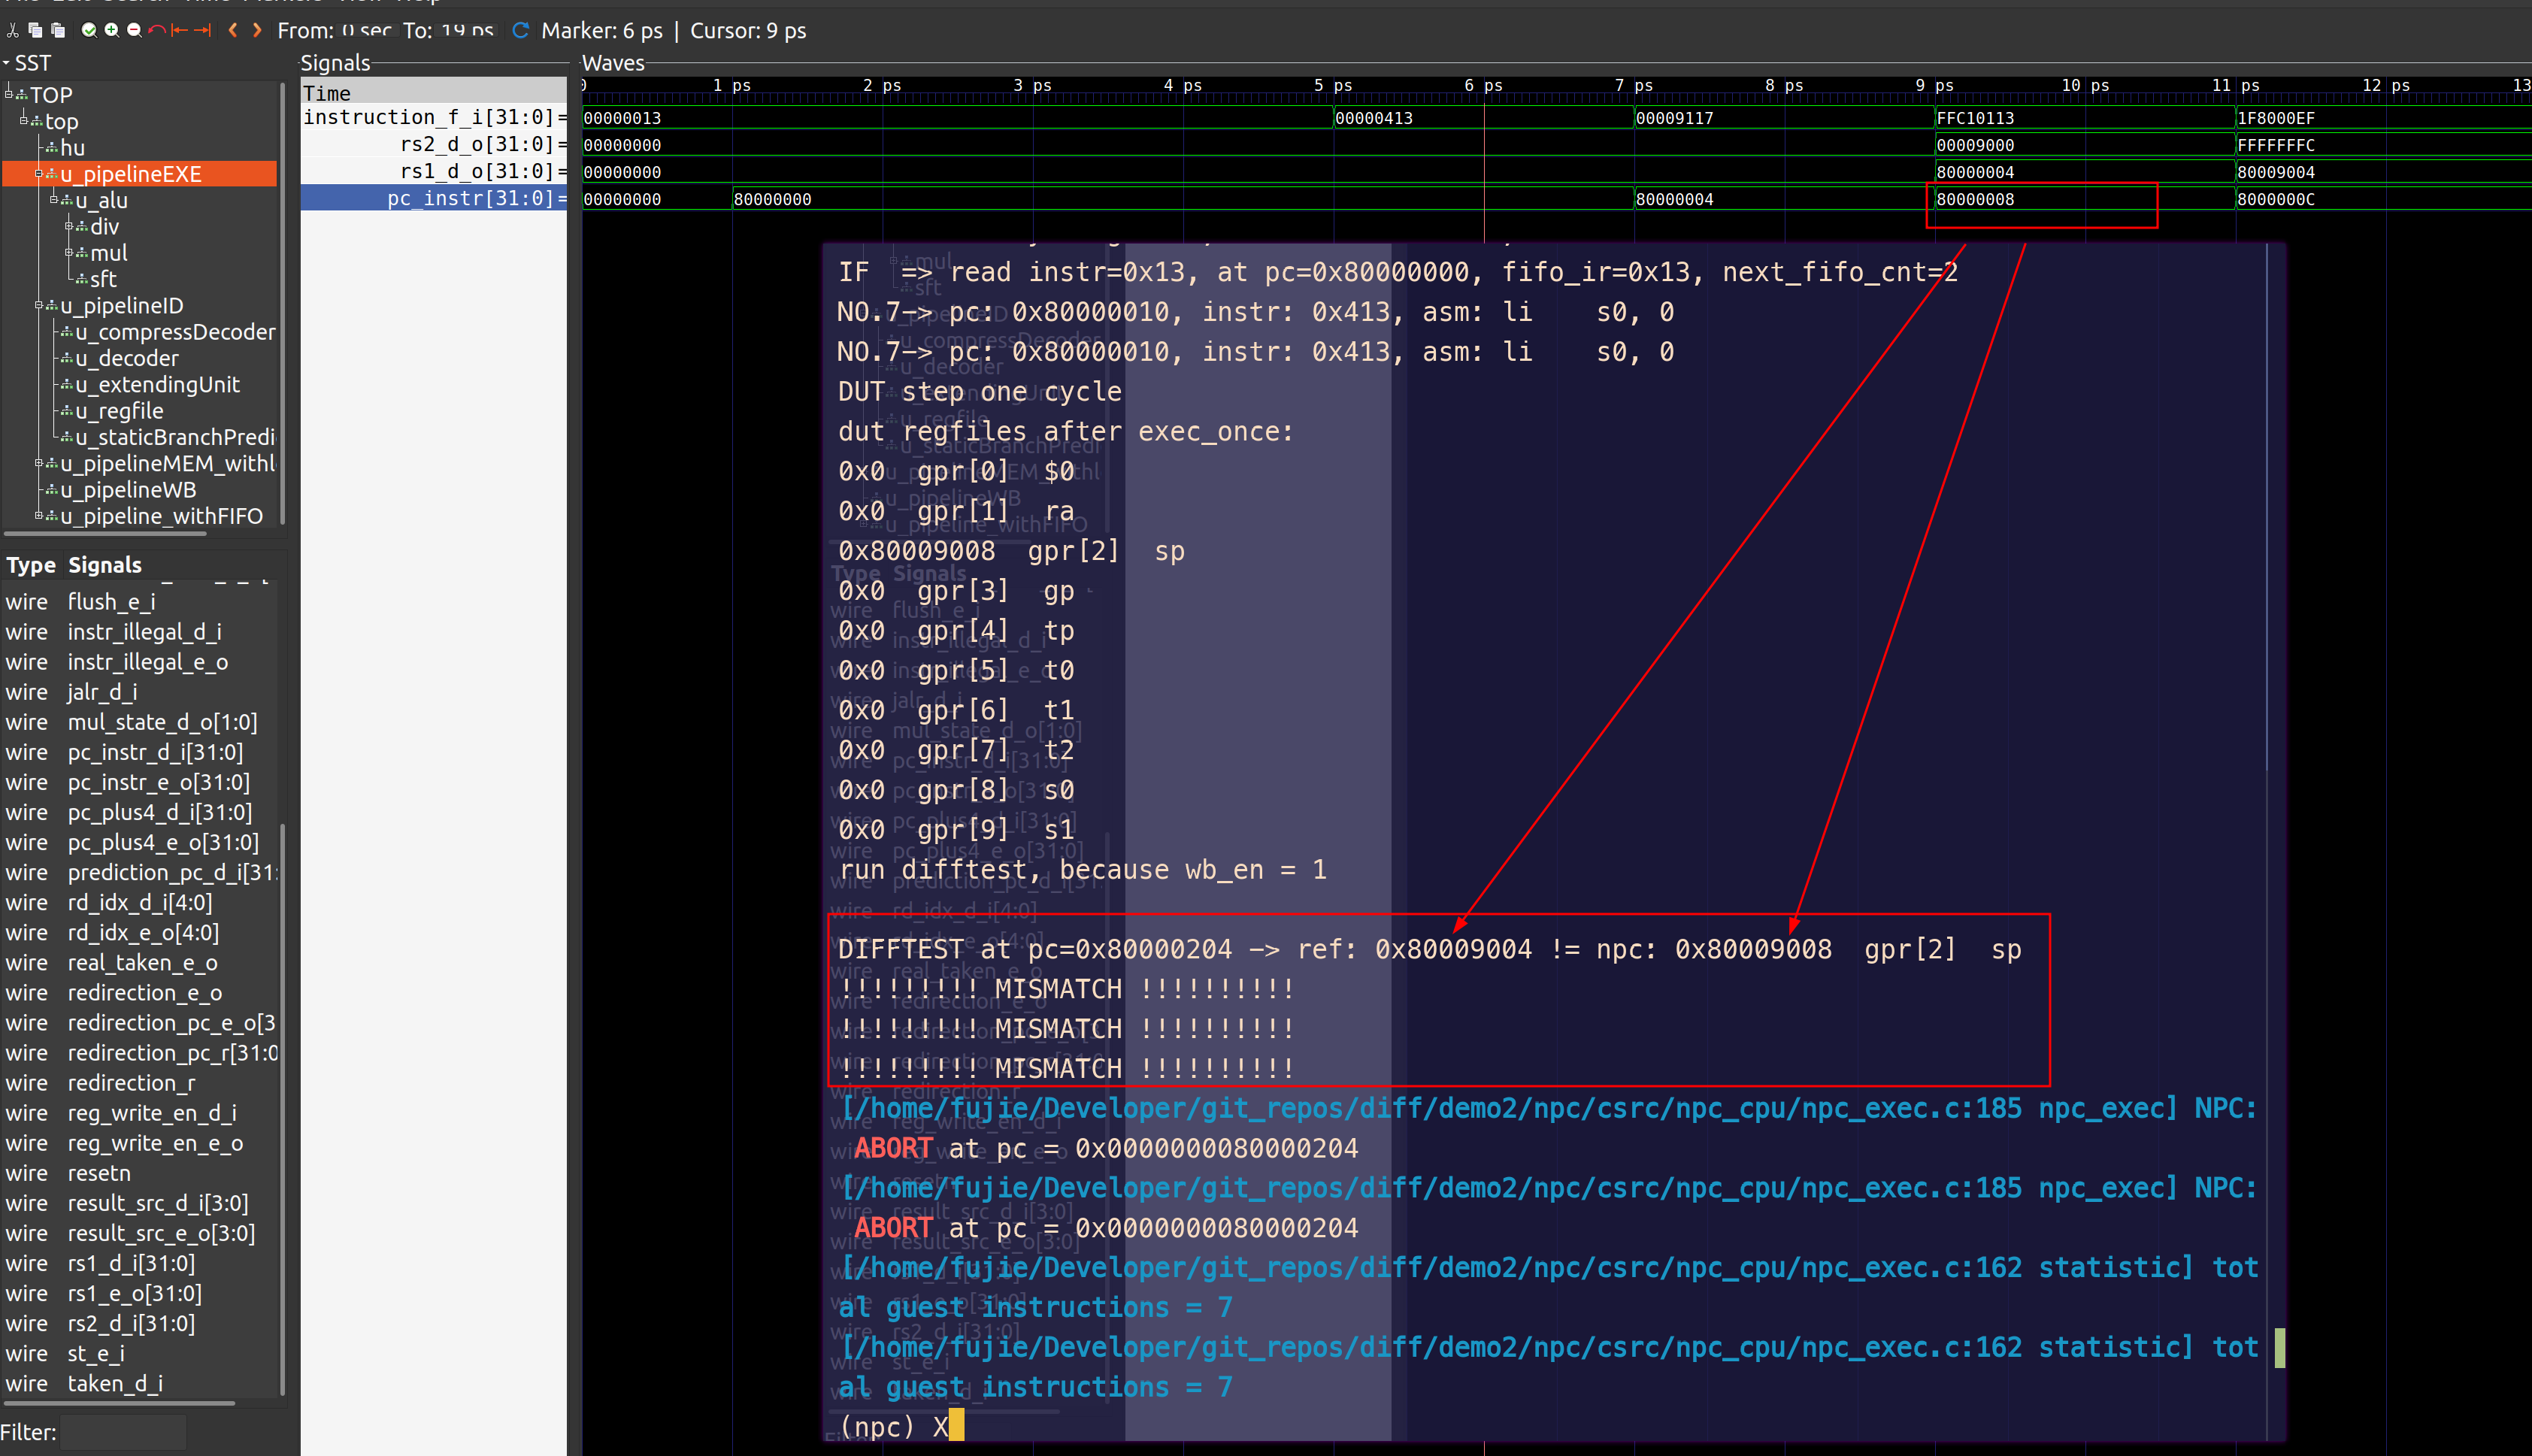
bug 修复:将当前 pc 的值赋值给源操作数
rs1_d_o1
2
3
4
5// pipelineID.v
else begin
// rs1_d_o <= pc_next; // alu source from pc+4
rs1_d_o <= pc_instr; // alu source from pc
end
reset 之后第一条指令的 pc 时序问题
- bug 描述:resetn 触发之后,ID 会强制跳转到初始 PC,但是之前 MCU 初始 PC 是 0x00000000,因此每次 resetn 之后 pc 跳转都会出错
- bug 修复:将 resetn 之后的 redirection_d_o 修复为 0x80000000
1
2
3
4
5
6// file: pipelineID.v
assign redirection_d_o = ({32{~resetn_delay | flush_i}} & 32'h80000000)| // <- fix bug
({32{ptnt_e_i & ~branchJAL_o}} & pc_next)| // sbp taken, alu not taken
({32{ptnt_e_i & branchJAL_o}} & redirection_pc)| // sbp taken, alu not taken, following by JAL
({32{ redirection_e_i}} & redirection_pc_e_i)| // pc from EXE
({32{~redirection_e_i}} & redirection_pc); // pc from SBP
MCU 内存跟 riscv 内存存储方式不一致
bug 描述:MCU 跟 Difftest 的二进制程序,其大小端方向不一致,因此 Difftest 得到的镜像文件加载之后,需要调换其顺序才可以得到指令
PS: riscv 采用小端存放的格式,对于 32bits 的指令一条指令 aabbccdd,其存储为 ccddaabb
bug 修复:跟 MCU 之前测试时二进制程序编译有关、跟 Difftest 二进制程序编译有关、跟 MCU imemory 设计有关
NOP 指令导致错误的
wb_enbug 描述:需要被冲刷的指令,其行为会被翻译成一条 NOP 指令,但是 NOP 指令本质上是
addi x0, x0, 0,译码单元对于addi指令会判断其wb_en=1,因此当系统 resetn 出发时,其面几条 NOP 指令会导致wb_en=1,进而导致 Difftest 开始比较 MCU 跟 Reference Model,进而导致比较失败bug 修复:译码的时候,如果发现指令是 NOP 指令,则
wb_en=0,即assign wb_en_o = instruction_i != 32'h00000013;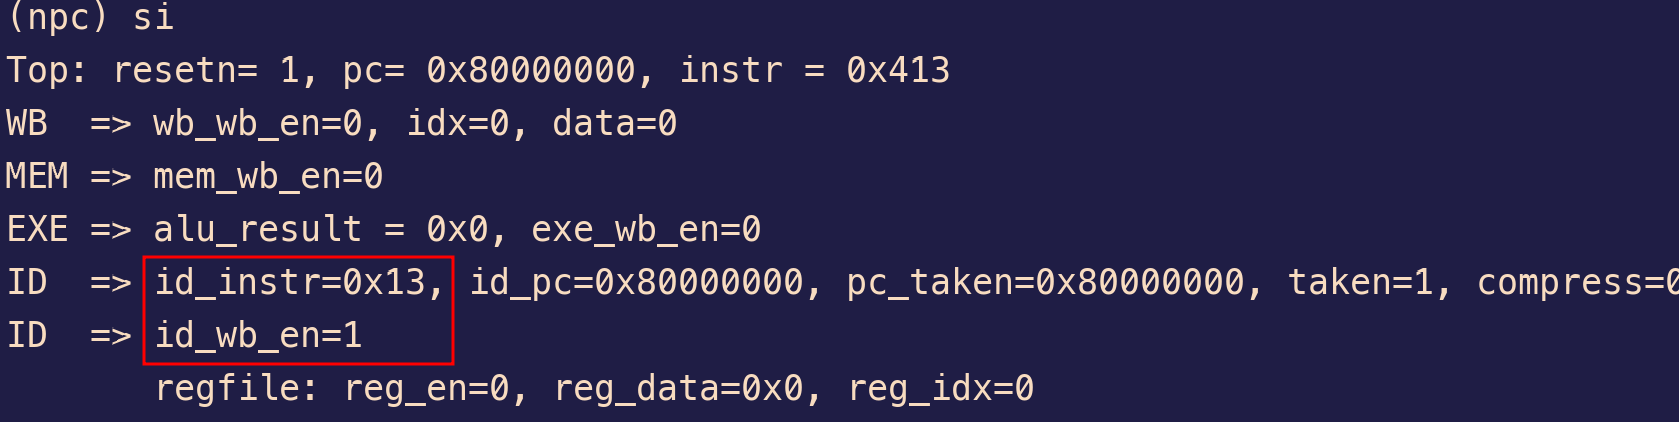
RV32 R-Type 指令跟 RV32 M 指令译码错误
- bug 描述:R-Type 指令
instruction[25]==0,M 指令instruction[25]==1,在decoder.v文件里,把该条件写反了 - bug 修复:如果
instruction[25]==0则按照 R-Type 指令进行译码
- bug 描述:R-Type 指令
EXE Stage 在
redirection_e_o信号对JAL指令判断错误bug 描述:EXE Stage 需要判断 SBP 对于 Branch 的分支预测是否正确;但是 EXE Stage 不需要判断 SBP 对于
JAL指令判断是否正确bug 修复:EXE Stage 在判断的时候,首先判断是否是 Branch 指令,再判断 SBP 预测是否正确;从而避免多此一举的对
JAL是否预测正确判断1
2
3
4
5
6
7
8
9
10
11
12diff --git a/npc/vsrc/pipelineEXE.v b/npc/vsrc/pipelineEXE.v
index 8f44516..407184c 100644
--- a/npc/vsrc/pipelineEXE.v
+++ b/npc/vsrc/pipelineEXE.v
@@ -21,6 +21,7 @@ module pipelineEXE (
+ input wire btype_d_i, // instruction is branch type instruction
@@ -128,7 +129,7 @@ module pipelineEXE (
end
assign redirection_e_o = st_e_i? redirection_r :
- (taken_d_i^alu_taken)|(jalr_d_i&~taken_d_i);
+ ( btype_d_i & taken_d_i^alu_taken)|(jalr_d_i&~taken_d_i);
lui 指令需要 bypass 的时候,bypass 了错误的值
- bug
描述:当一条指令的源寄存器跟它上一条指令的目的寄存器想同时,则会存在
EXE->ID 的 bypass,将 alu_result bypass 到 ID Stage. 目前 EXE Stage
的代码只会 bypass
alu_result,但是对于
LUI指令,其写回到寄存器的指不是 alu 的计算结果,而是extended_imm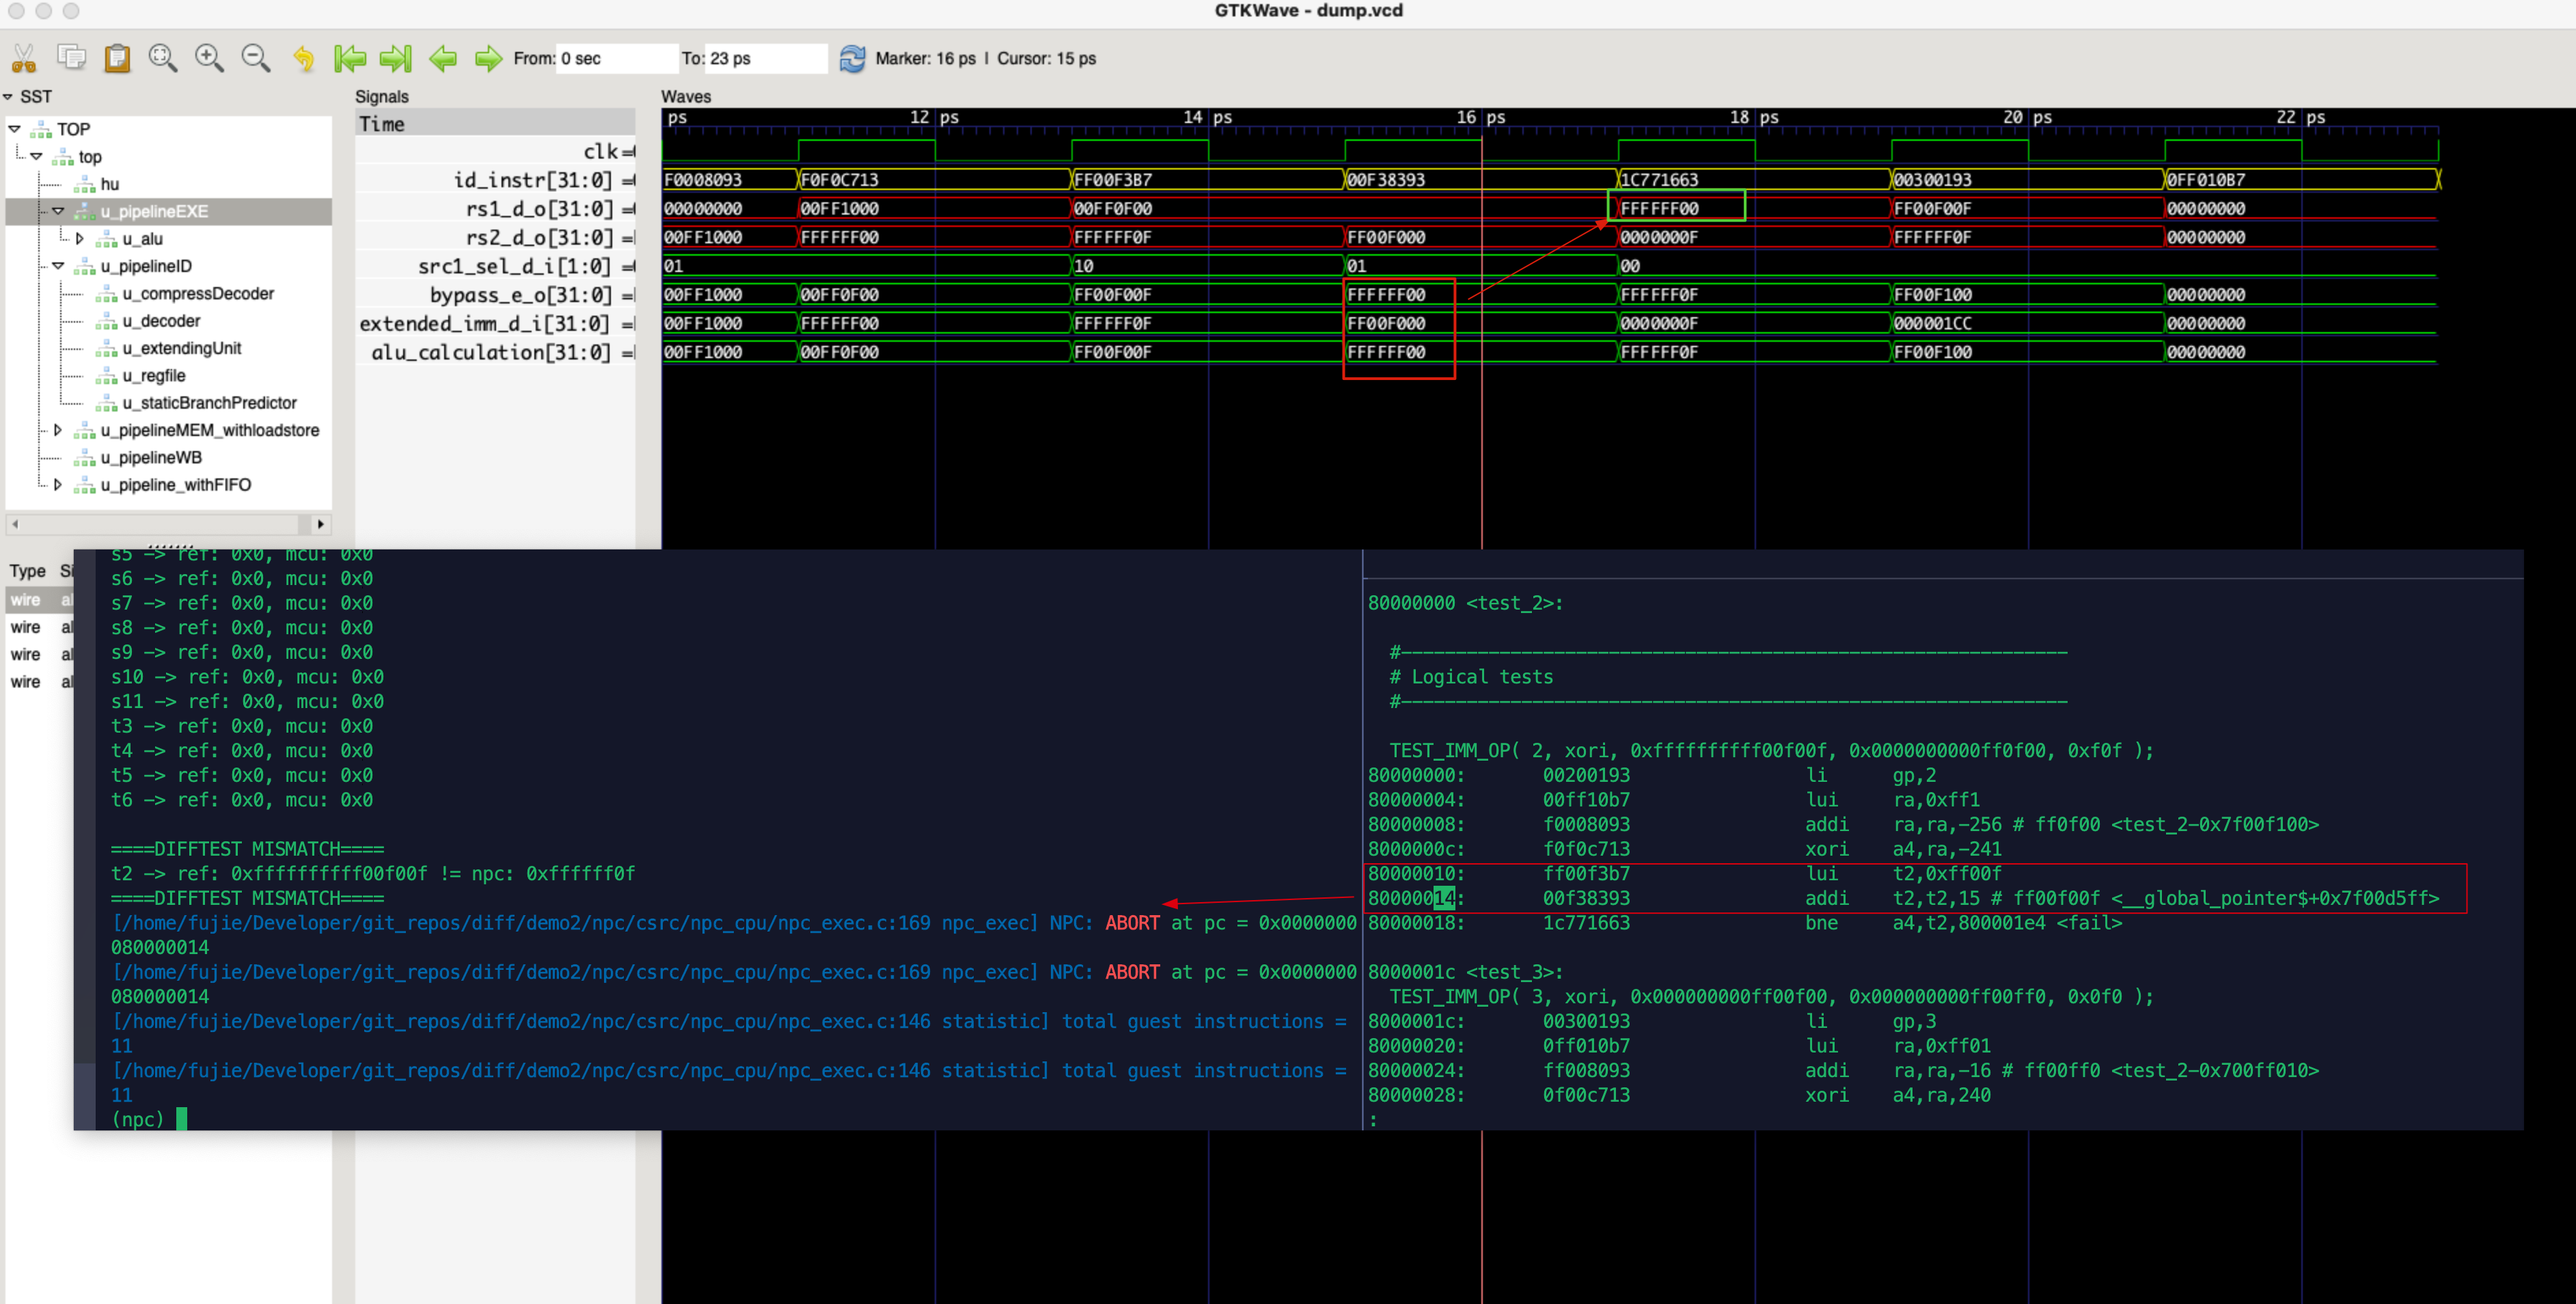
- bug 修复:在 bypass
的时候,需要根据写回到寄存器的来源,选择正确的源进行 bypass,一共有 4
种写会到寄存器的源:
- alu_result
- extended_imm
- next_pc
- load_data <- only in MEM stage bypass
1
2
3
4
5
6
7
8diff --git a/npc/vsrc/pipelineEXE.v b/npc/vsrc/pipelineEXE.v
index b81fbbe..62bb8e2 100644
--- a/npc/vsrc/pipelineEXE.v
+++ b/npc/vsrc/pipelineEXE.v
- assign bypass_e_o=alu_calculation;
+ assign bypass_e_o = {32{result_src_d_i[0]}} & alu_calculation |
+ {32{result_src_d_i[1]}} & extended_imm_d_i|
+ {32{result_src_d_i[3]}} & pc_plus4_d_i;- bug
描述:当一条指令的源寄存器跟它上一条指令的目的寄存器想同时,则会存在
EXE->ID 的 bypass,将 alu_result bypass 到 ID Stage. 目前 EXE Stage
的代码只会 bypass
alu_result,但是对于
Store指令错误选择src1当作写回的数据
- bug 描述:Store指令选择将src2写入到Data
Memory,当前的MCU错误的选择了将src1写回到Data Memory
- bug 修复:EXE Stage -> MEM Stage都选择src2作为写回到Data Memory的数据
- bug 描述:Store指令选择将src2写入到Data
Memory,当前的MCU错误的选择了将src1写回到Data Memory
针对Store指令,ID需要将src2的两种可能传递给EXE
- bug 描述:Store指令需要两个操作:
- 计算地址:
addr=src1+imm - 将src2写回
当前代码里ID->EXE对于src的选择,要么是寄存器读出的数,要么是立即数拓展,
导致地址计算正确跟取到正确的写回数据只能同时满足一个
- 计算地址:
- bug
修复:对于ID来说,针对src2需要同时将RF读取值跟立即数拓展同时传递给EXE
- EXE利用立即数拓展计算地址
- 将RF读取值传递给MEM
- bug 描述:Store指令需要两个操作:
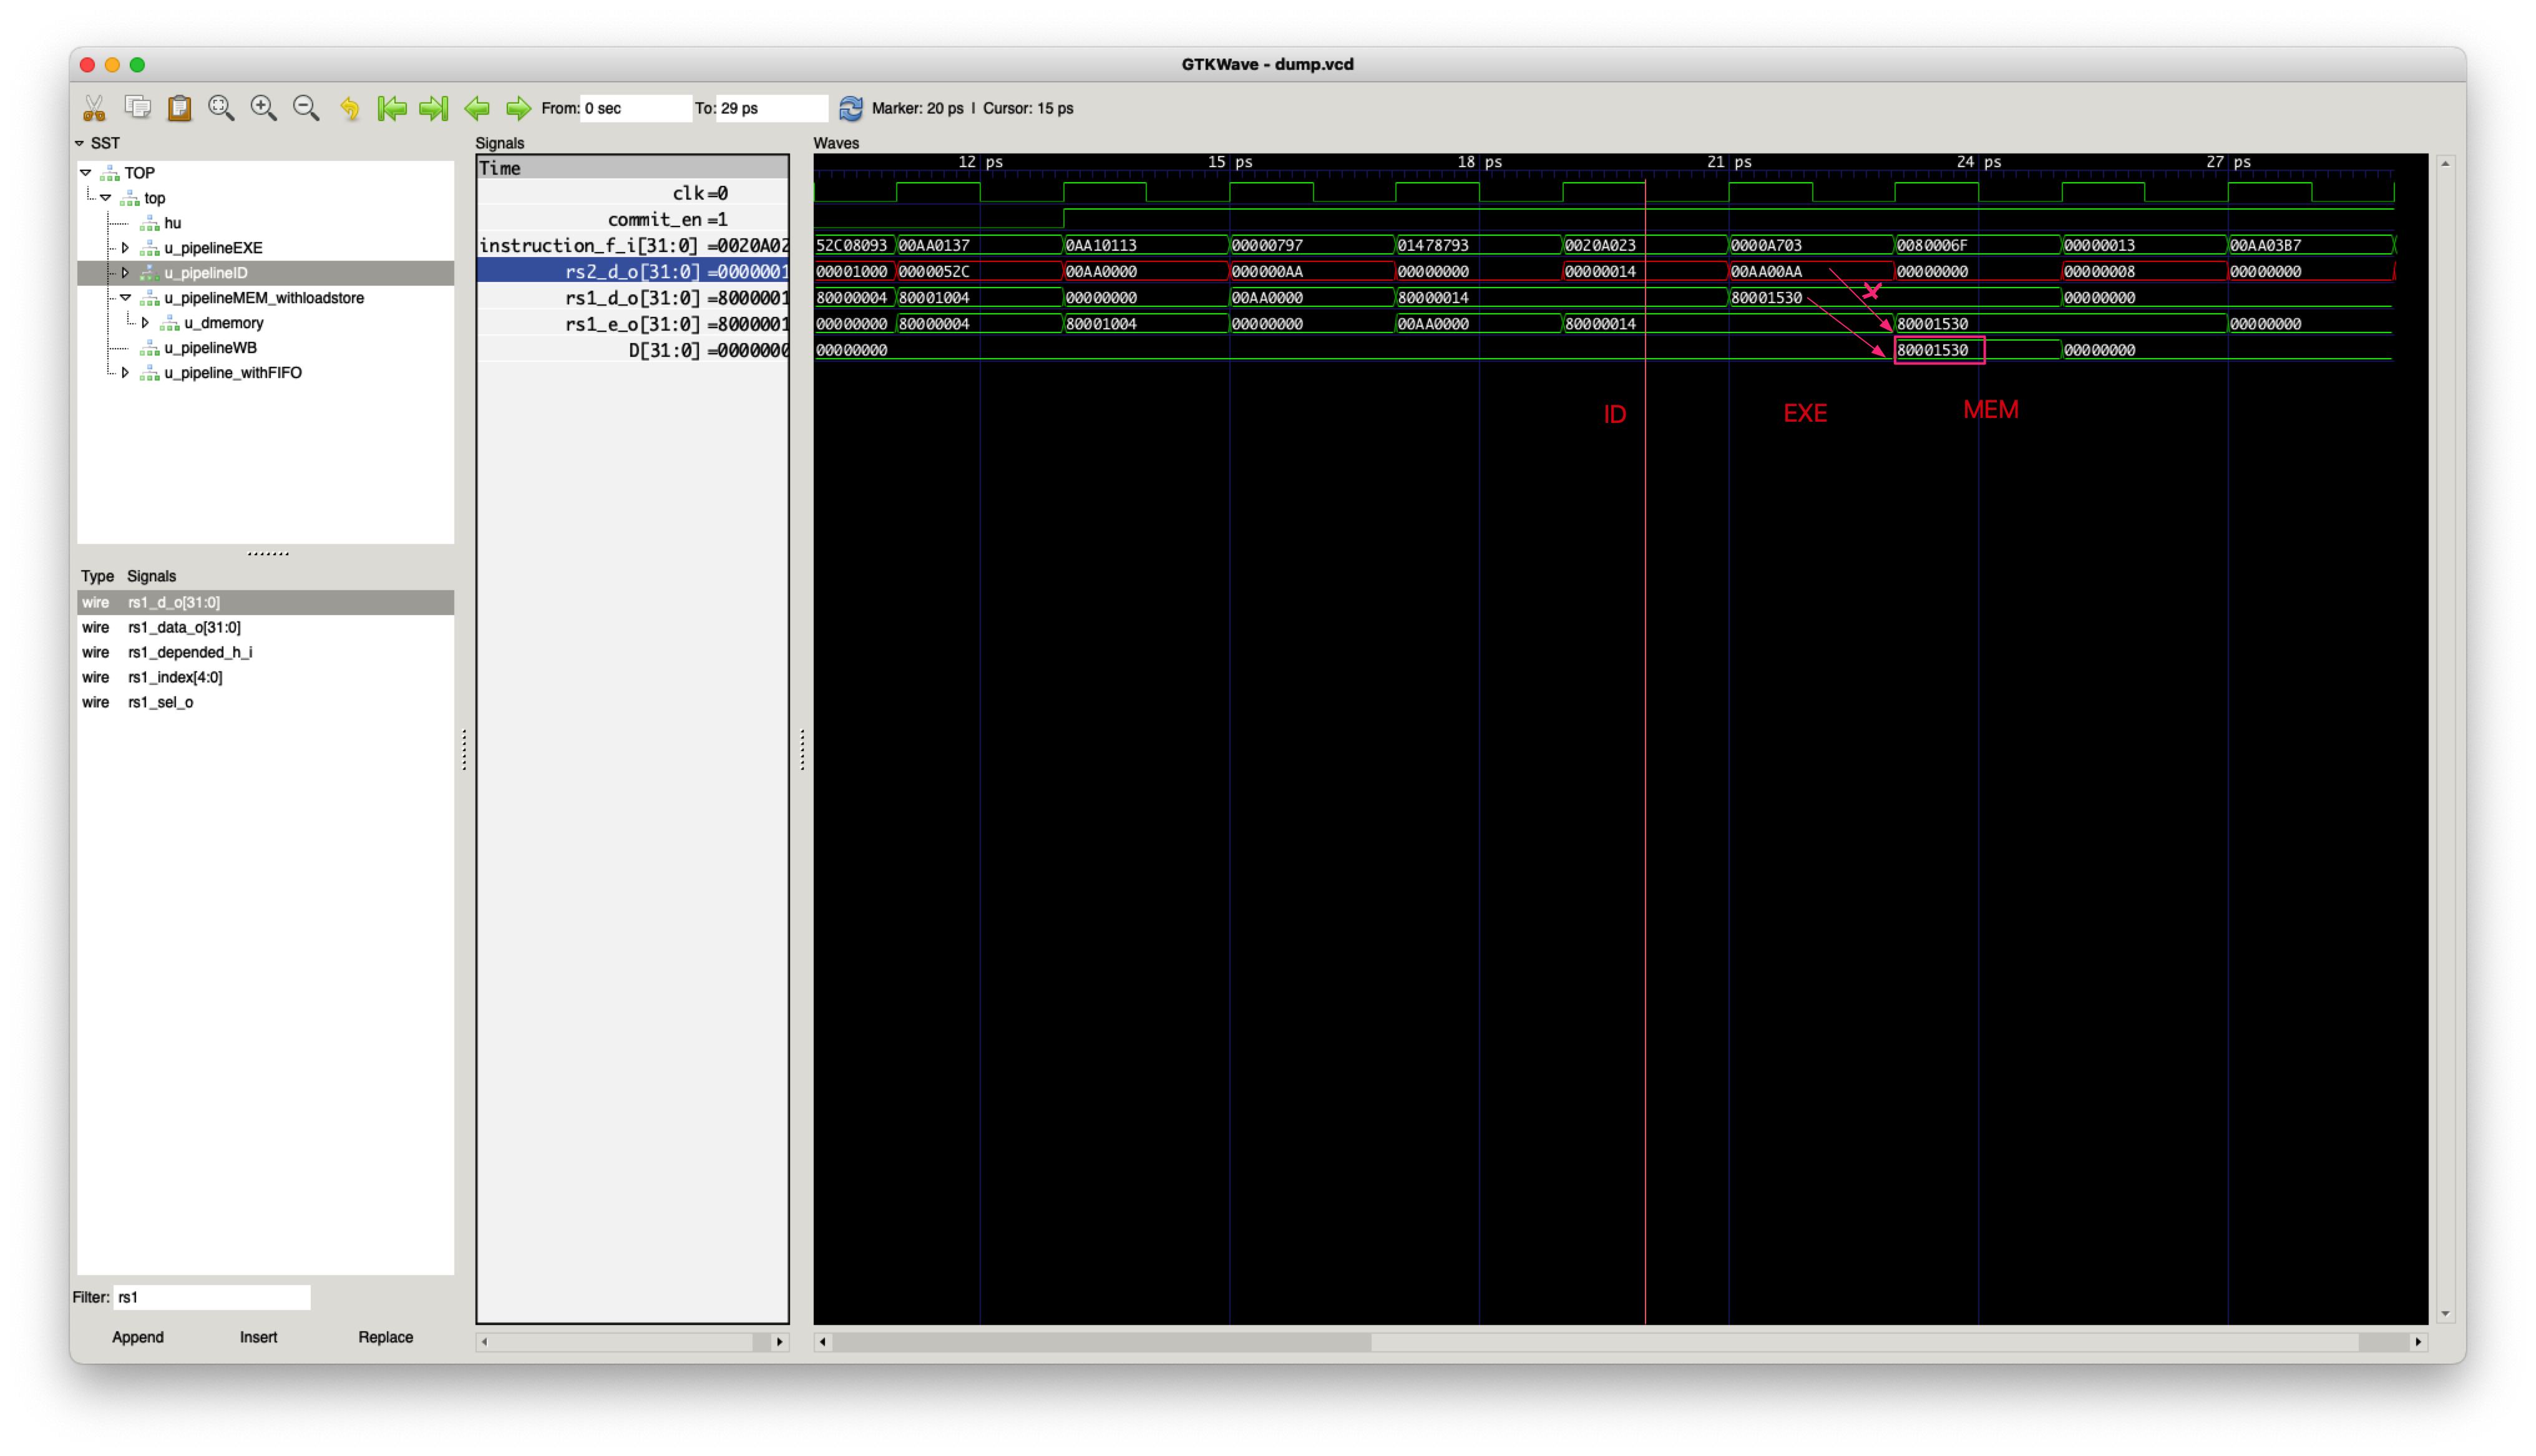
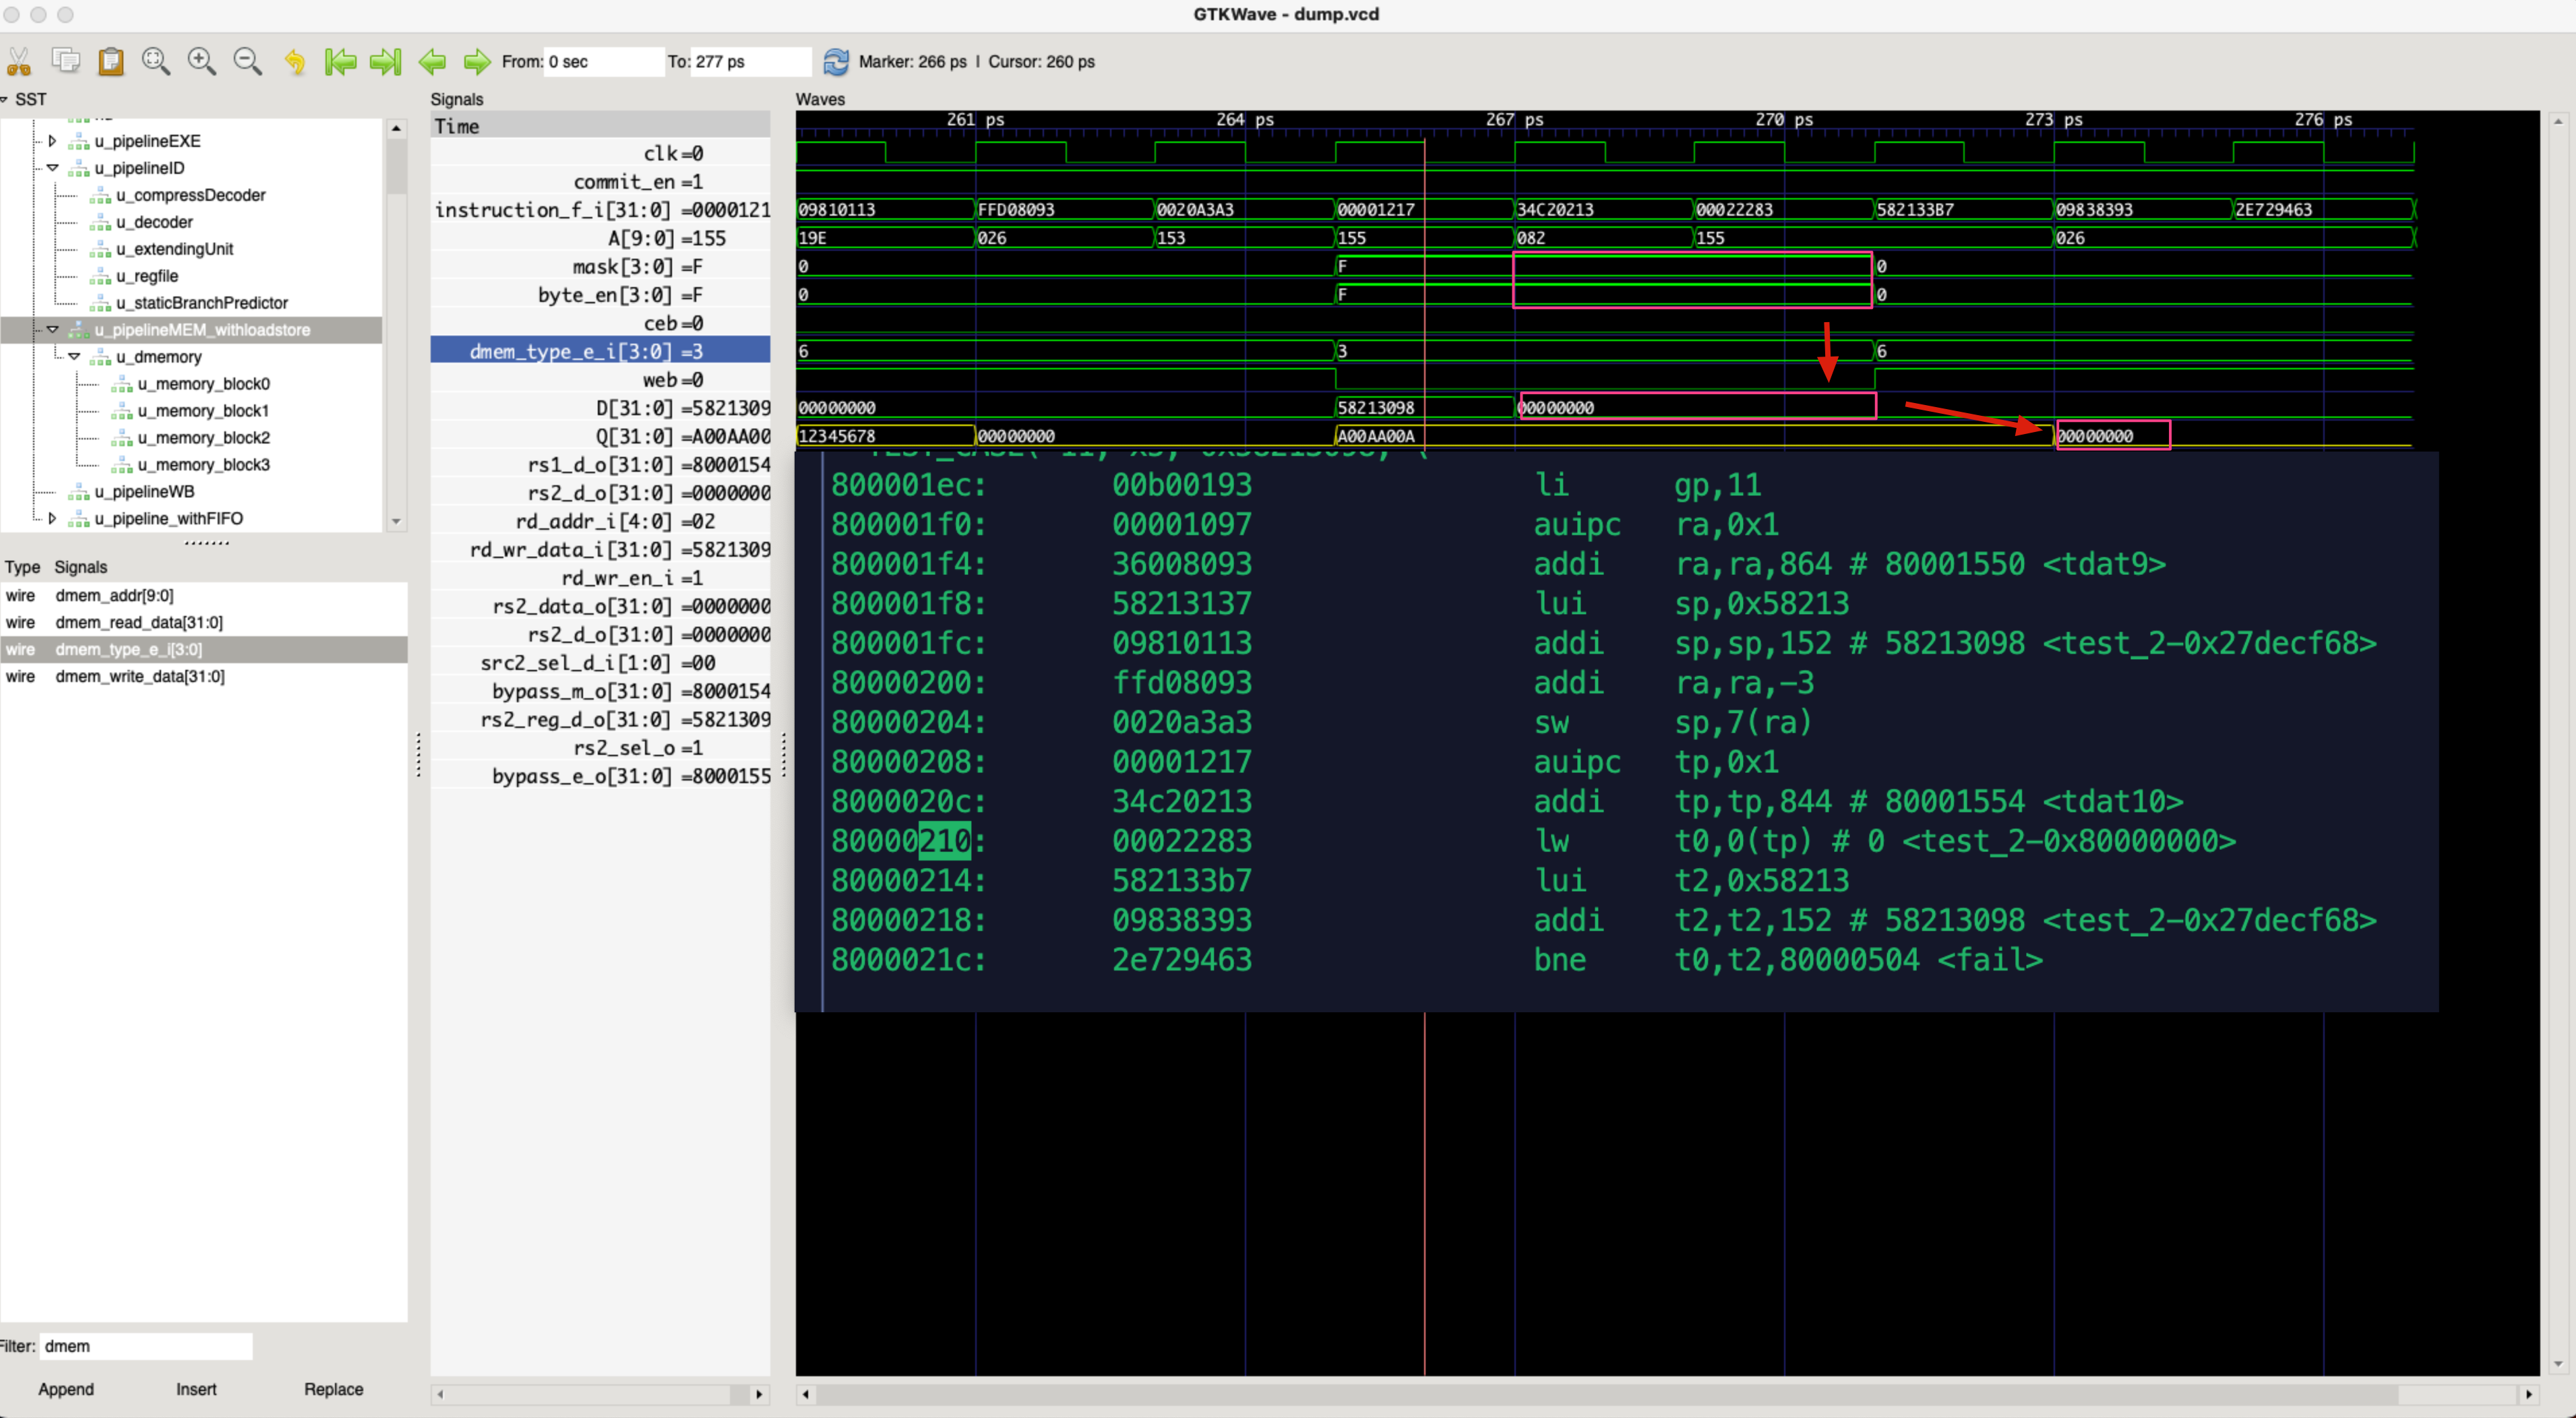
MEM写入读出必须提前一个周期
- bug 描述:由于Data Memory写入需要一个周期的延迟,因此EXE必须提前一个cycle给出地址到Data Memory才可以保证Data Memory在MEM State完成数据的写入
- bug 修复:EXE在遇到Store类型指令时,将其addr, src2, dmem_type都直接给到MEM,不通过pipeline register
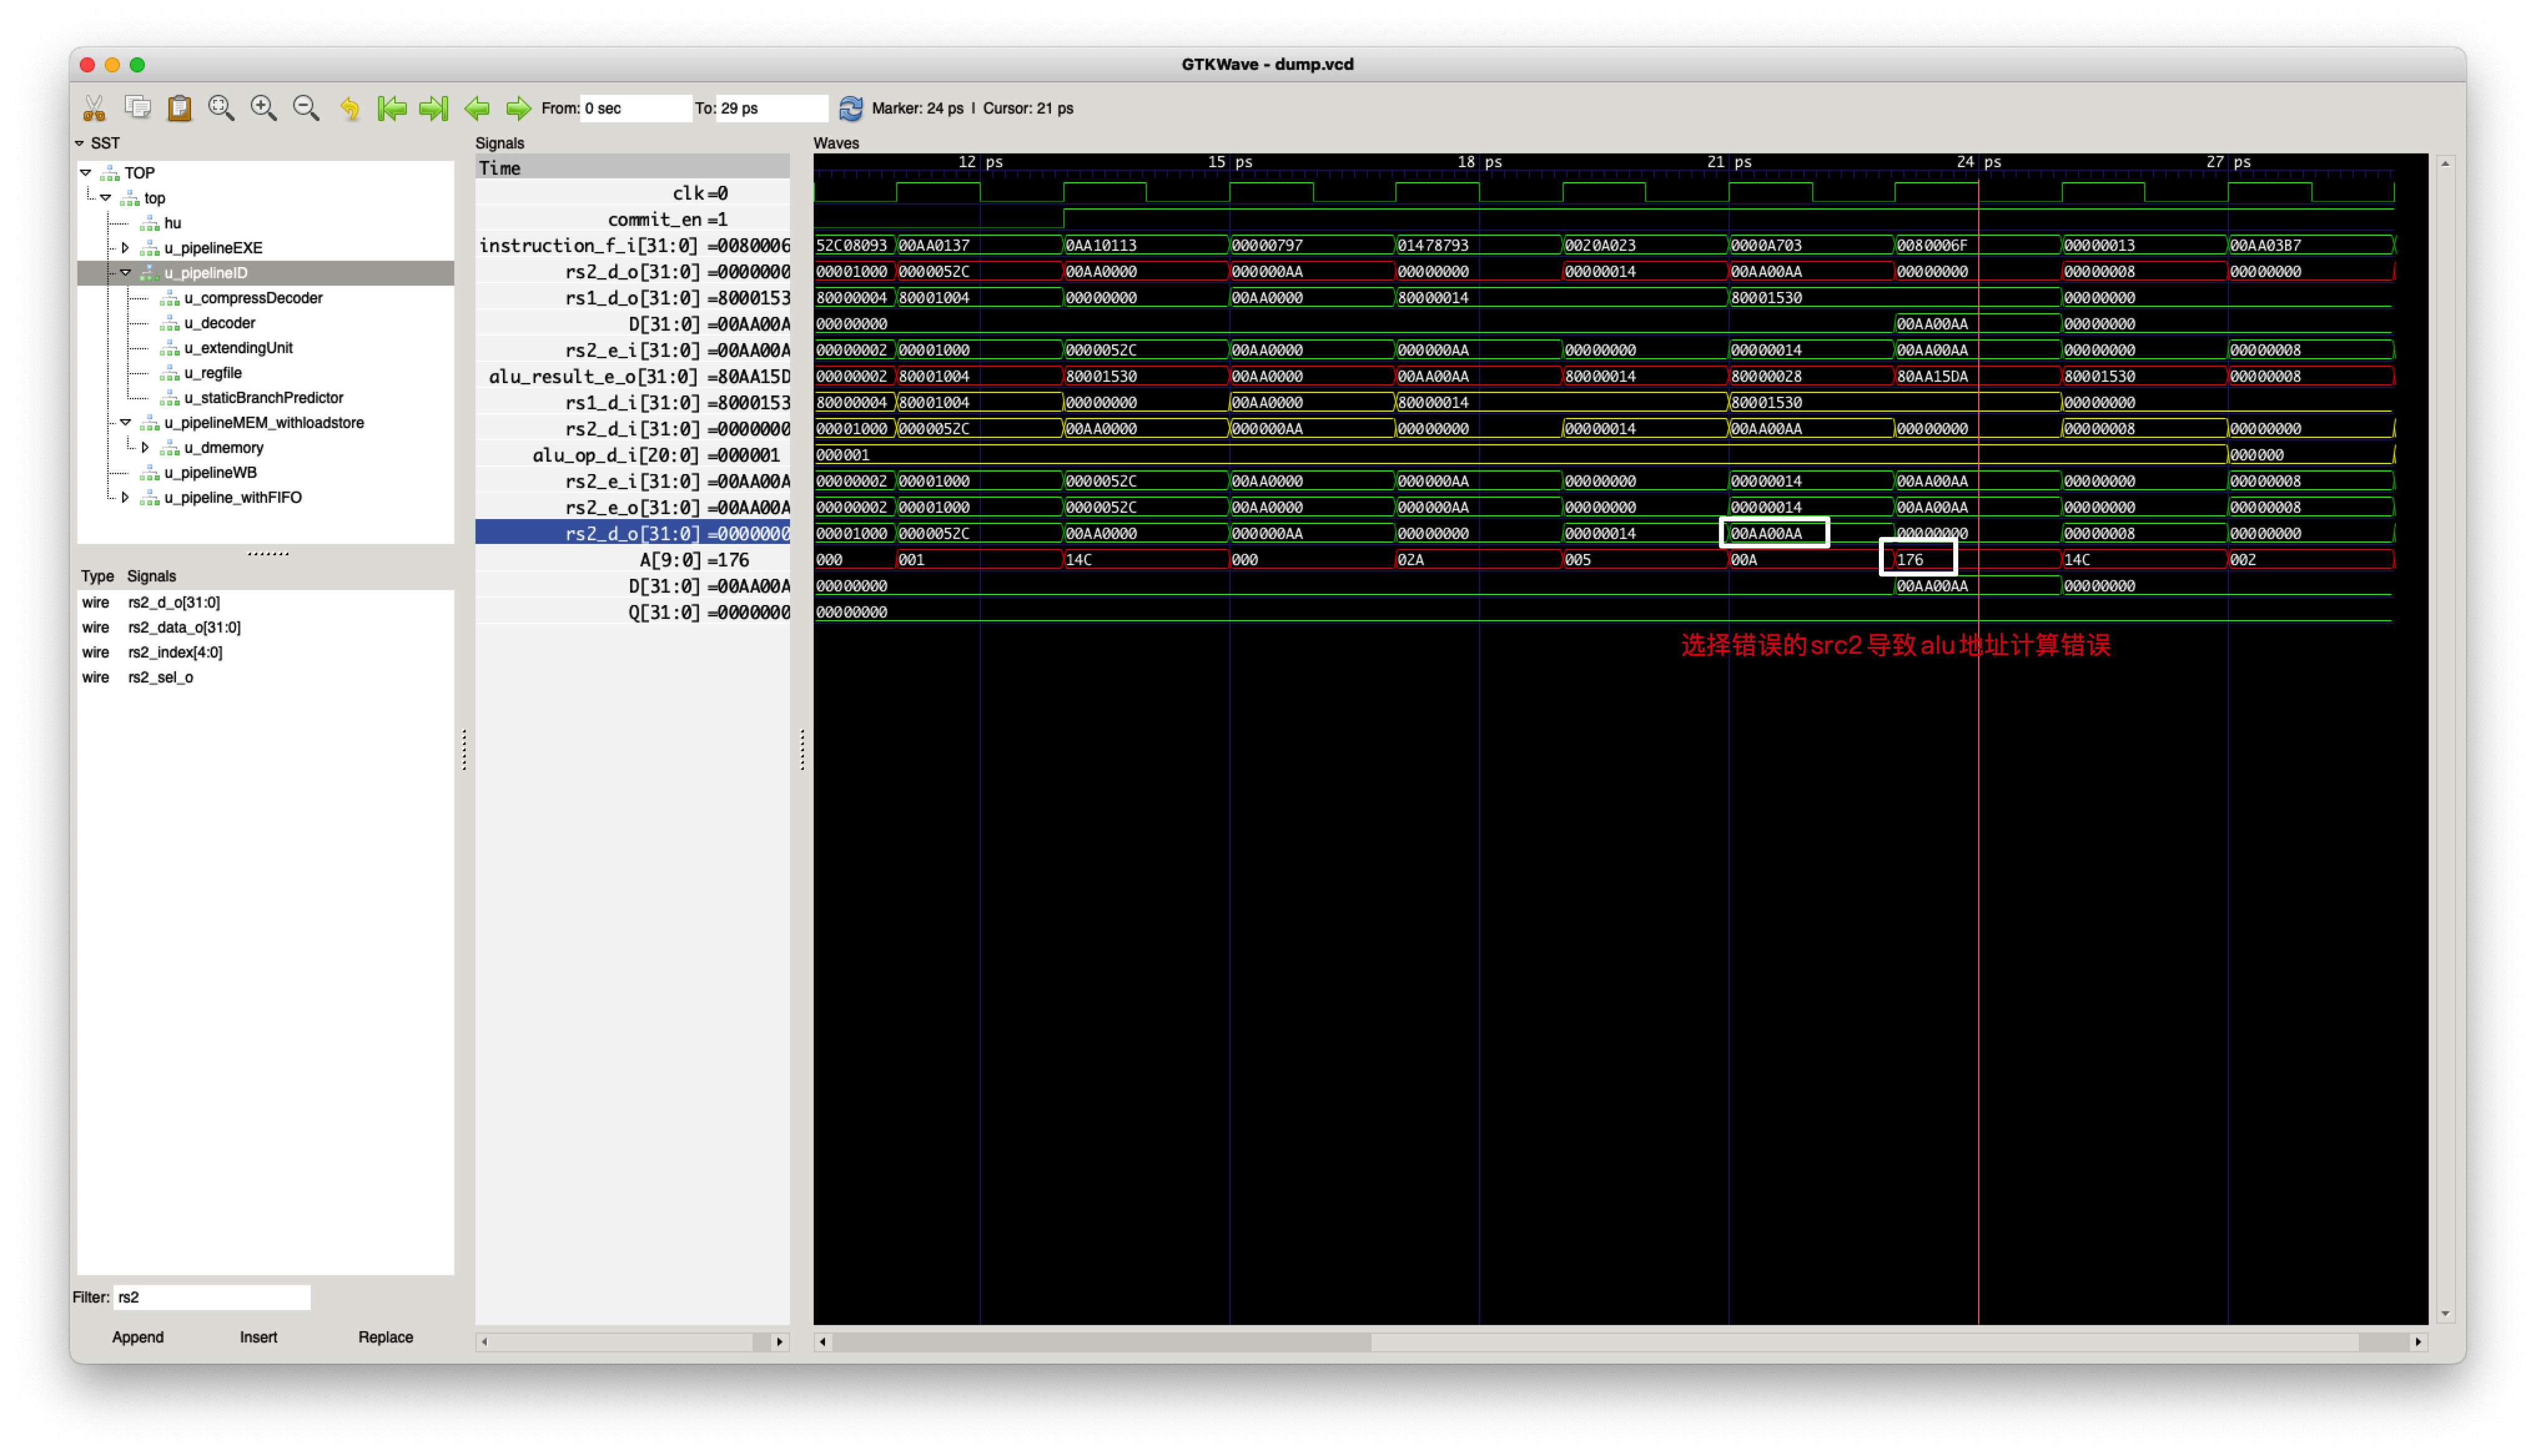
非访存指令(除load/store)之外的指令,decoder为设置其访存类型为
DMEM_NO- bug
描述:decoder没有设置非访存指令的访存类型,导致一条访存指令后面的所有非访存指令都可以写入到Data
Memory,从而导致写入的数据是错误的数据
- bug 修复:在decoder中设置非访存指令不能够访问Data Memory
1
2
3
4
5
6
7
8
9
10
11
12diff --git a/npc/vsrc/decoder.v b/npc/vsrc/decoder.v
index e607eca..66b45f8 100644
--- a/npc/vsrc/decoder.v
+++ b/npc/vsrc/decoder.v
@@ -83,6 +83,7 @@ module decoder(
instr_illegal_o = 1'b0; // suppose instruction is legal by default.
wb_src_o = `WBSRC_ALU; // suppose write back source is from ALU
wb_en_o = 1'b0; // suppose write back is not enable
+ dmem_type_o = `DMEM_NO;
case(opcode)
`OPCODE_LOAD : begin
imm_type_o = `IMM_I;
- bug
描述:decoder没有设置非访存指令的访存类型,导致一条访存指令后面的所有非访存指令都可以写入到Data
Memory,从而导致写入的数据是错误的数据
移位器msb计算错误
- bug
描述:移位器默认是右移,左移是通过将
din对折、取反、再对折来实现的;用右移来实现左移的时候,alu里shifter32的例化方式会导致左移恒补1,进而出错1
2
3
4
5
6
7
8
9// alu.v
shifter32 #(32,5) sft(
.d_in(ain),
.shift(bin[4:0]),
.arithOrLogic(srl_op), // SRA or SRL
.leftOrRight(sra_op|srl_op), // shift left or right
.d_out(sft_ans));
// shifter32.v
assign msbFill=arithOrLogic?0:d_in[DATA_WIDTH-1]; - bug 修复:msbFill在左移的时候,必须置0
1
2// shifter32.v
assign msbFill=leftOrRight ? (arithOrLogic?0:d_in[DATA_WIDTH-1]) : 0;
- bug
描述:移位器默认是右移,左移是通过将
ID Stage没有在译码到Load指令时,未将
is_load信号发送给hazard unit,导致Load Stall失败bug 描述:ID Stage没有给到hazard unit对应的信号,导致hazard unit无法识别load指令
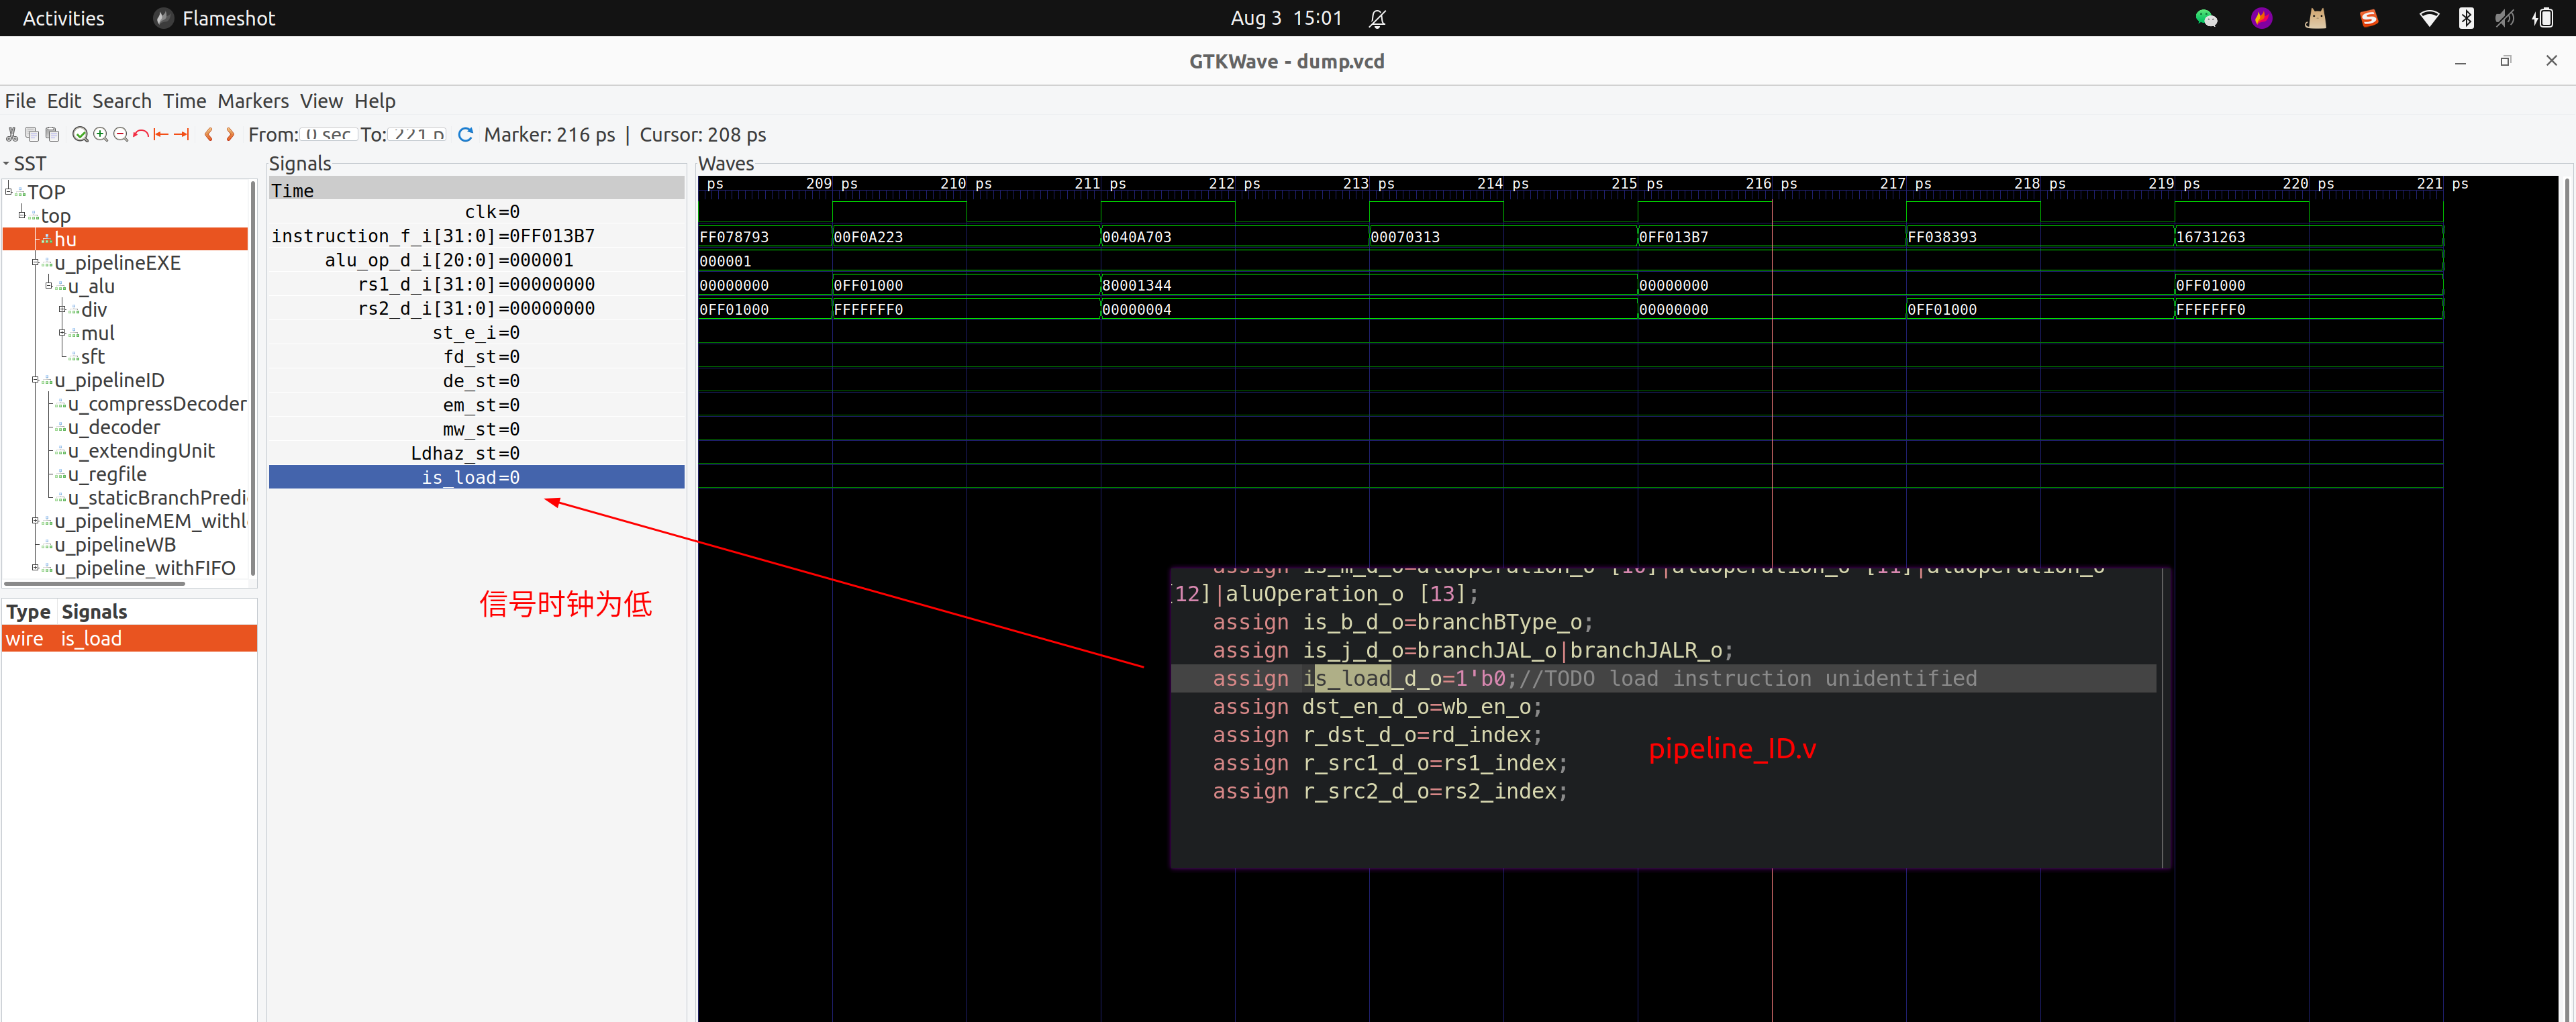
bug 修复:ID需要将对应的信号给到hazard unit
1
2
3
4
5
6
7
8
9
10
11
12
13
14
15
16
17
18// pipelineID.v
// decode instance
decoder u_decoder(
//ports
.instruction_i ( instru_32bits ),
.alu_op_o ( aluOperation_o ),
.rs1_sel_o ( rs1_sel_o ),
.rs2_sel_o ( rs2_sel_o ),
.imm_type_o ( imm_type_o ),
.branchBType_o ( branchBType_o ),
.branchJAL_o ( branchJAL_o ),
.branchJALR_o ( branchJALR_o ),
.is_load_o ( is_load_d_o ),
.dmem_type_o ( dmem_type_o ),
.wb_src_o ( wb_src_o ),
.wb_en_o ( wb_en_o ),
.instr_illegal_o ( decoder_instr_illegal )
);
ID Stage计算指令pc的时候,没有考虑stall的情况
- bug 描述:ID Stage负责计算每条指令对应的pc,流水线stall的时候,ID
Stage依然错误地增加了pc的值,pc的值被打乱之后,所有需要pc进行计算的指令都会出错
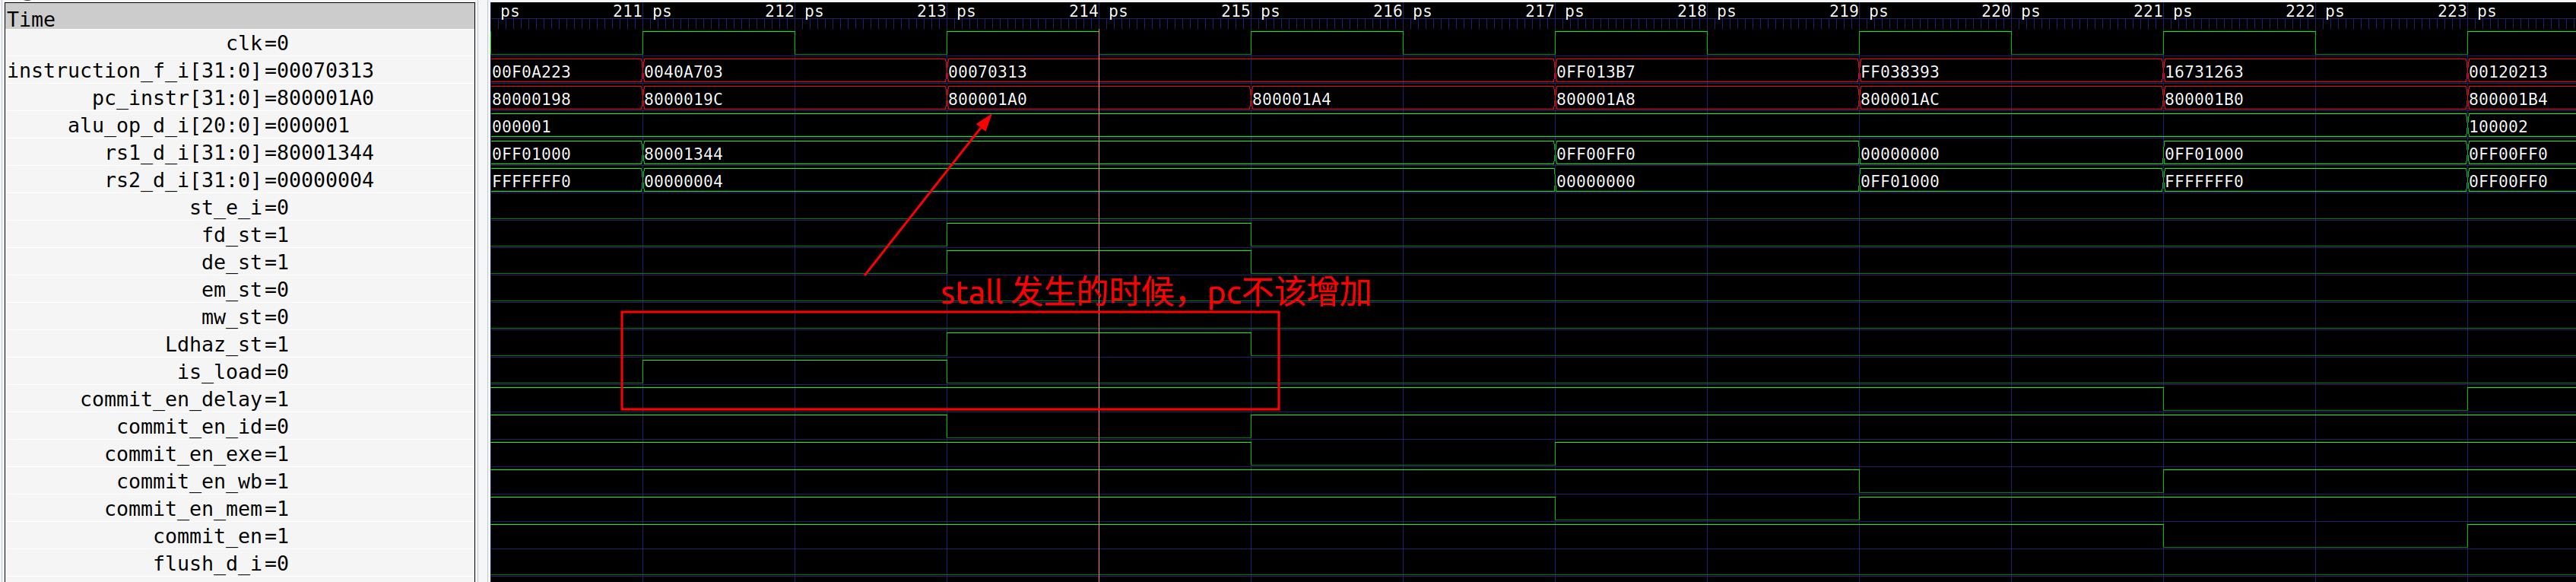
- bug 修复:ID需要输入流水线stall的信号,在stall的时候,将当前的pc固定
1
2
3
4
5
6
7
8
9
10
11always @(posedge clk ) begin
if(~resetn) begin
pc_instr <= 32'h80000000;
end
else if(taken_reg) begin
pc_instr <= pc_taken;
end
else if(~stall_i)begin // pc don't change when stall signal is high
pc_instr <= pc_next;
end
end
- bug 描述:ID Stage负责计算每条指令对应的pc,流水线stall的时候,ID
Stage依然错误地增加了pc的值,pc的值被打乱之后,所有需要pc进行计算的指令都会出错
ID Stage被flush的指令,错误地导致了重定向
- bug 描述:ID 需要计算重定向pc跟taken,目前ID
Stage在计算taken的时候,没有考虑ID Stage的flush信号,
导致被flush的指令,其静态分支预测的地址,被作为重定向pc,取到了错误的指令
1
2// pipelineID.v
assign taken_d_o = ~resetn_delay | ptnt_e_i | redirection_e_i | taken;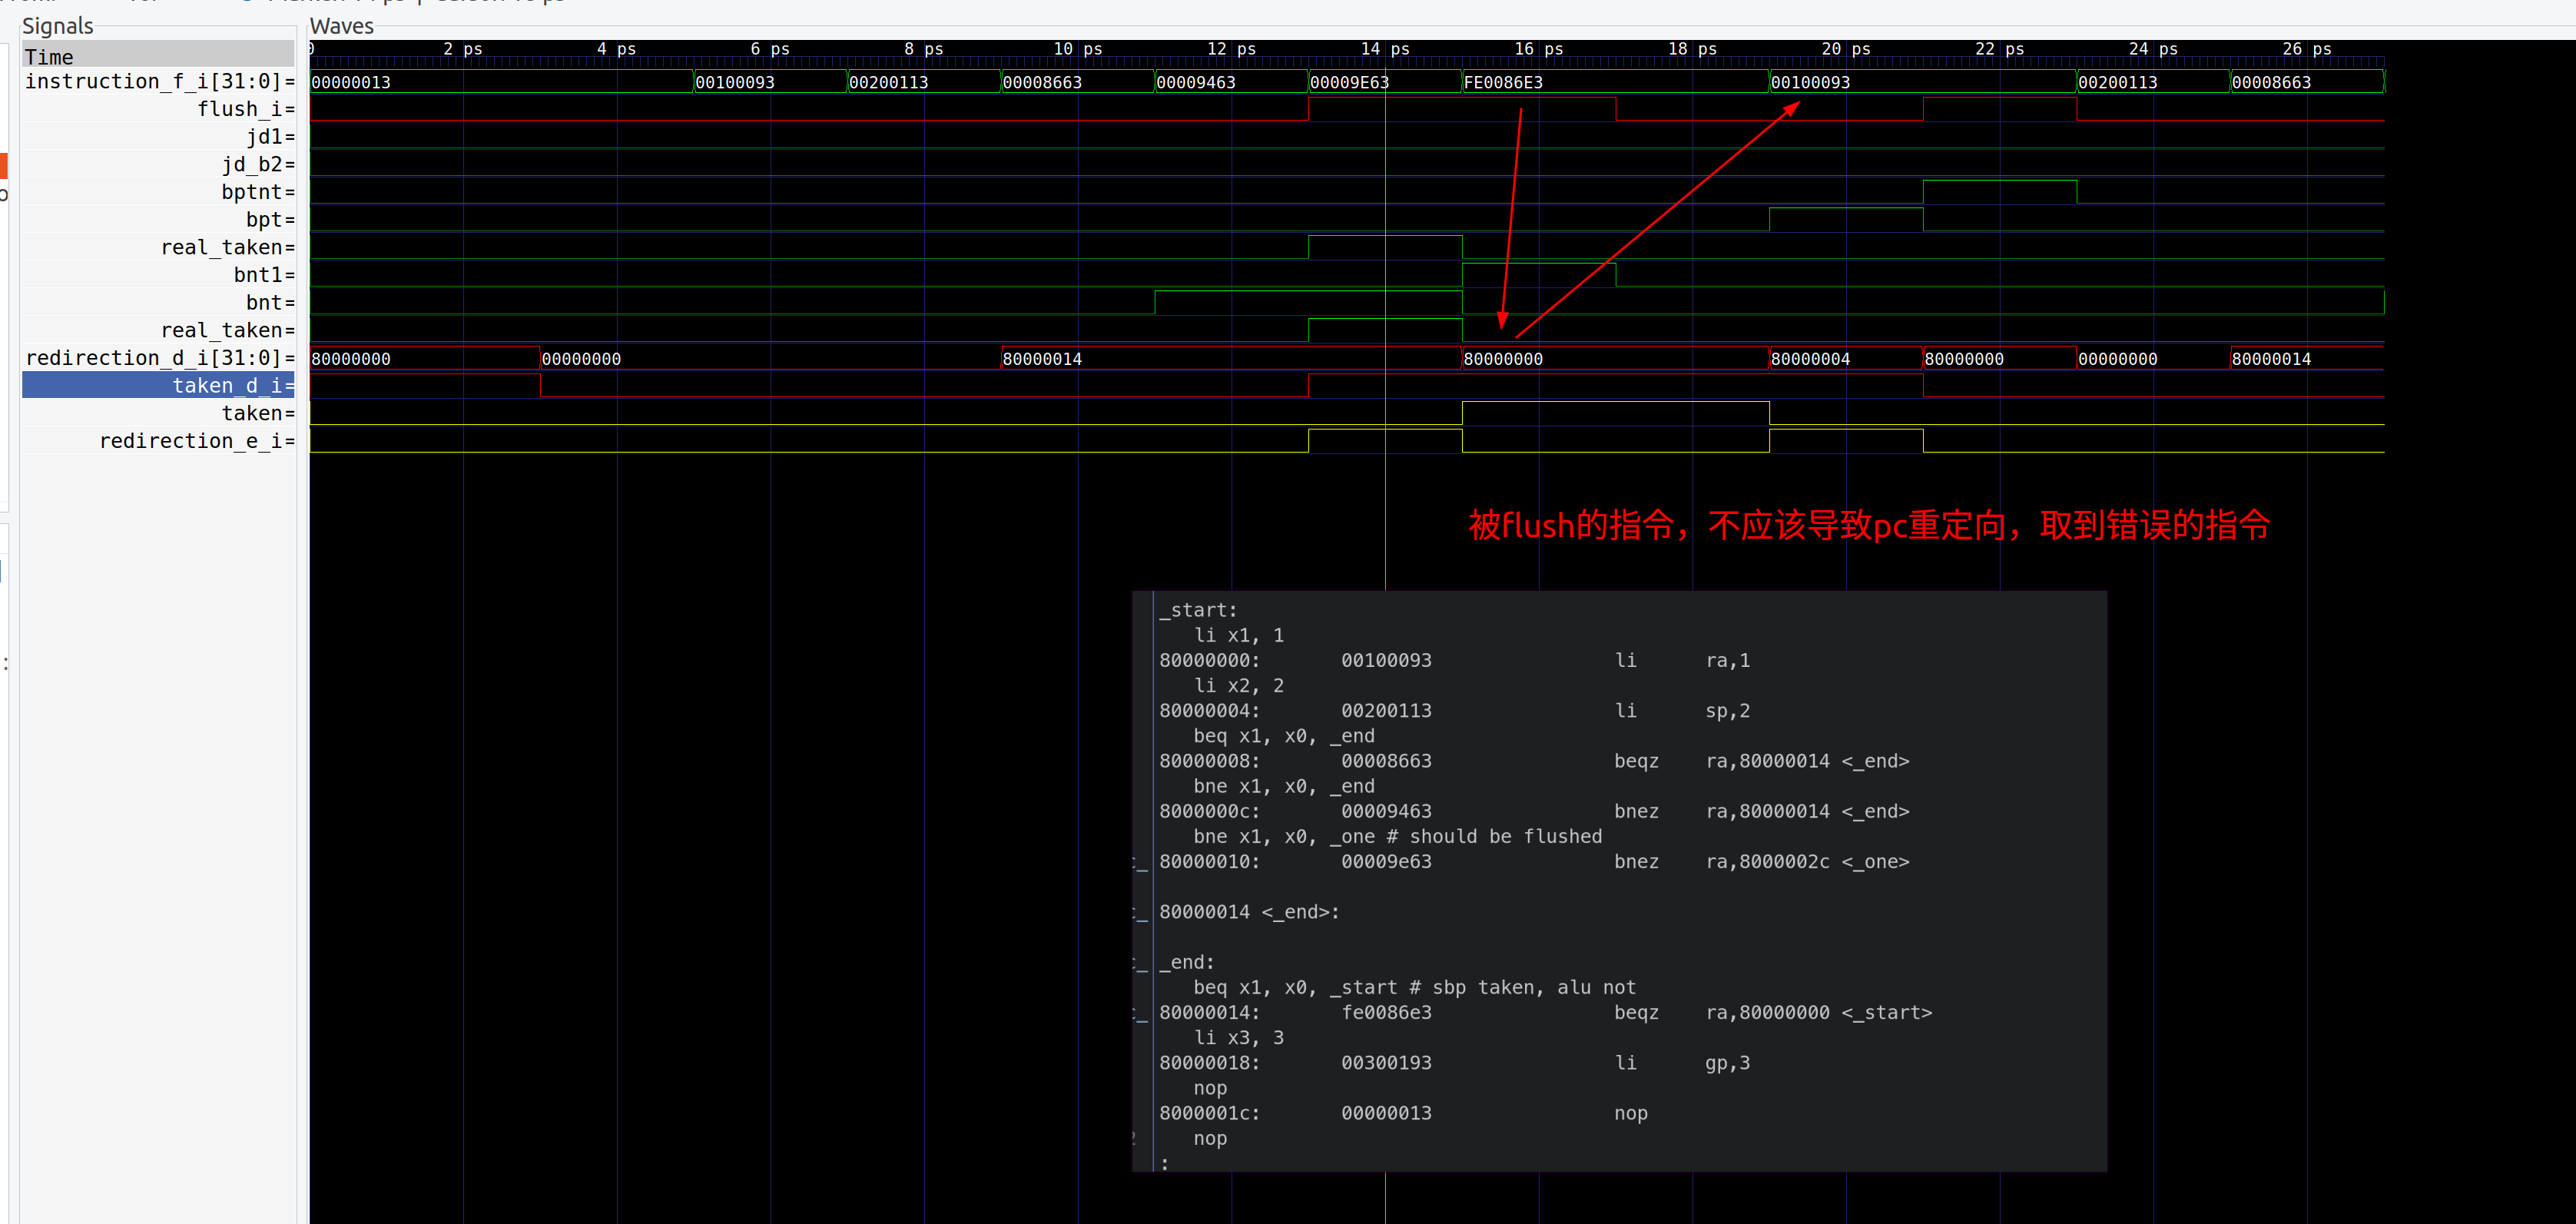
- bug 修复:在计算taken的时候,必须考虑flush信号
1
2// pipelineID.v
assign taken_d_o = ~resetn_delay | ptnt_e_i | redirection_e_i | (~flush_i & taken );
- bug 描述:ID 需要计算重定向pc跟taken,目前ID
Stage在计算taken的时候,没有考虑ID Stage的flush信号,
导致被flush的指令,其静态分支预测的地址,被作为重定向pc,取到了错误的指令
乘法指令产生的stall,没有正确地被拉低
- bug
描述:乘法指令执行4个周期,因此需要stall流水线,目前代码里乘法指令stall不能够正确的
被拉低,导致后续指令一直stall。 其原因在于hazard
unit的代码里,通过
is_m跟fin来判断乘法执行的执行状态, 但是fin为高的时候,前面的is_m也是为高,所以Linst_st_keep一直为高1
2
3
4
5
6
7
8
9// hazard.v
if((~flush)&(is_d|is_m))
begin
Linst_st_keep<=1'b1;
end
else if(fin)
begin
Linst_st_keep<=1'b0;
end - bug
修复:将
fin的判断放到前面去,这样Linst_st_keep可以被正确地拉低1
2
3
4
5
6
7
8
9// hazard.v
if(fin)
begin
Linst_st_keep<=1'b0;
end
else if((~flush)&(is_d|is_m))
begin
Linst_st_keep<=1'b1;
end
- bug
描述:乘法指令执行4个周期,因此需要stall流水线,目前代码里乘法指令stall不能够正确的
被拉低,导致后续指令一直stall。 其原因在于hazard
unit的代码里,通过
乘法状态机不是从0开始,从1开始,导致周期错误
- bug
描述:如下面波形图所示,执行完一个乘法之后,其下一次乘法的状态机不是从0开始,
是从1开始的,导致下次乘法只执行了3个周期
- bug
修复:将判断条件从
11变成10,这样每个乘法都是4个周期1
2
3
4
5
6
7
8
9
10
11
12
13// pipelineID.v
else if(aluOperation_o [10]|aluOperation_o [11]|aluOperation_o [12]|aluOperation_o [13])
begin
mul_state<=mul_next_state;
if(mul_state==2'b10) // bug fix
begin
fin<=1'b1;
end
else
begin
fin<=1'b0;
end
end
- bug
描述:如下面波形图所示,执行完一个乘法之后,其下一次乘法的状态机不是从0开始,
是从1开始的,导致下次乘法只执行了3个周期
乘法运算
mulh错误,错误选择了低32bits结果- bug
描述:alu错误地选择了乘法器的结果,应该选择高32bits,但是选择了低32bits
- bug 修复:对于
mulh,mulhu,mulhsu指令,需要选择乘法器高32bits结果1
2
3
4
5
6
7
8
9// alu.v
assign ALUout= ({32{sub_op|add_op}}&add_ans[31:0])|
({32{rem_op|remu_op}}&rem_ans)|
({32{div_op|divu_op}}&div_ans) |
({32{mul_op}}&mul_low) |
({32{mulh_op|mulhsu_op|mulhu_op}}&mul_high) | // bug fix: choose msb, not lsb
({32{or_op|and_op|xor_op}}&log_ans) |
({32{sll_op|srl_op|sra_op}}&sft_ans) |
({32{sltu_op|slt_op}}&{31'b0,add_ans[32]});
- bug
描述:alu错误地选择了乘法器的结果,应该选择高32bits,但是选择了低32bits
alu判断乘法指令类型错误
- bug
描述:alu错误的判断了
mulhu跟mulhsu,把二者搞反了
- bug 修复:将判断逻辑替换即可
1
2
3
4
5
6
7
8
9
10
11
12diff --git a/src/verification/vsrc/alu.v b/src/verification/vsrc/alu.v
index c86bb04..29cd15a 100644
--- a/src/verification/vsrc/alu.v
+++ b/src/verification/vsrc/alu.v
@@ -41,8 +41,8 @@ assign slt_op= ALUop[8];
assign sltu_op= ALUop[9];
assign mul_op= ALUop[10];
assign mulh_op= ALUop[11];
-assign mulhsu_op= ALUop[12];
-assign mulhu_op= ALUop[13];
+assign mulhu_op= ALUop[12];
+assign mulhsu_op= ALUop[13];
- bug
描述:alu错误的判断了
乘法多计算了一个周期
- bug
描述:乘法本来应该在四个周期内计算出结果,但是目前乘法由于其state在ID计算,再通过pipeline
register传递给EXE stage, 导致乘法实际上需要5个周期才可以得到对应的结果

- bug
修复:修改
multi乘法的时序,将结果提前一个周期计算出来1
2
3
4
5
6
7
8diff --git a/src/verification/vsrc/multi.v b/src/verification/vsrc/multi.v
index 57fa64b..ce645f0 100644
--- a/src/verification/vsrc/multi.v
+++ b/src/verification/vsrc/multi.v
+wire [63:0] real_calculation;
+assign real_calculation = ({64{state==2'b11}} & {ans_temp+{mul16ans,32'b0}});
-assign prod=ans_temp;
+assign prod=real_calculation;
- bug
描述:乘法本来应该在四个周期内计算出结果,但是目前乘法由于其state在ID计算,再通过pipeline
register传递给EXE stage, 导致乘法实际上需要5个周期才可以得到对应的结果
ID Stage write_back_enable 没有考虑stall的情况
- bug 描述:ID
Stage在执行乘法指令时,应该只在乘法第四个周期才将write_back_enable拉高;
但是目前ID Stage在前三个周期都将write_back_enable拉高了;
这样会导致hazard unit错误地计算bypass信号
- bug 修复:在ID
Stage计算write_back_enable的时候,需要判断乘法、除法指令的周期,只在最后一个周期拉高
1
2
3
4
5
6
7
8
9
10
11
12
13// pipelineID.v
diff --git a/src/verification/vsrc/pipelineID.v b/src/verification/vsrc/pipelineID.v
--- a/src/verification/vsrc/pipelineID.v
+++ b/src/verification/vsrc/pipelineID.v
+ wire wb_en_mul_div;
+ // write back enable with mul and div operation
+ assign wb_en_mul_div = (~is_m_d_o & ~is_d_d_o & wb_en_o)|
+ ( is_m_d_o & (mul_state==2'b11))|
+ ( is_m_d_o & div_last);
- reg_write_en_d_o <= wb_en_o;
+ reg_write_en_d_o <= wb_en_mul_div;
- assign dst_en_d_o=wb_en_o;
+ assign dst_en_d_o=wb_en_mul_div;
- bug 描述:ID
Stage在执行乘法指令时,应该只在乘法第四个周期才将write_back_enable拉高;
但是目前ID Stage在前三个周期都将write_back_enable拉高了;
这样会导致hazard unit错误地计算bypass信号
乘法器计算符号的时候,没有考虑乘数为零的情况
- bug
描述:乘法器计算的时候,如果有一个乘数为零,其结果的符号位应该为零,
但是当前乘法器在计算符号位的时候,没有考虑乘数为零的情况,导致符号位计算错误

- bug
修复:在计算符号位的时候,判断乘数,如果有乘数为零,则强制符号位为零
1
2
3
4
5
6
7
8
9diff --git a/src/verification/vsrc/multi16.v b/src/verification/vsrc/multi16.v
--- a/src/verification/vsrc/multi16.v
+++ b/src/verification/vsrc/multi16.v
@@ -310,10 +310,9 @@ half_adder ha30_2_0(.ain(c29_1_0), .bin(s30_1_0), .sout(ans1[30]), .cout(c30_2_
-assign sign_out=(ss&(ain[15]^bin[15])) |
+assign sign_out = (ain==0 | bin ==0) ? 0 : (ss&(ain[15]^bin[15])) |
(su&ain[15]) |
(us&bin[15]);
- bug
描述:乘法器计算的时候,如果有一个乘数为零,其结果的符号位应该为零,
但是当前乘法器在计算符号位的时候,没有考虑乘数为零的情况,导致符号位计算错误
除法器bug
- bug 描述:当前测试版本除法器bug较多,例如不能正确计算除法结果、 结果出现负数时会比正确答案小1;
- bug 修复:已经上报给淼鸿、并且已经解决所有bug
CSR wdata选择错误
bug 描述:写入到CSR寄存器的时候,
CSR[x] = rs1,当前代码错误地选择了ALU的计算结果作为写回值1
2
3
4
5
6
7// file top.v
CSR csru(
.raddr ( CSR_addr_d_o_w ),
.waddr ( CSR_addr_d_o ),
.wdata ( alu_calculation_e_o ), // wrong
.resetn ( resetn ),
.clk ( clk ),bug 修复:写入到CSR的数据选择rs1即可,
CSR[x] = rs11
2
3
4
5
6
7
8// file top.v
CSR csru(
.raddr ( CSR_addr_d_o_w ),
.waddr ( CSR_addr_d_o ),
.wdata ( ),
.resetn ( resetn ),
.clk ( clk ),
概括
- bug 描述:
- bug 修复:
测试通过的 riscv-tests
- Immdiate Type
- Register-Type
- Branch-Type
- Memory-Type
- Multiple
- Compressed
测试通过截图
Immdiate-Type
- ADDI
- SLTI
- SLTIU
- XORI
- ORI
- ANDI
- SLLI

- SRLI
- SRAI
- AUIPC
- LUI
Register-Type
- ADD
- SUB
- SLT
- SLTU
- XOR
- OR
- AND
- SLL

- SRL
- SRA
Branch-Type
- JALR
- JAL
- BEQ
- BNE
- BLT
- BGE
- BLTU
- BGEU
Memory-Type
- LB
- LH
- LW

- LBU
- LHU
- SB

- SH
- SW
Multiple
- DIV
- DIVU
- MUL
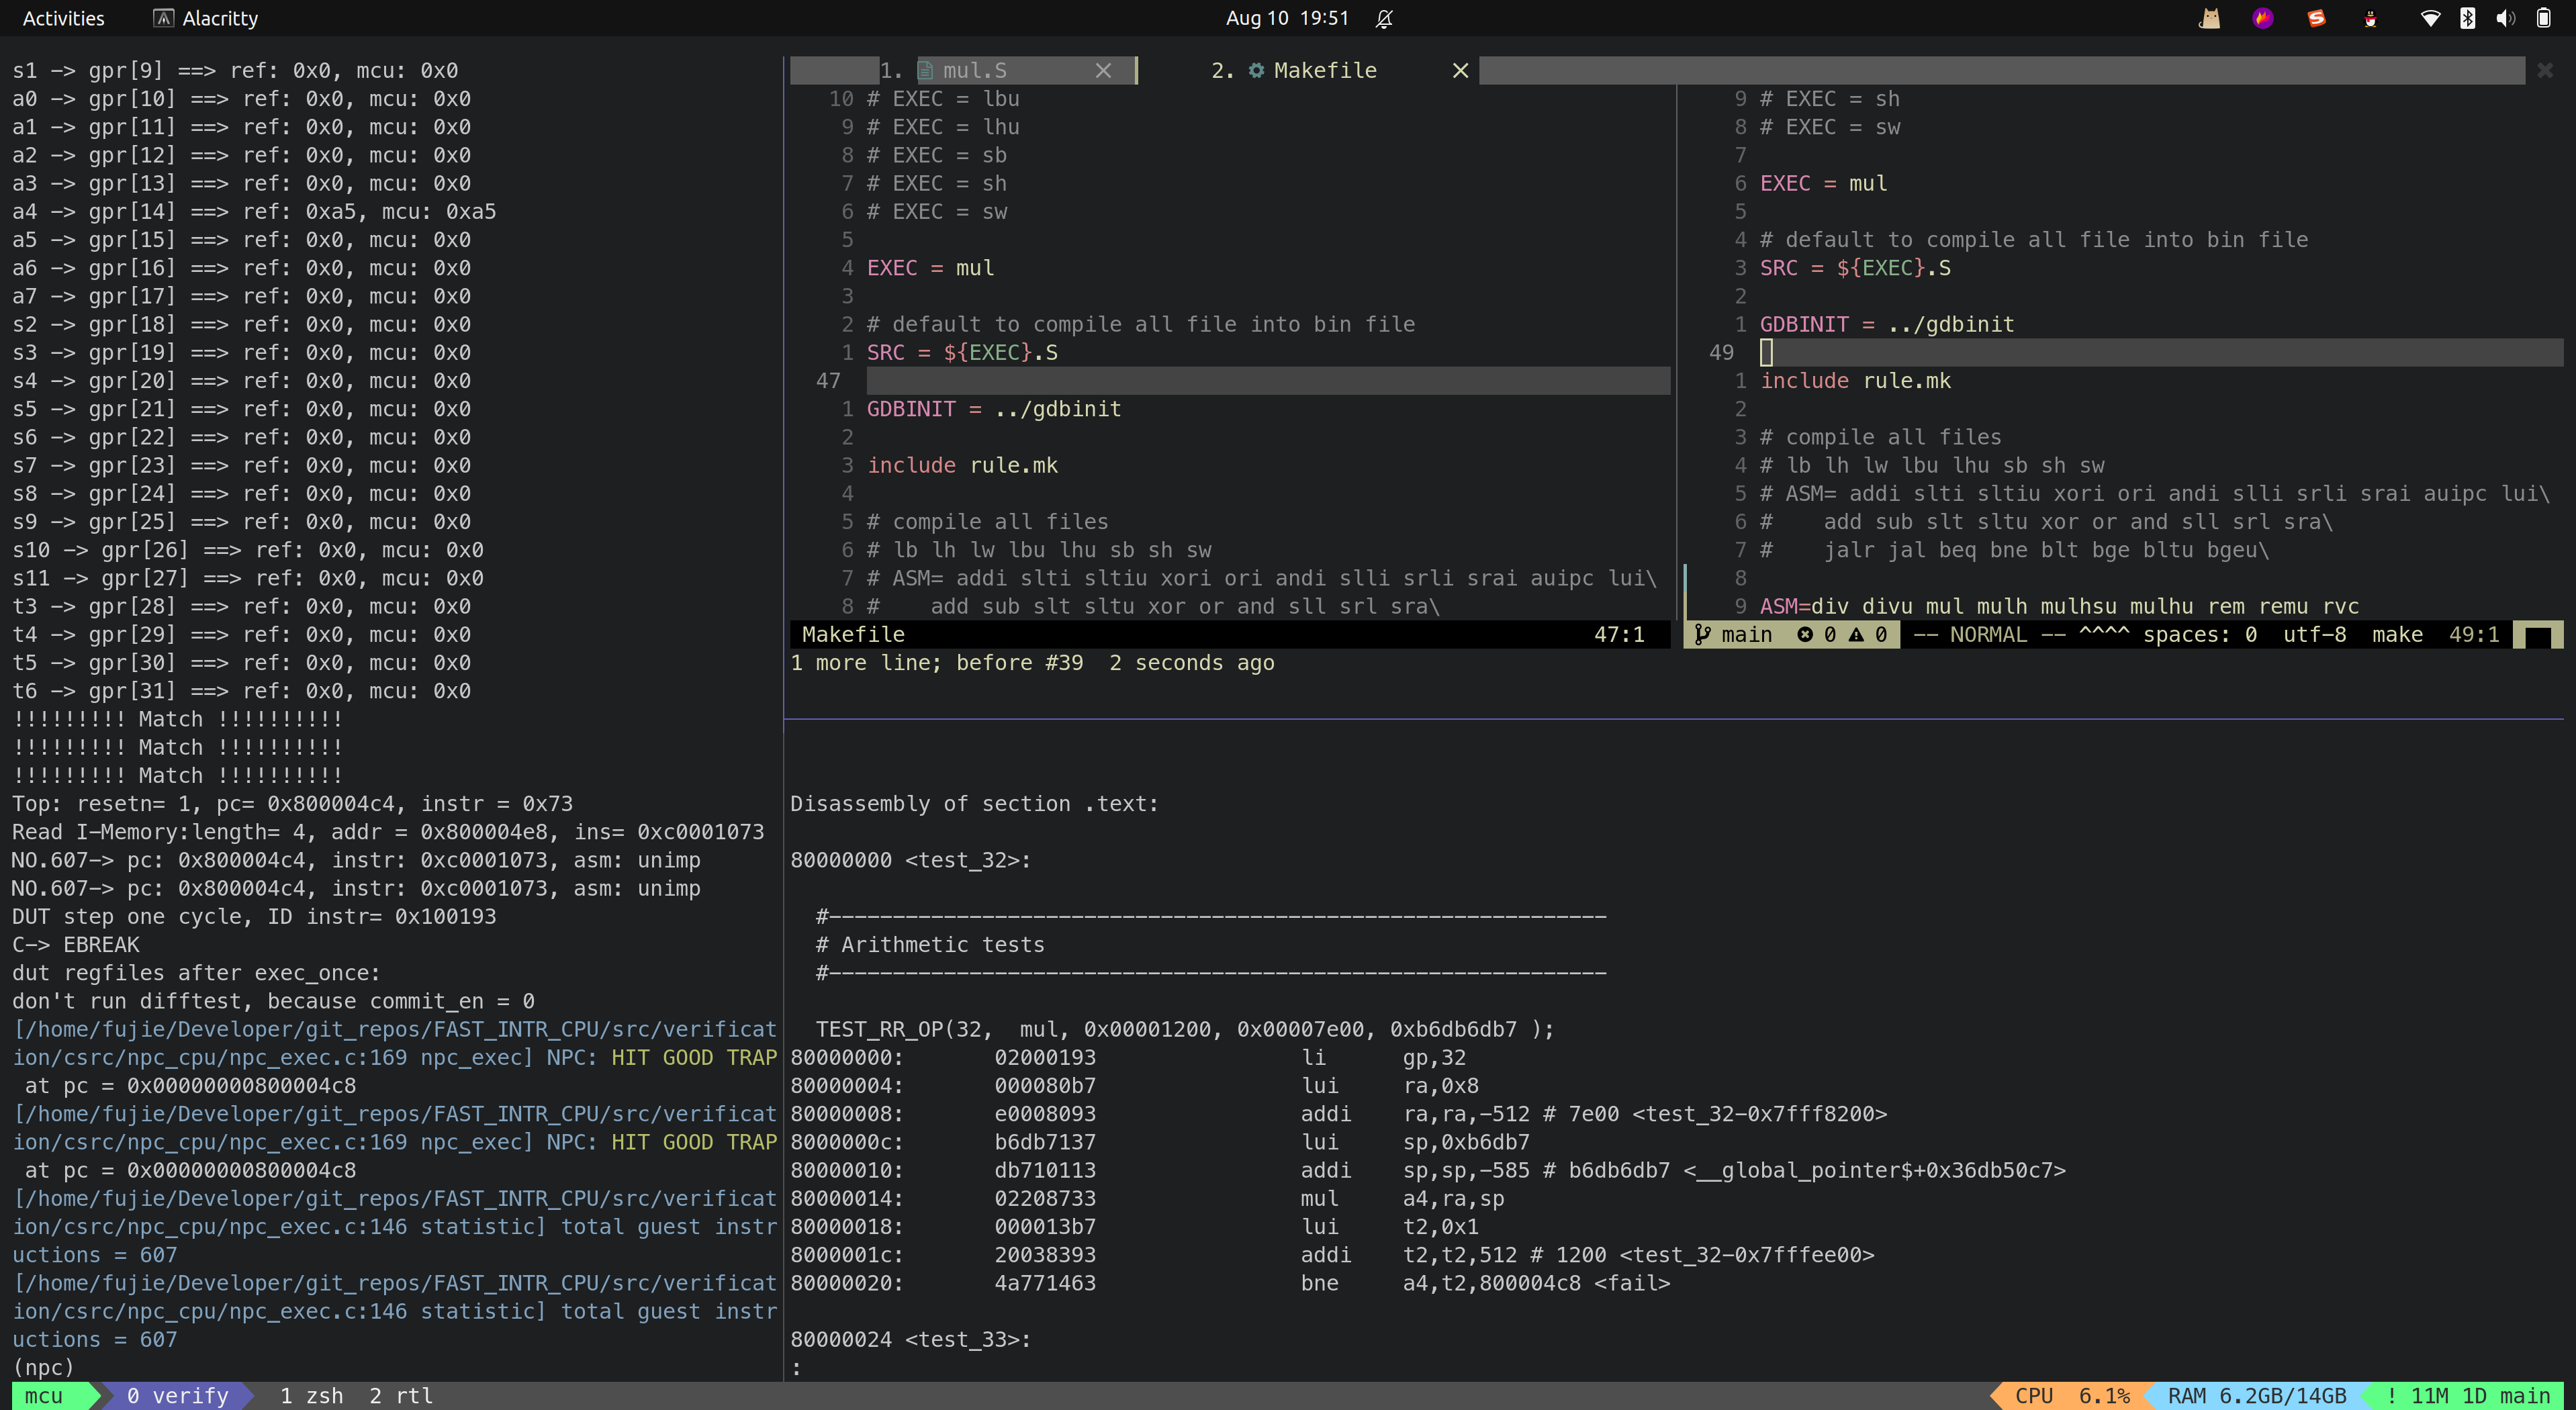
- MULH

- MULHSU
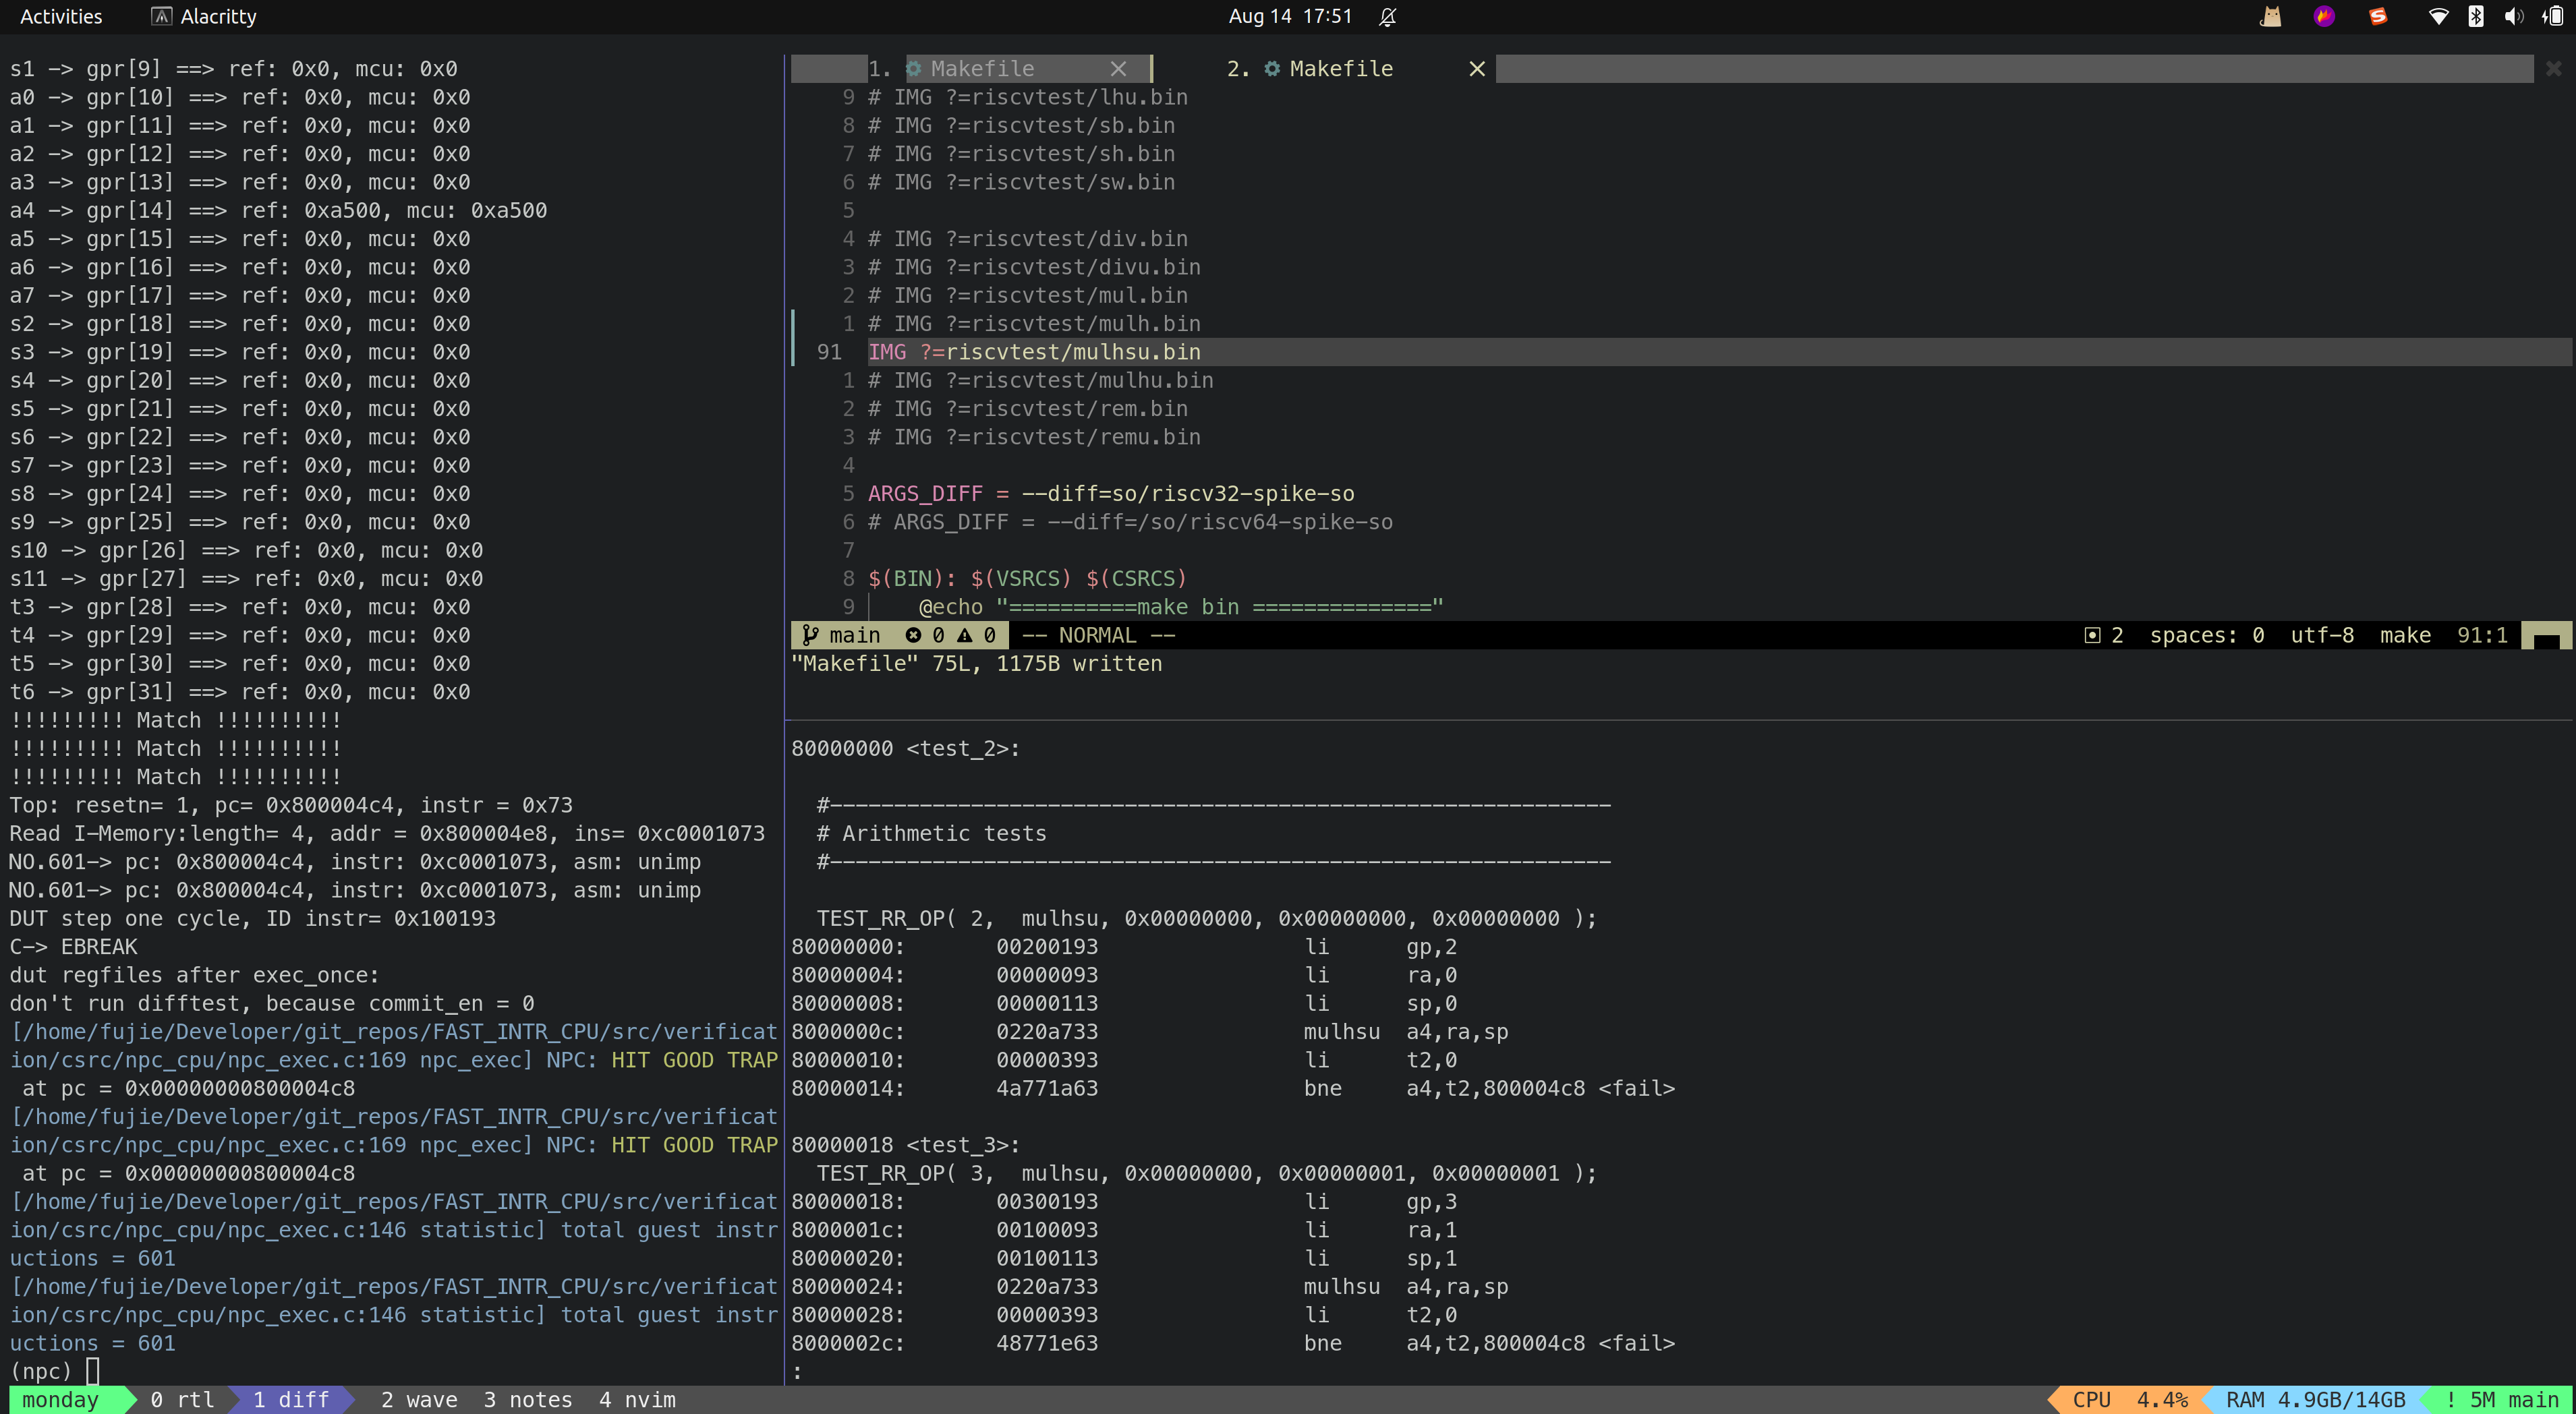
- MULHU
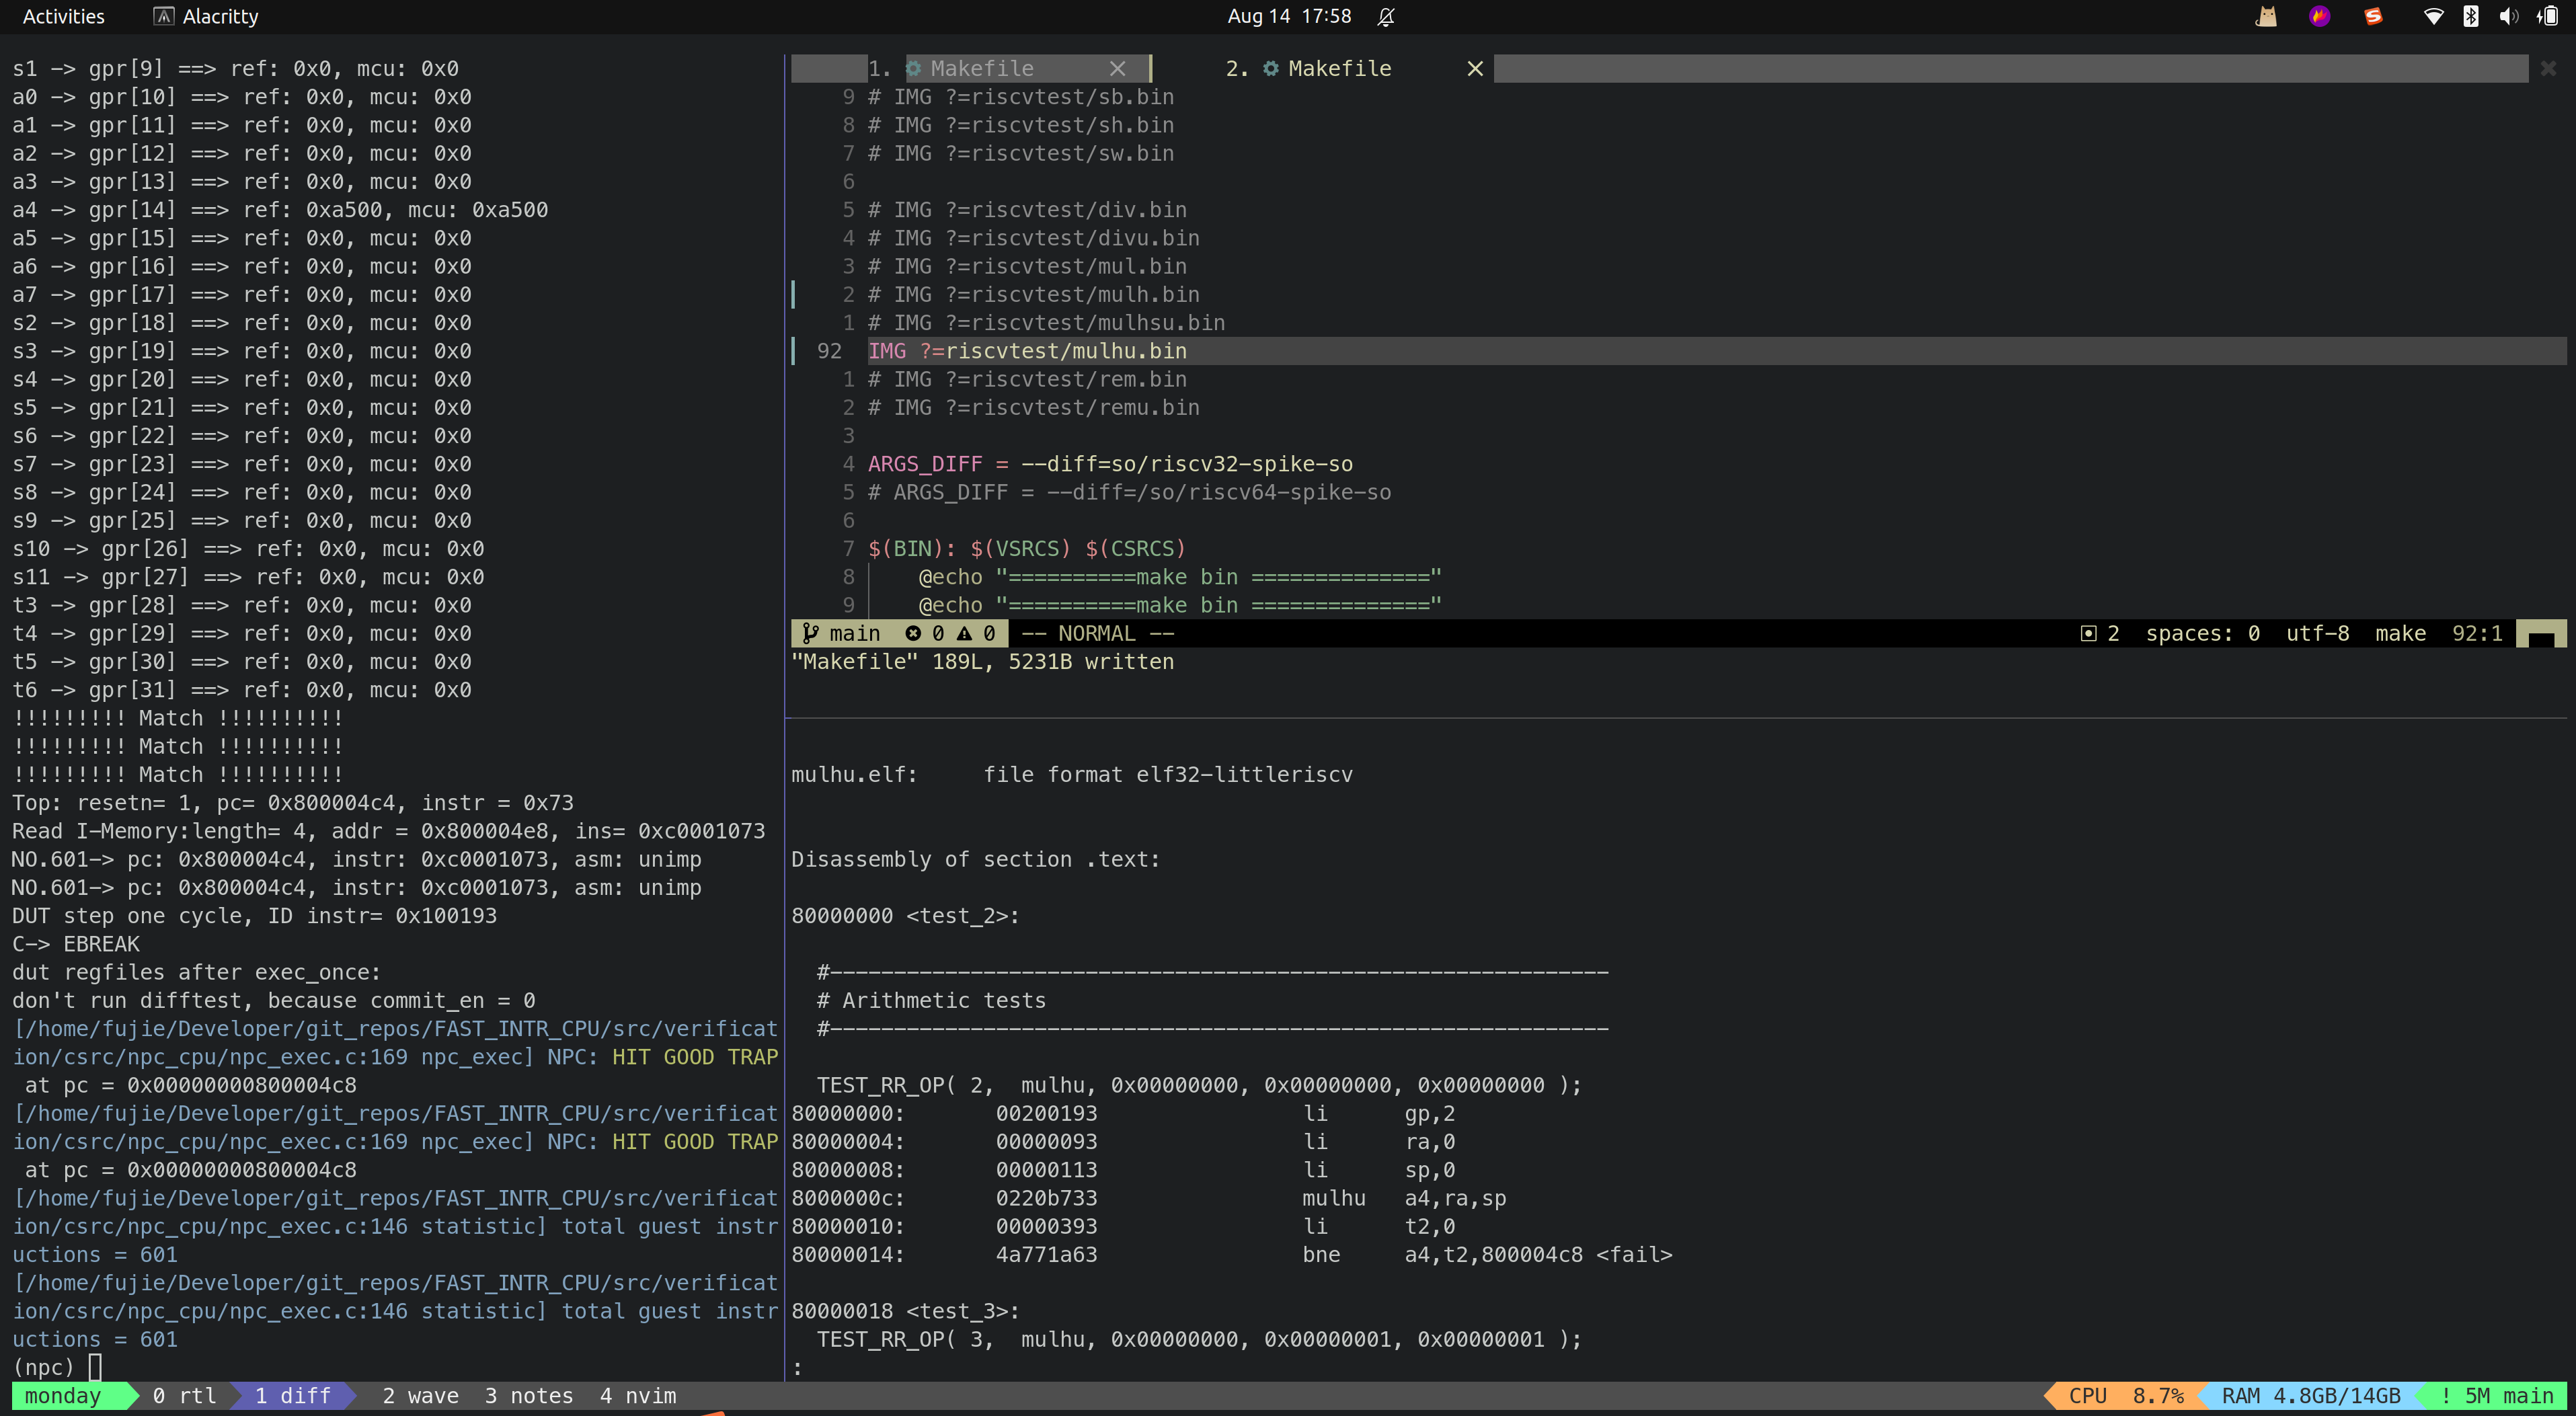
- REM
- REMU
Compressed
- RVC
编译32 bits的reference model
Q: 为什么需要32 bits的reference model?
A: 在进行riscv-tests测试的时候,针对addi, xor等测试集,64
bits的reference model勉强可以用(在使用的时候,针对64bits的reference
model, 我们可以取其寄存器低32bits来同MCU进行比较);
但是在遇到sra,srl等指令的时候,就不能这么操作了:因为64bits的reference
model,其最高位是跟32bits的MCU是不同的,例如:
1 | lui ra, 0x80000 |
在32bits的MCU上:ra=0x80000000; a4=0x40000000;
在64bits的Ref上:ra=0xffffffff80000000; a4=0x7fffffffc0000000;
即使取Ref的低32bits,也会有:0xc0000000 != 0x40000000 
编译32bits reference model遇到的问题
目前DIFFTEST框架使用的是64bits的Spike作为reference model,在引入32bits的reference model时做了如下尝试:
尝试编译32bits的NEMU作为reference model,失败
- 在NEMU的GitHub主页上,给出了编译的教程,但是该教程只针对64bits的版本
- 尝试根据上述教程做修改编译32bits的NEMU作为reference model失败,因为官方给出的NEMU只包含64bits版本的实现
- 32bits的NEMU没有给出具体实现,因为一直以来一生一芯的培养过程当中,主要的培养内容就是让学生实现32bits版本的NEMU, 因此NEMU自然不会给出32版本的NEMU实现
- 另一方面,当前使用NEMU编译得到的64bits 的reference model在接入到DIFFTEST框架之后,会出现segment fault,目前还没有debug出原因。
尝试编译32bits的spike作为reference model,没有进展
- 根据Spike
GitHub主页
上的教程,更改了XLEN版本,进行编译,但是编译得到的Spike还是64bits的
- 根据Spike
GitHub主页
上的教程,更改了XLEN版本,进行编译,但是编译得到的Spike还是64bits的
可行的思路:在查资料的时候找到了一生一心第六期的讲义, 该讲义中提到了在编写32bits的NMEU的时候,可以使用Spike作为32bit是的reference moedel, 所以打算按照该讲义搭建一生一芯第六期的开发环境,然后在该开发环境里生成32bits的Spike reference model。
PS:感谢石峰同学在搭建Difftest框架时的帮助,例如MCU接入Difftest测试框架、编译Reference Model
受reference model导致测试不通过的测试集
- 右移指令
- SH, SB
- 其他未测试过的指令集,也有可能受reference model原因导致测试不通过
编译32版本的spike作为reference model
参考了一生一心第六期的讲义里的makefile,通过make -nB可以看到每make执行的每一条指令;
回到之前的difftest
框架中,参考上述的make指令即可编译出32bits的spike作为reference
model
1 | cd nemu/tools/spike-diff |
除此之外,需要将difftest里CPU_state里的gpr跟pc都更改为32bits位宽
1 | typedef struct { |
回归测试
之前测试riscv-tests时都是手动在Makefile里指定要测试的测试集,测试集不通过时会发现bug;一直修改bug直到通过测试集; 为了避免修改之后之前通过的测试集反而通过不了了,每次修改之后都应该把所有的测试集跑一遍,保证之前通过的测试集依然能够通过
目录结构介绍
1 | ├── build |
本目录格式如上所示,各个部分介绍如下:
- build:执行make命令后会编译可执行文件跟中间文件,这些文件都放在build目录下
- csrc:difftest相关的代码
- vsrc:MCU的所有verilog文件
- riscvtest:汇编测试文件,在该目录下可以编译所有的汇编文件得到可执行的bin文件
- so:golden reference存放目录,该目录下有32位的spike.so文件
- result.log:对所有的riscvtest测试集做回归方针,每个测试集是否通过会记录在该文件下
- dump.vcd:波形图
编译汇编文件
- 进入到riscvtest目录下
- 编译一个文件:在其Makefile中用EXEC指定想要编译的汇编文件名
make:编译该汇编文件得到elf文件,并且得到bin文件make code:查看反汇编文件的内容
- 编译所有文件:
make getAll
仿真测试
- 进入到verification目录下
- 测试一个测试集:在Makefile中用IMG指定想要测试的测试集,然后
make run即可运行difftest,并且进入到debug模式si可以进行单步调试,逐行执行指令c可以执行所有指令,直到所有指令执行完毕、或者出现错误
- 回归测试(测试所有测试集): 所有测试集通过的情况会记录在
1
make test_all
result.log文件中 > PS: 测试一个测试集跟测试所有测试集,需要编译的difftest有些许不同,因此在切换测试模式之前,需要先make clean - 查看波形:
make waveform,即可通过gtkwave打开仿真生成的波形
语法测试
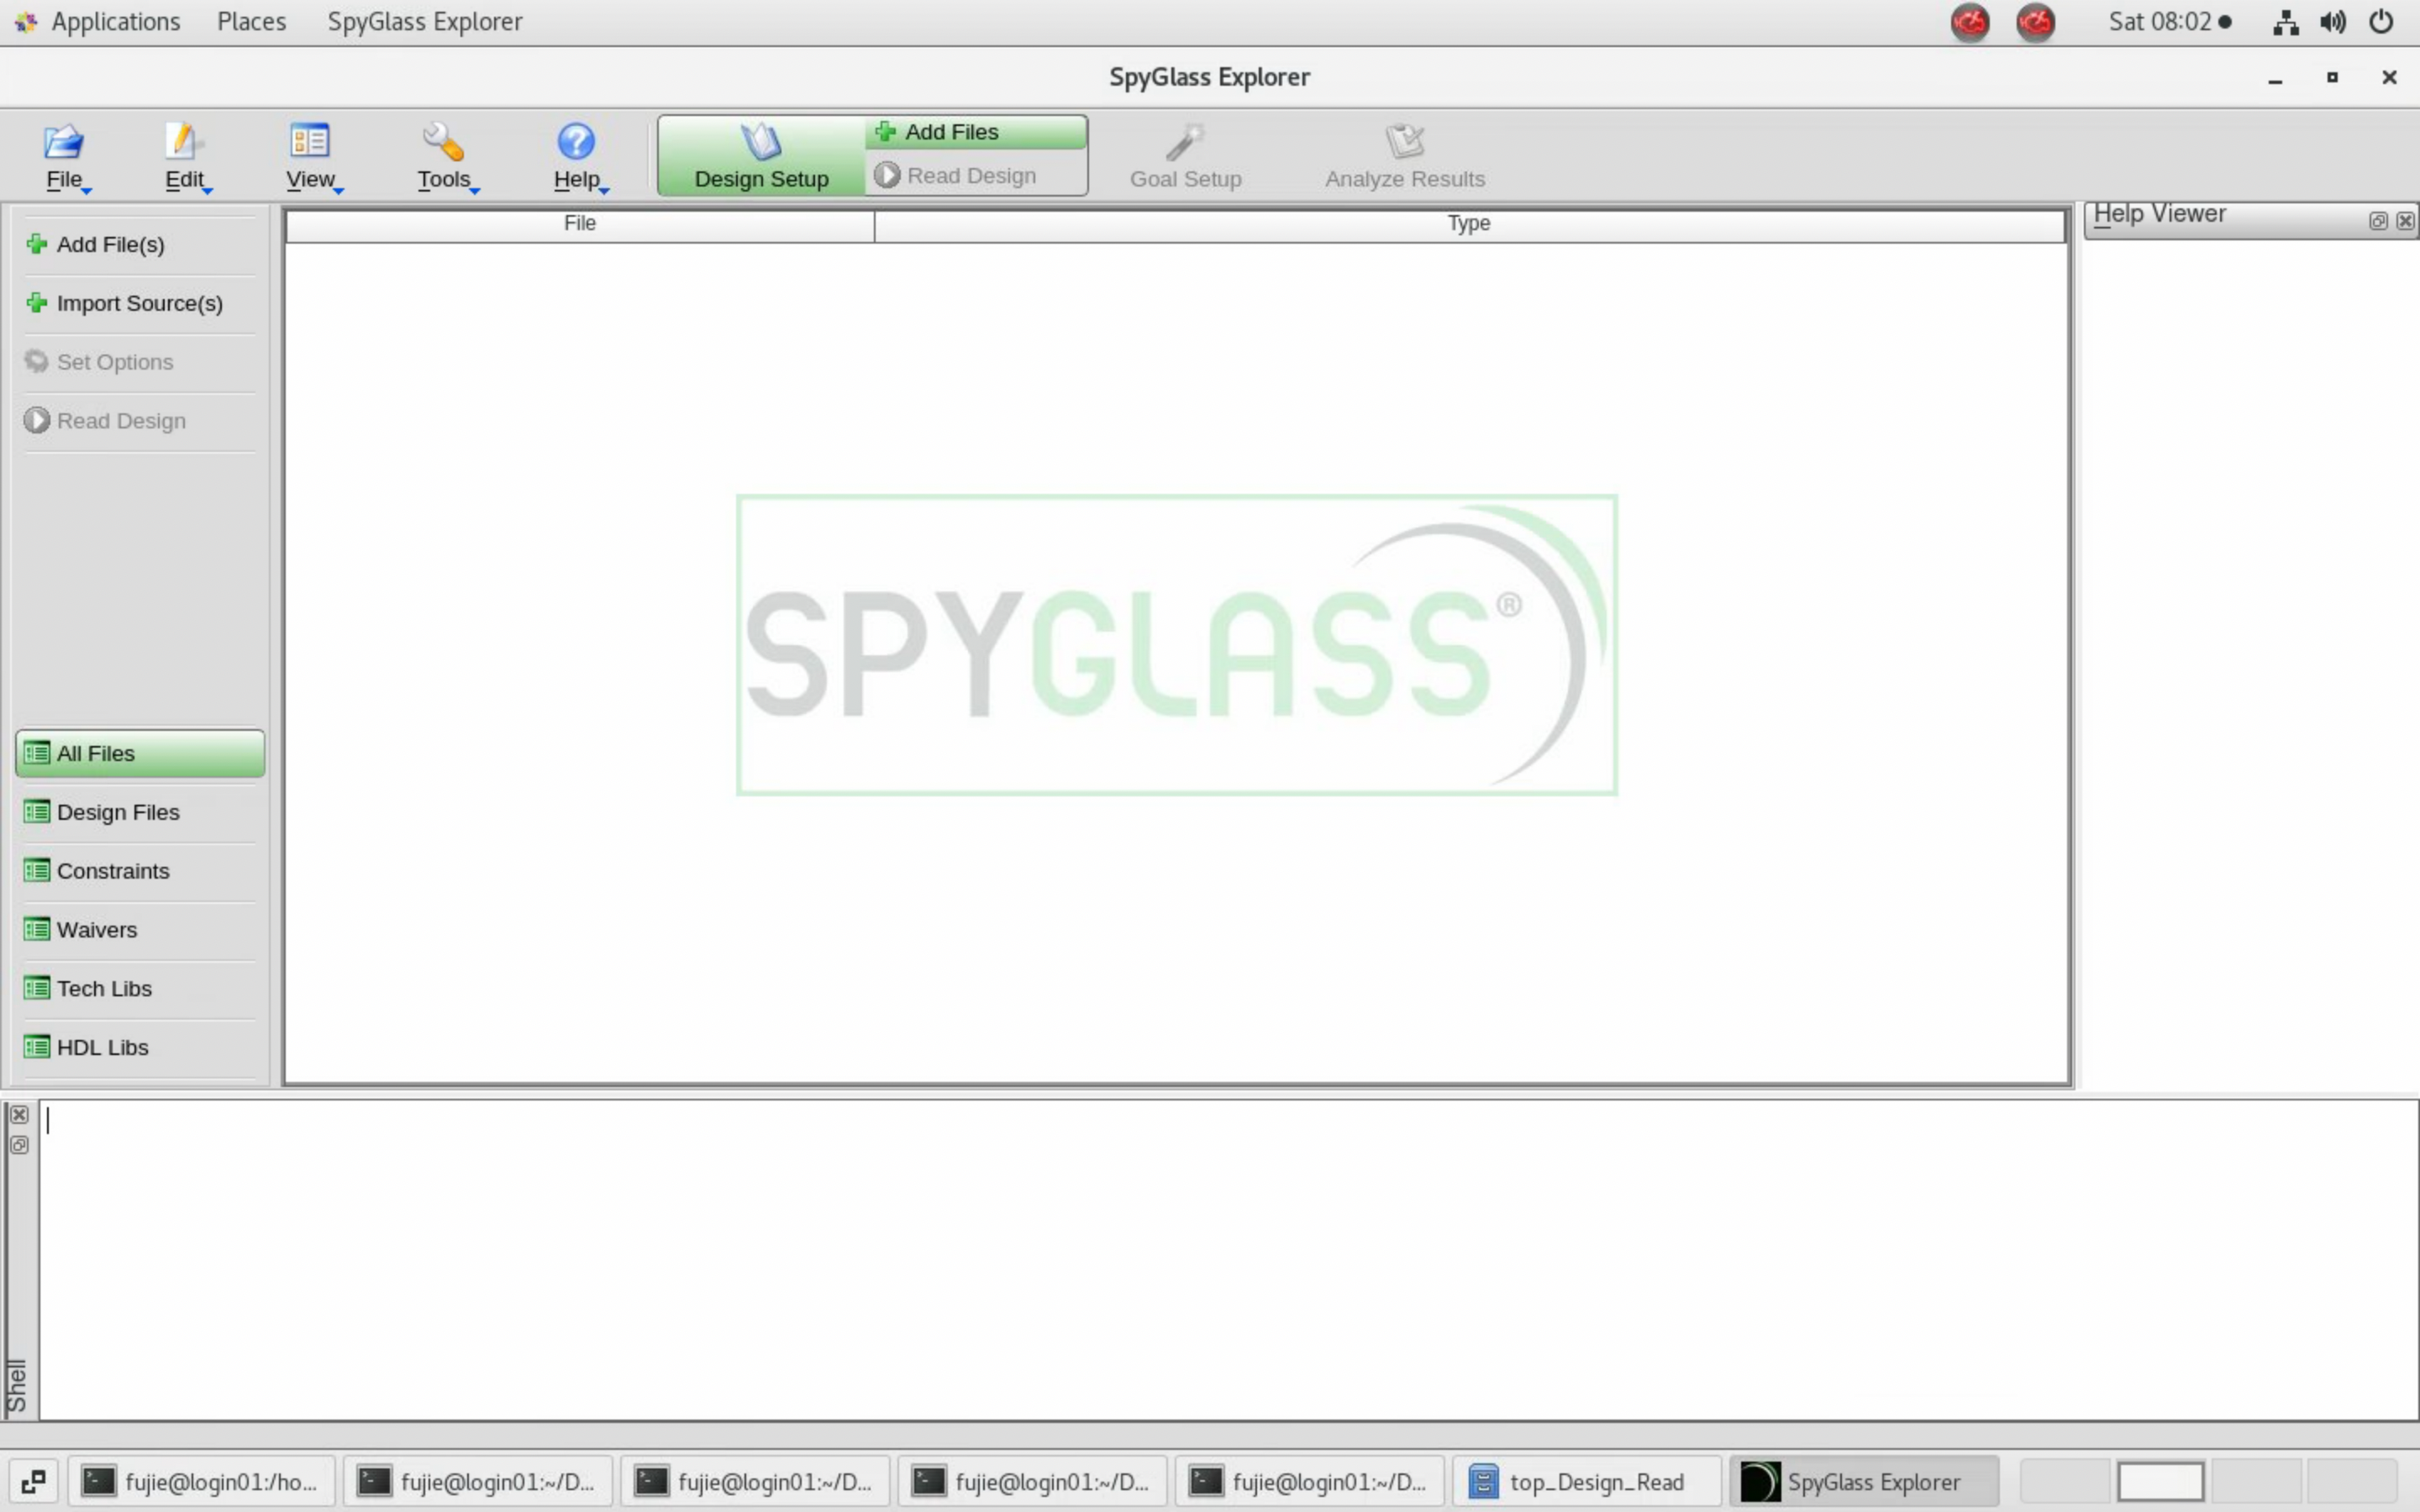
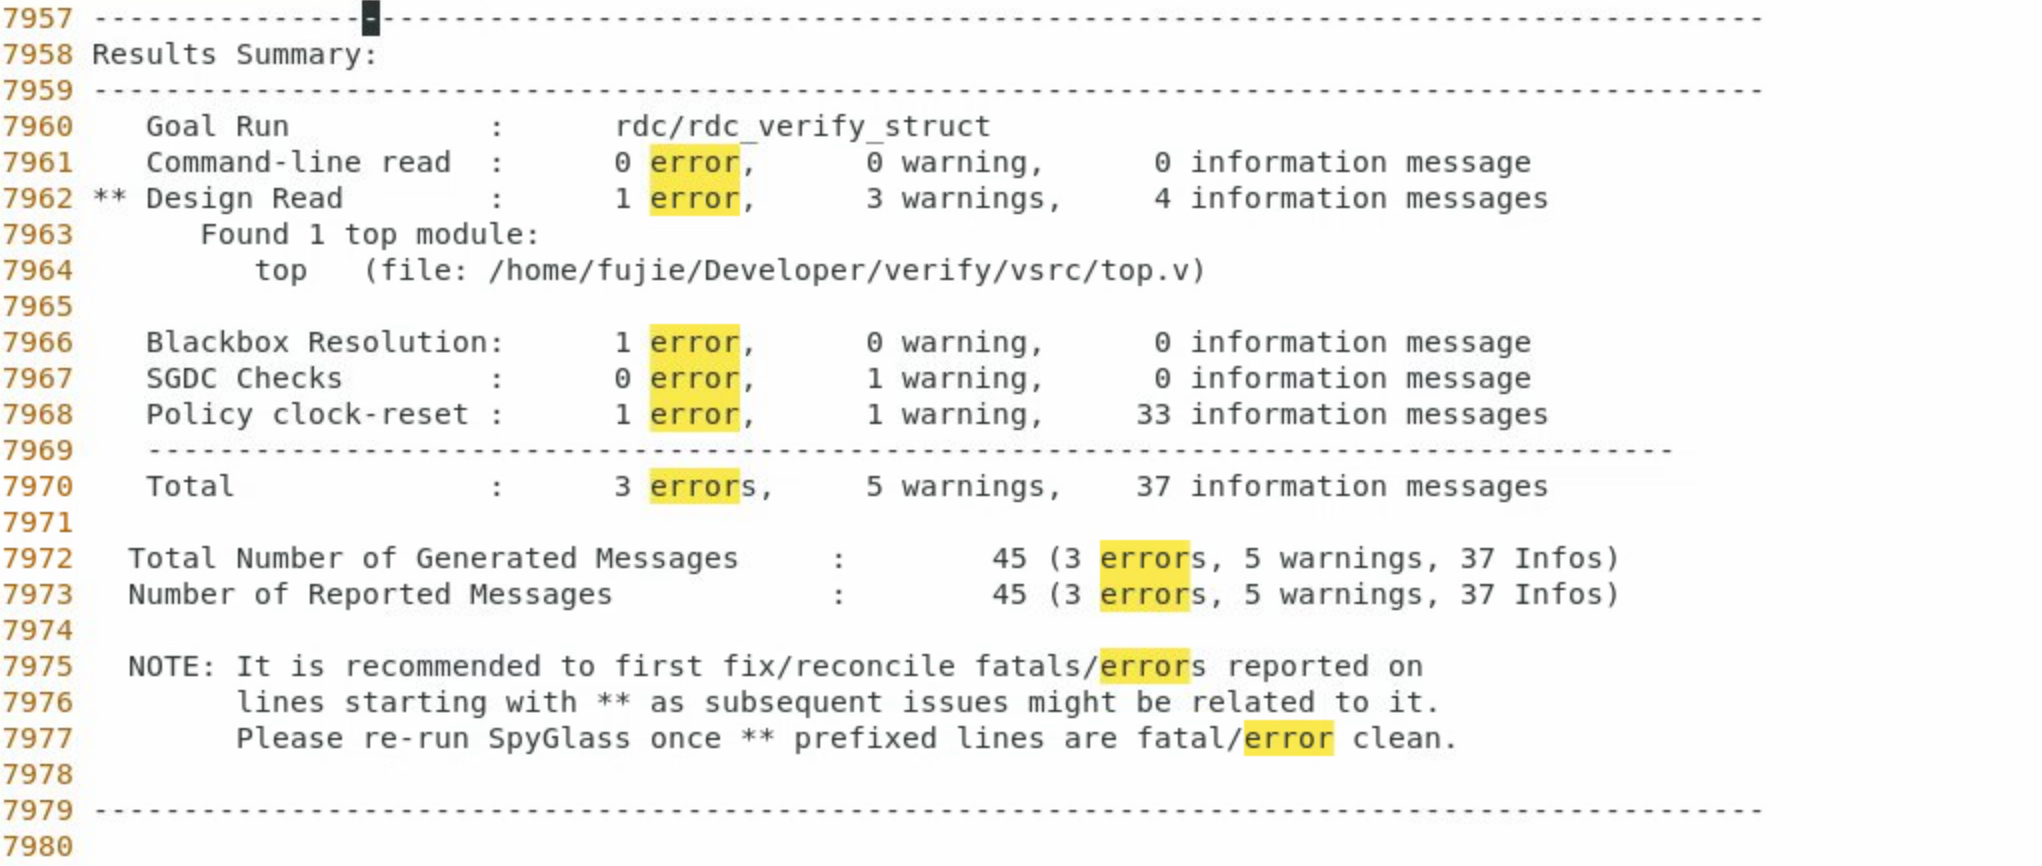
Spyglass检查语法错误
- Top文件里,变量先使用后定义导致的错误
- Difftest函数导致的报错
- 最终的测试报告
项目地址:
/home/fujie/Developer/verify
Verilator检查语法错误
发现的语法错误
1
verilator --lint-only -Wall --top-module top top.
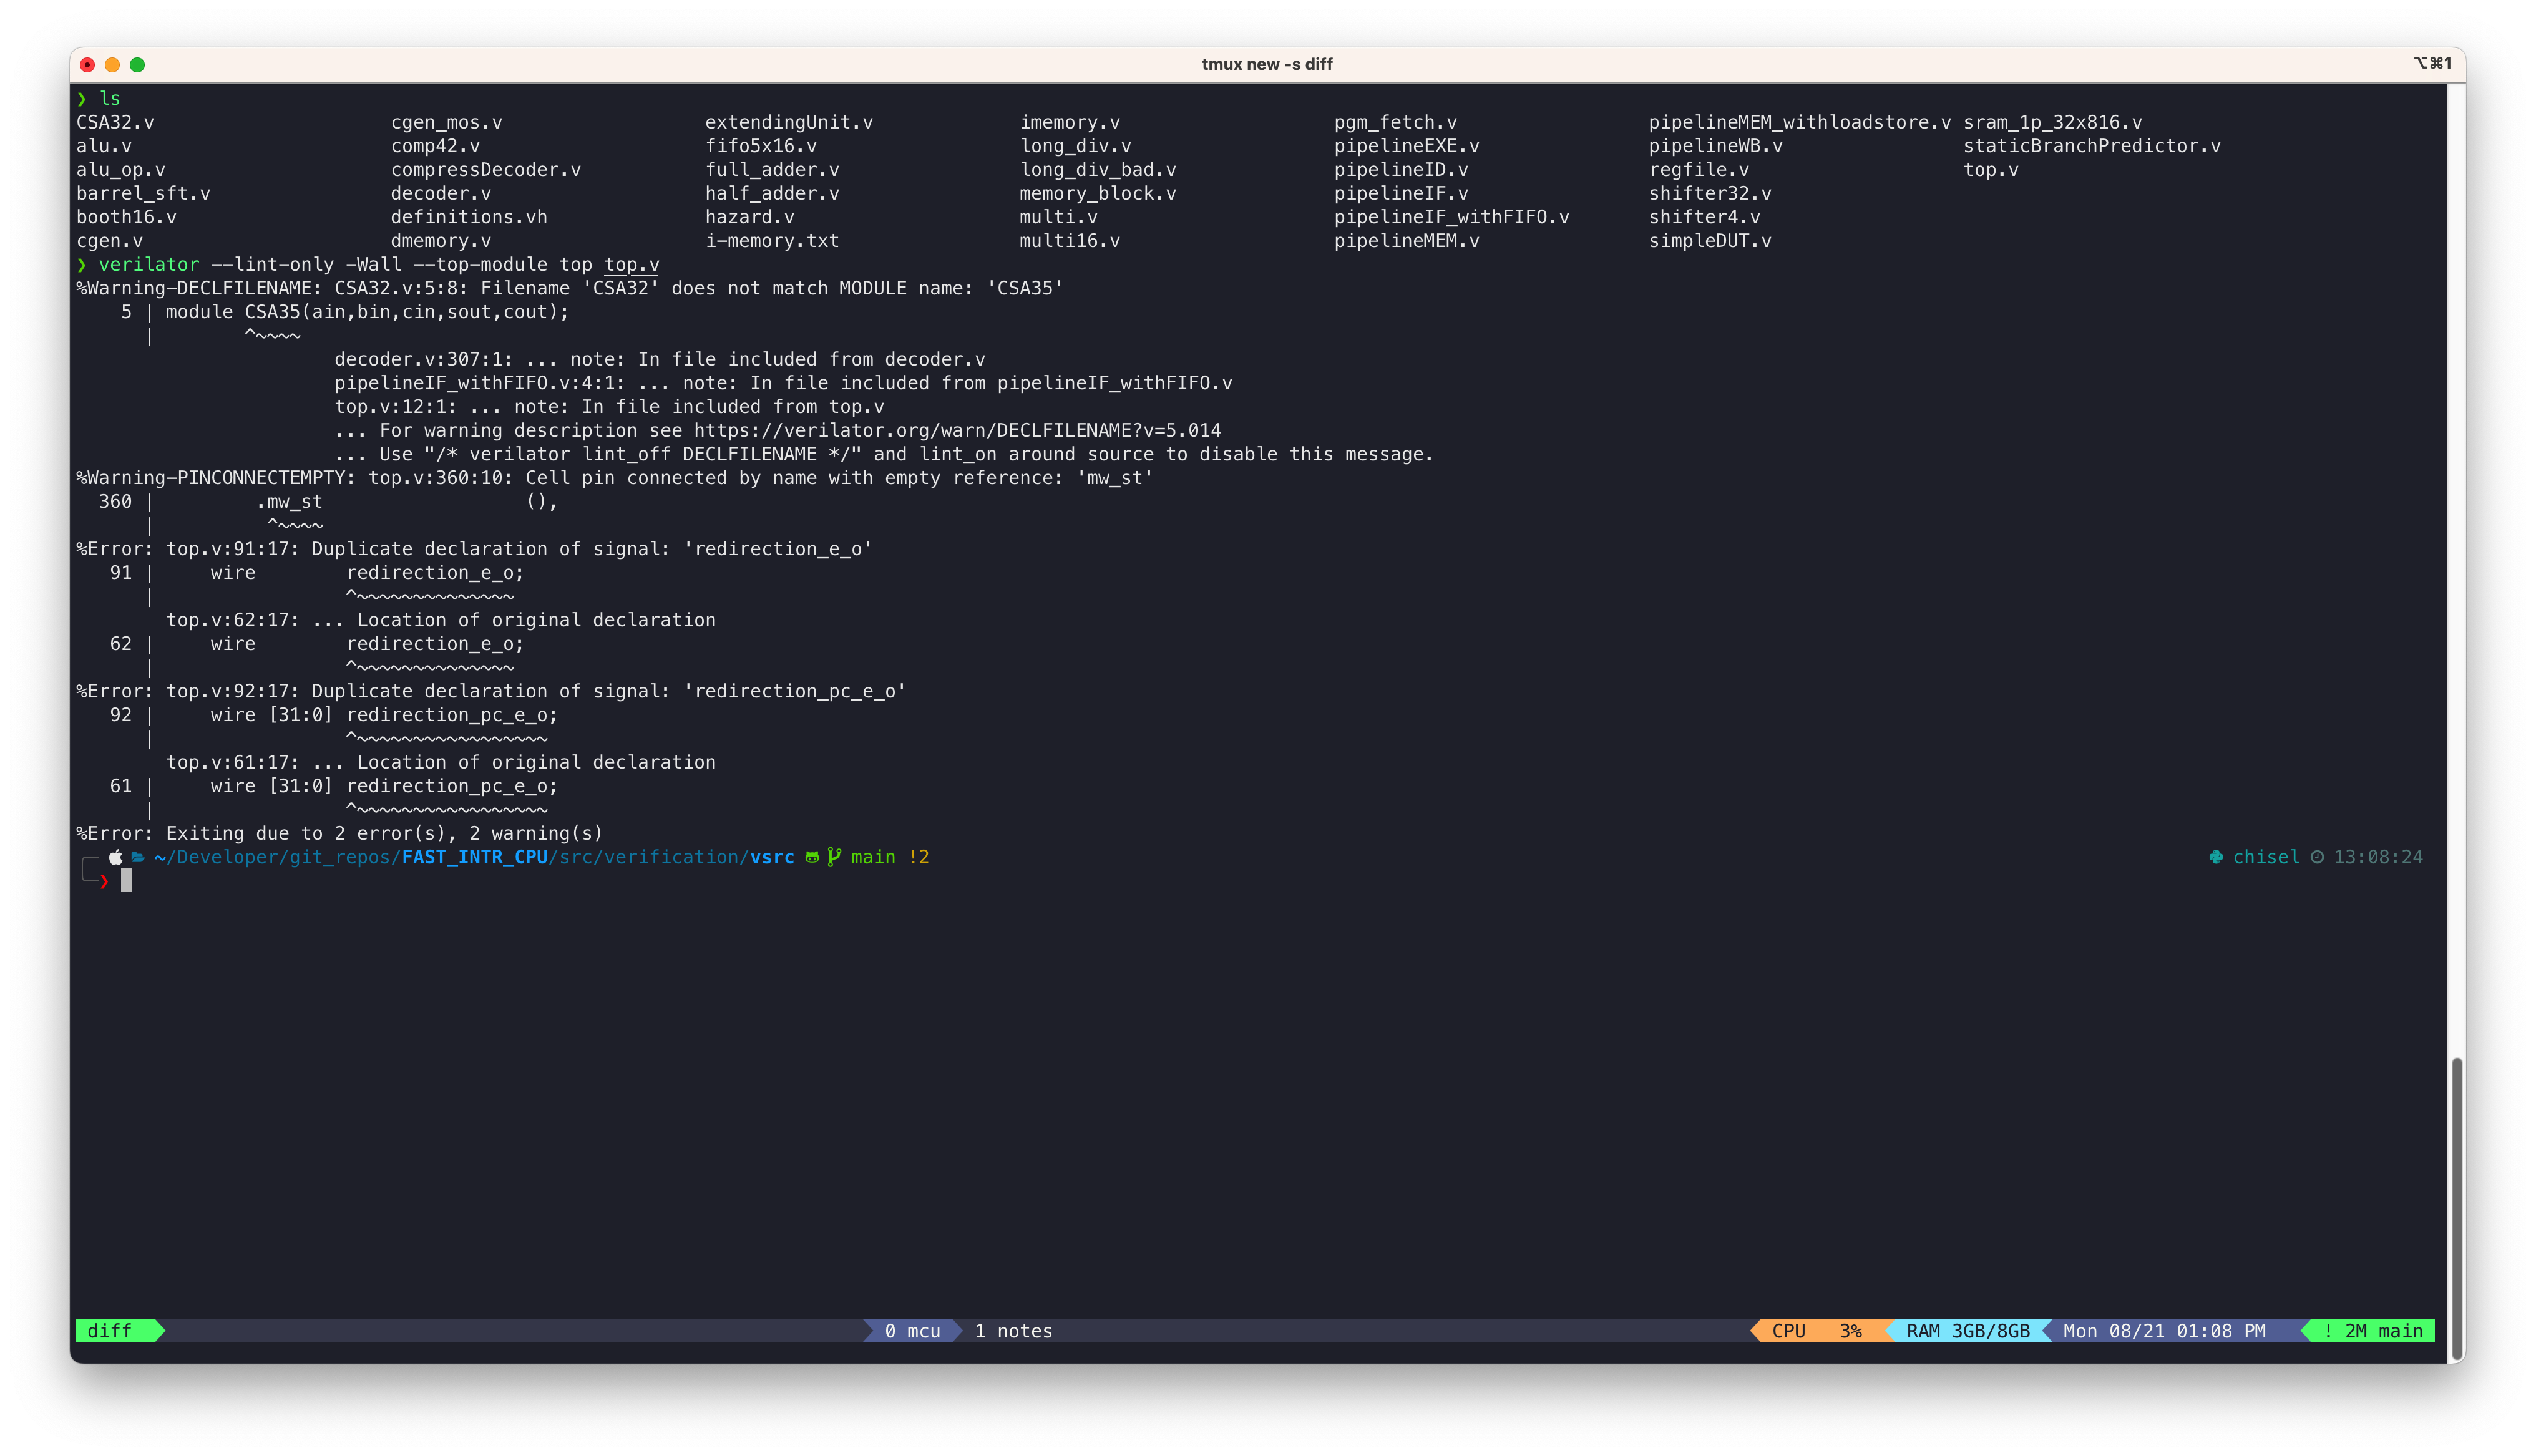
修复完top的变量名重定义之后,再次检测语法错误,报错的情况如下:
文件名跟模块名不一致:1个,已解决
pin没有连接:1个,已解决
信号没有驱动:1个,已解决
信号未被使用、信号某些比特未被使用:23个
信号未使用字段 所属文件 已解决 解决方法 instr top ✅ difftest相关信号、忽略 instrIllegal_e_o pipelineID ✅ 预留给CSR Unit、忽略 instr_i[6:0] extendingUnit ✅ 只用得到部分bits,忽略 resetn memory_block ✅ 删除该无用信号 sram_addr pipelineIF_withFIFO ✅ verilator错误,忽略 ceb pipelineIF_withFIFO ✅ verilator错误,忽略 web pipelineIF_withFIFO ✅ verilator错误,忽略 flush_delay pipelineIF_withFIFO ✅ 删除该无用信号 alu_calculation_e_i pipelineMEM_withloadstore ✅ D-memory只有1k,忽略 clk pipelineWB ✅ 删除该无用信号 resetn pipelineWB ✅ 删除该无用信号 fin_d_o hazard ✅ ld_dst2 hazard ✅ jd2 hazard ✅ jd_b3 hazard ✅ bptrt hazard ✅ bptnt1 hazard ✅ bnt2 hazard ✅ resetn alu ✅ e_last long_div ✅ sub3_pc[34] long_div ✅ rem[34:33] long_div ✅ adder8[16] multi16 ✅
1
2
3
4
5
6
7
8
9
10
11
12
13
14
15
16
17
18
19
20
21
22
23
24
25
26
27
28
29
30
31
32
33
34
35
36
37
38
39
40
41
42
43
44
45
46
47
48
49
50
51
52
53
54
55
56
57
58
59
60
61
62
63
64
65
66
67
68
69
70
71
72
73
74
75
76
77
78
79
80
81
82
83
84
85
86
87
88
89
90
91
92
93
94
95
96
97
98
99
100
101
102
103
104
105
106
107
108
109
110
111
112
113
114
115
116
117
118
119
120
121
122
123
124
125
126
127
128
129
130
131
132
133
134
135
136
137
138
139
140
141
142
143
144
145
146# top name not match
%Warning-DECLFILENAME: CSA32.v:5:8: Filename 'CSA32' does not match MODULE name: 'CSA35'
5 | module CSA35(ain,bin,cin,sout,cout);
| ^~~~~
decoder.v:307:1: ... note: In file included from decoder.v
pipelineIF_withFIFO.v:4:1: ... note: In file included from pipelineIF_withFIFO.v
top.v:12:1: ... note: In file included from top.v
... For warning description see https://verilator.org/warn/DECLFILENAME?v=5.014
... Use "/* verilator lint_off DECLFILENAME */" and lint_on around source to disable this message.
# pin empty
%Warning-PINCONNECTEMPTY: top.v:358:10: Cell pin connected by name with empty reference: 'mw_st'
358 | .mw_st (),
| ^~~~~
# signals not driven
%Warning-UNDRIVEN: hazard.v:26:26: Signal is not driven: 'mw_st'
: ... In instance top.hu
26 | output fd_st,de_st,em_st,mw_st;
| ^~~~~
pipelineWB.v:40:1: ... note: In file included from pipelineWB.v
# signals not used
%Warning-UNUSEDSIGNAL: top.v:28:24: Bits of signal are not used: 'instr'[63:32]
: ... In instance top
28 | input wire [63:0] instr,
| ^~~~~
%Warning-UNUSEDSIGNAL: top.v:87:13: Signal is not used: 'fin_d_o'
: ... In instance top
87 | wire fin_d_o;
| ^~~~~~~
%Warning-UNUSEDSIGNAL: top.v:99:11: Signal is not used: 'instrIllegal_e_o'
: ... In instance top
99 | wire instrIllegal_e_o;
| ^~~~~~~~~~~~~~~~
%Warning-UNUSEDSIGNAL: pipelineIF_withFIFO.v:32:16: Signal is not used: 'sram_addr'
: ... In instance top.u_pipeline_withFIFO
32 | wire [9:0] sram_addr;
| ^~~~~~~~~
pipelineIF_withFIFO.v:4:1: ... note: In file included from pipelineIF_withFIFO.v
top.v:12:1: ... note: In file included from top.v
%Warning-UNUSEDSIGNAL: pipelineIF_withFIFO.v:33:10: Signal is not used: 'ceb'
: ... In instance top.u_pipeline_withFIFO
33 | wire ceb, web;
| ^~~
pipelineIF_withFIFO.v:4:1: ... note: In file included from pipelineIF_withFIFO.v
top.v:12:1: ... note: In file included from top.v
%Warning-UNUSEDSIGNAL: pipelineIF_withFIFO.v:33:15: Signal is not used: 'web'
: ... In instance top.u_pipeline_withFIFO
33 | wire ceb, web;
| ^~~
pipelineIF_withFIFO.v:4:1: ... note: In file included from pipelineIF_withFIFO.v
top.v:12:1: ... note: In file included from top.v
%Warning-UNUSEDSIGNAL: pipelineIF_withFIFO.v:44:17: Signal is not used: 'flush_delay'
: ... In instance top.u_pipeline_withFIFO
44 | reg flush_delay;
| ^~~~~~~~~~~
pipelineIF_withFIFO.v:4:1: ... note: In file included from pipelineIF_withFIFO.v
top.v:12:1: ... note: In file included from top.v
%Warning-UNUSEDSIGNAL: pipelineMEM_withloadstore.v:20:23: Bits of signal are not used: 'alu_calculation_e_i'[31:12]
: ... In instance top.u_pipelineMEM_withloadstore
20 | input wire [31:0] alu_calculation_e_i,
| ^~~~~~~~~~~~~~~~~~~
%Warning-UNUSEDSIGNAL: pipelineWB.v:14:23: Signal is not used: 'clk'
: ... In instance top.u_pipelineWB
14 | input wire clk,
| ^~~
%Warning-UNUSEDSIGNAL: pipelineWB.v:15:23: Signal is not used: 'resetn'
: ... In instance top.u_pipelineWB
15 | input wire resetn,
| ^~~~~~
%Warning-UNUSEDSIGNAL: hazard.v:33:13: Signal is not used: 'ld_dst2'
: ... In instance top.hu
33 | reg ld_dst1,ld_dst2;
| ^~~~~~~
pipelineWB.v:40:1: ... note: In file included from pipelineWB.v
%Warning-UNUSEDSIGNAL: hazard.v:38:9: Signal is not used: 'jd2'
: ... In instance top.hu
38 | reg jd1,jd2,jd_b1,jd_b2,jd_b3;
| ^~~
pipelineWB.v:40:1: ... note: In file included from pipelineWB.v
%Warning-UNUSEDSIGNAL: hazard.v:38:25: Signal is not used: 'jd_b3'
: ... In instance top.hu
38 | reg jd1,jd2,jd_b1,jd_b2,jd_b3;
| ^~~~~
pipelineWB.v:40:1: ... note: In file included from pipelineWB.v
%Warning-UNUSEDSIGNAL: hazard.v:39:9: Signal is not used: 'bptrt'
: ... In instance top.hu
39 | reg bpt,bptrt,bptnt,bptnt1;
| ^~~~~
pipelineWB.v:40:1: ... note: In file included from pipelineWB.v
%Warning-UNUSEDSIGNAL: hazard.v:39:21: Signal is not used: 'bptnt1'
: ... In instance top.hu
39 | reg bpt,bptrt,bptnt,bptnt1;
| ^~~~~~
pipelineWB.v:40:1: ... note: In file included from pipelineWB.v
%Warning-UNUSEDSIGNAL: hazard.v:40:14: Signal is not used: 'bnt2'
: ... In instance top.hu
40 | reg bnt,bnt1,bnt2;
| ^~~~
pipelineWB.v:40:1: ... note: In file included from pipelineWB.v
%Warning-UNUSEDSIGNAL: extendingUnit.v:27:23: Bits of signal are not used: 'instr_i'[6:0]
: ... In instance top.u_pipelineID.u_extendingUnit
27 | input wire [31:0] instr_i,
| ^~~~~~~
decoder.v:307:1: ... note: In file included from decoder.v
pipelineIF_withFIFO.v:4:1: ... note: In file included from pipelineIF_withFIFO.v
top.v:12:1: ... note: In file included from top.v
%Warning-UNUSEDSIGNAL: alu.v:14:11: Signal is not used: 'resetn'
: ... In instance top.u_pipelineEXE.u_alu
14 | input clk,resetn;
| ^~~~~~
pipelineIF_withFIFO.v:4:1: ... note: In file included from pipelineIF_withFIFO.v
top.v:12:1: ... note: In file included from top.v
%Warning-UNUSEDSIGNAL: memory_block.v:9:16: Signal is not used: 'resetn'
: ... In instance top.u_pipelineMEM_withloadstore.u_dmemory.u_memory_block3
9 | input wire resetn,
| ^~~~~~
imemory.v:4:1: ... note: In file included from imemory.v
pipelineIF_withFIFO.v:4:1: ... note: In file included from pipelineIF_withFIFO.v
top.v:12:1: ... note: In file included from top.v
%Warning-UNUSEDSIGNAL: long_div.v:14:26: Signal is not used: 'e_last'
: ... In instance top.u_pipelineEXE.u_alu.div
14 | input d_init, e_advance, e_last;
| ^~~~~~
pipelineIF_withFIFO.v:4:1: ... note: In file included from pipelineIF_withFIFO.v
top.v:12:1: ... note: In file included from top.v
%Warning-UNUSEDSIGNAL: long_div.v:24:22: Bits of signal are not used: 'sub3_pc'[34]
: ... In instance top.u_pipelineEXE.u_alu.div
24 | wire [34:0] sub3_ps, sub3_pc, rem_sub3;
| ^~~~~~~
pipelineIF_withFIFO.v:4:1: ... note: In file included from pipelineIF_withFIFO.v
top.v:12:1: ... note: In file included from top.v
%Warning-UNUSEDSIGNAL: long_div.v:27:12: Bits of signal are not used: 'rem'[34:33]
: ... In instance top.u_pipelineEXE.u_alu.div
27 | reg [34:0] rem;
| ^~~
pipelineIF_withFIFO.v:4:1: ... note: In file included from pipelineIF_withFIFO.v
top.v:12:1: ... note: In file included from top.v
%Warning-UNUSEDSIGNAL: multi16.v:15:69: Bits of signal are not used: 'adder8'[16]
: ... In instance top.u_pipelineEXE.u_alu.mul.m16
15 | wire [16:0] adder0,adder1,adder2,adder3,adder4,adder5,adder6,adder7,adder8;
| ^~~~~~
long_div.v:92:1: ... note: In file included from long_div.v
pipelineIF_withFIFO.v:4:1: ... note: In file included from pipelineIF_withFIFO.v
top.v:12:1: ... note: In file included from top.v
Benchmarks
什么是基准测试
- 目的:测试处理器运行的速度,从而评价处理器的性能
- 影响处理器单位时间内工作的因素有很多,如:编译器性能、访存的时间、应用的种类
- 基准测试:精心设计的一套程序用于覆盖一些通用的计算场景,如列表操作、矩阵计算等
- 测试原理:比较处理器完成基准测试的时间,时间越快越好
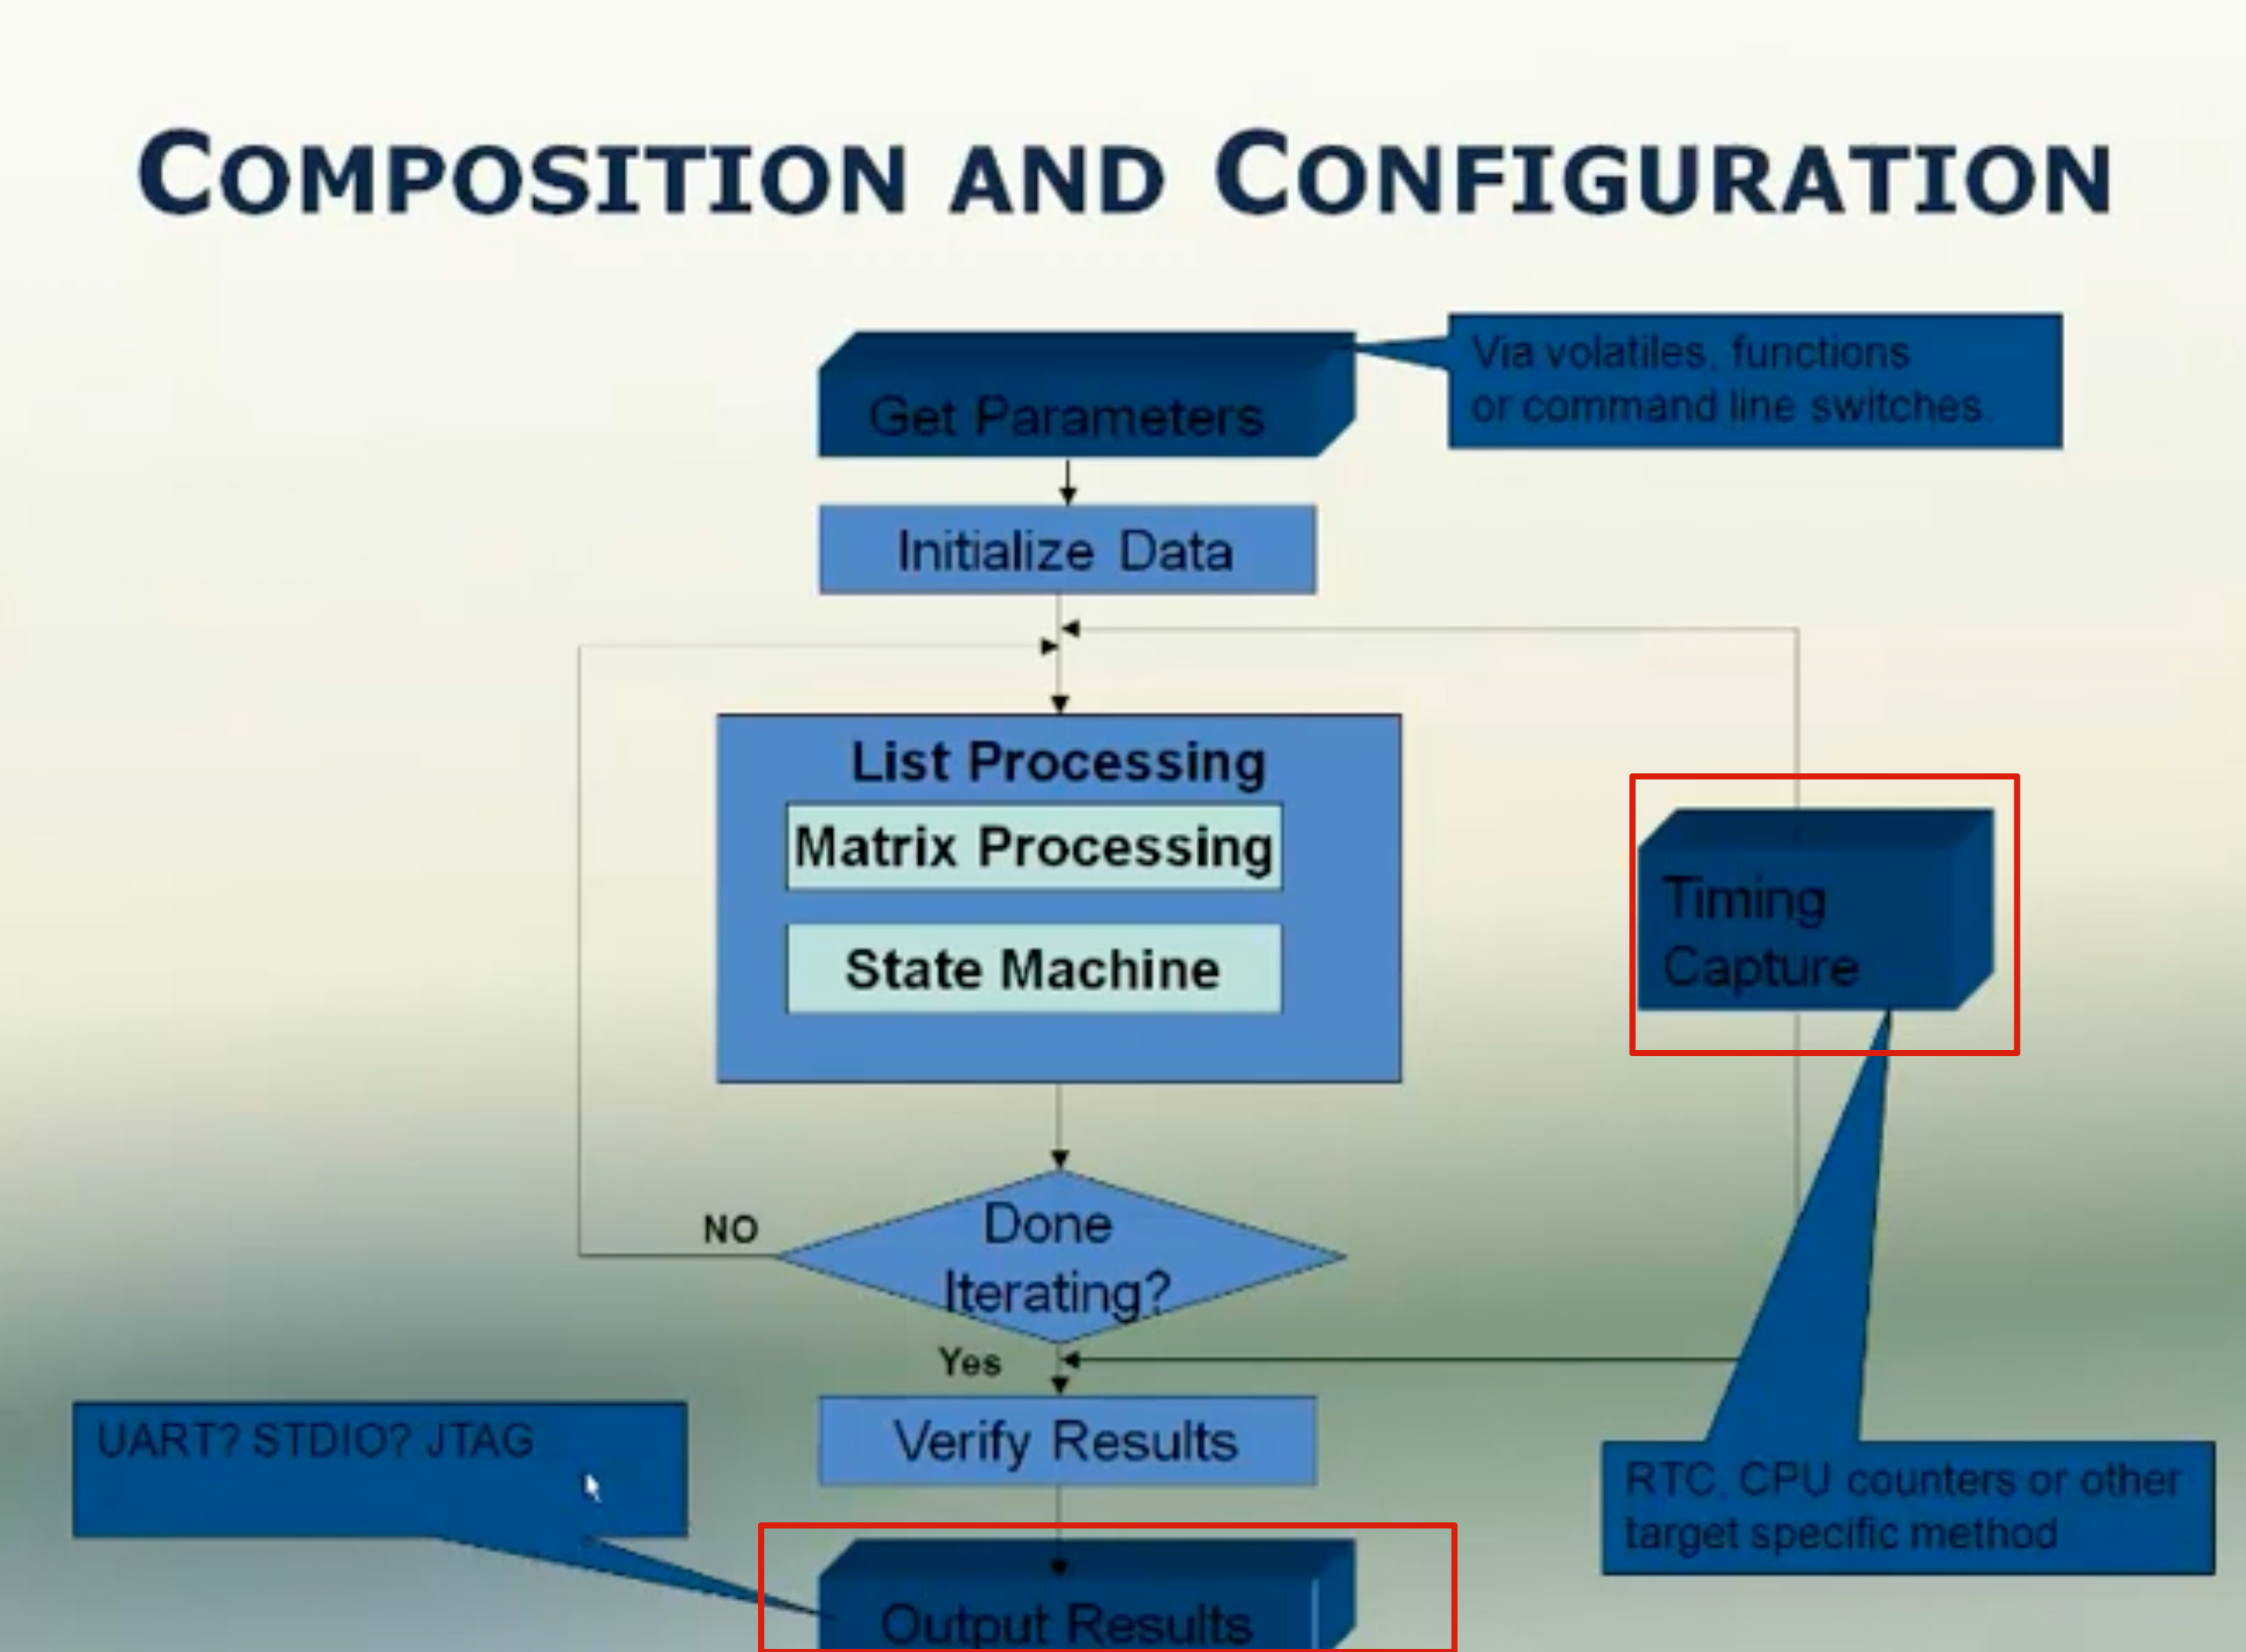
CoreMark
网站主页](https://www.eembc.org/coremark/)
- CoreMark主要用于测试嵌入式系统的MCU跟CPU的性能, 测试标准是在配置参数的组合下单位时间内运行的CoreMark程序次数(单位:CoreMark/MHz),该数字值越大则说明测试的性能越好
- 诞生于2009年,目的是作为Dhrystone的替代品(Dhrystone其实主要测试的是编译器的性能), 为了避免编译器优化导致预先计算出结果,基准测试中的每个操作都会派生一个在编译时不可用的值。
- CoreMark由C编写,包含的测试集主要有:==列表处理(列表搜索、排序)、矩阵操作、状态机测试、CRC测试==
- CoreMark支持8 bits到64 bits的微处理器
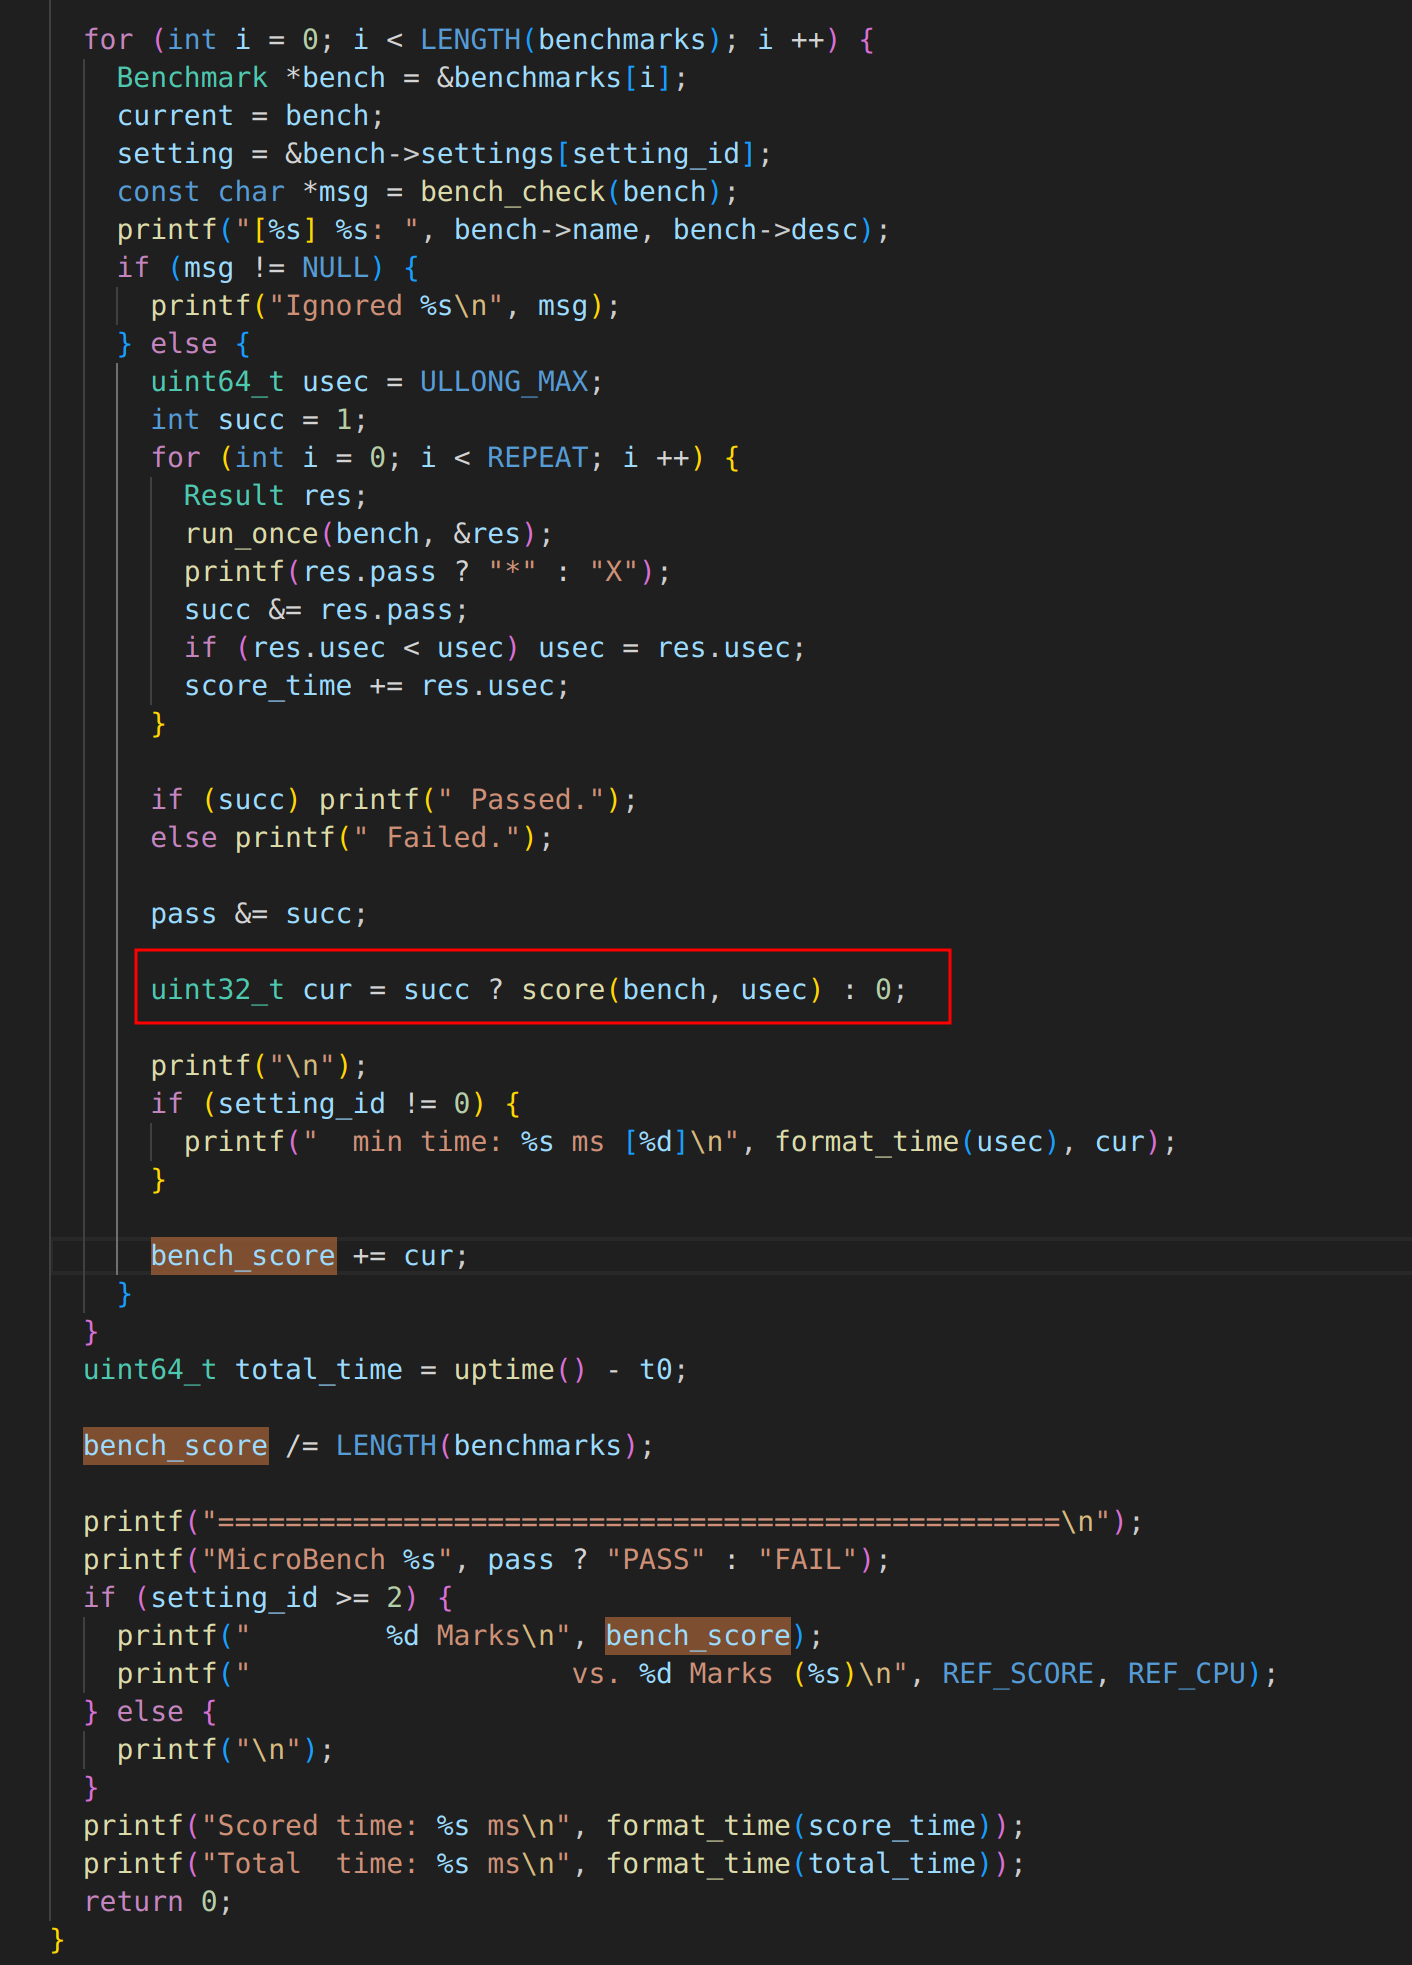
Microbench
每个benchmark都记录以
REF_CPU为基础测得的运行时间微秒数。每个benchmark的评分是相对于REF_CPU的运行速度,与基准处理器一样快的得分为REF_SCORE=100000。 所有benchmark的平均得分是整体得分。
需要实现==TRM==和==IOE==的API。
在IOE的全部实现均留空的情况下仍可运行。如果有正确实现的
AM_TIMER_UPTIME,可以输出正确的统计时间。若这个功能没有实现(返回0),仍可进行正确性测试。使用
putch(ch)输出。堆区
heap必须初始化(堆区可为空)。如果heap.start == heap.end,即分配了空的堆区,只能运行不使用堆区的测试程序。每个基准程序会预先指定堆区的大小,堆区不足的基准程序将被忽略。主要包含的测试程序:
名称 描述 ref堆区使用 huge堆区使用 qsort 快速排序随机整数数组 640KB 16MB queen 位运算实现的n皇后问题 0 0 bf Brainf**k解释器,快速排序输入的字符串 32KB 32KB fib Fibonacci数列f(n)=f(n-1)+…+f(n-m)的矩阵求解 256KB 2MB sieve Eratosthenes筛法求素数 2MB 10MB 15pz A*算法求解4x4数码问题 2MB 64MB dinic Dinic算法求解二分图最大流 680KB 2MB lzip Lzip数据压缩 4MB 64MB ssort Skew算法后缀排序 4MB 64MB md5 计算长随机字符串的MD5校验和 10MB 64MB
Source Code
- Microbench
- Coremark
MCU移植CoreMark:
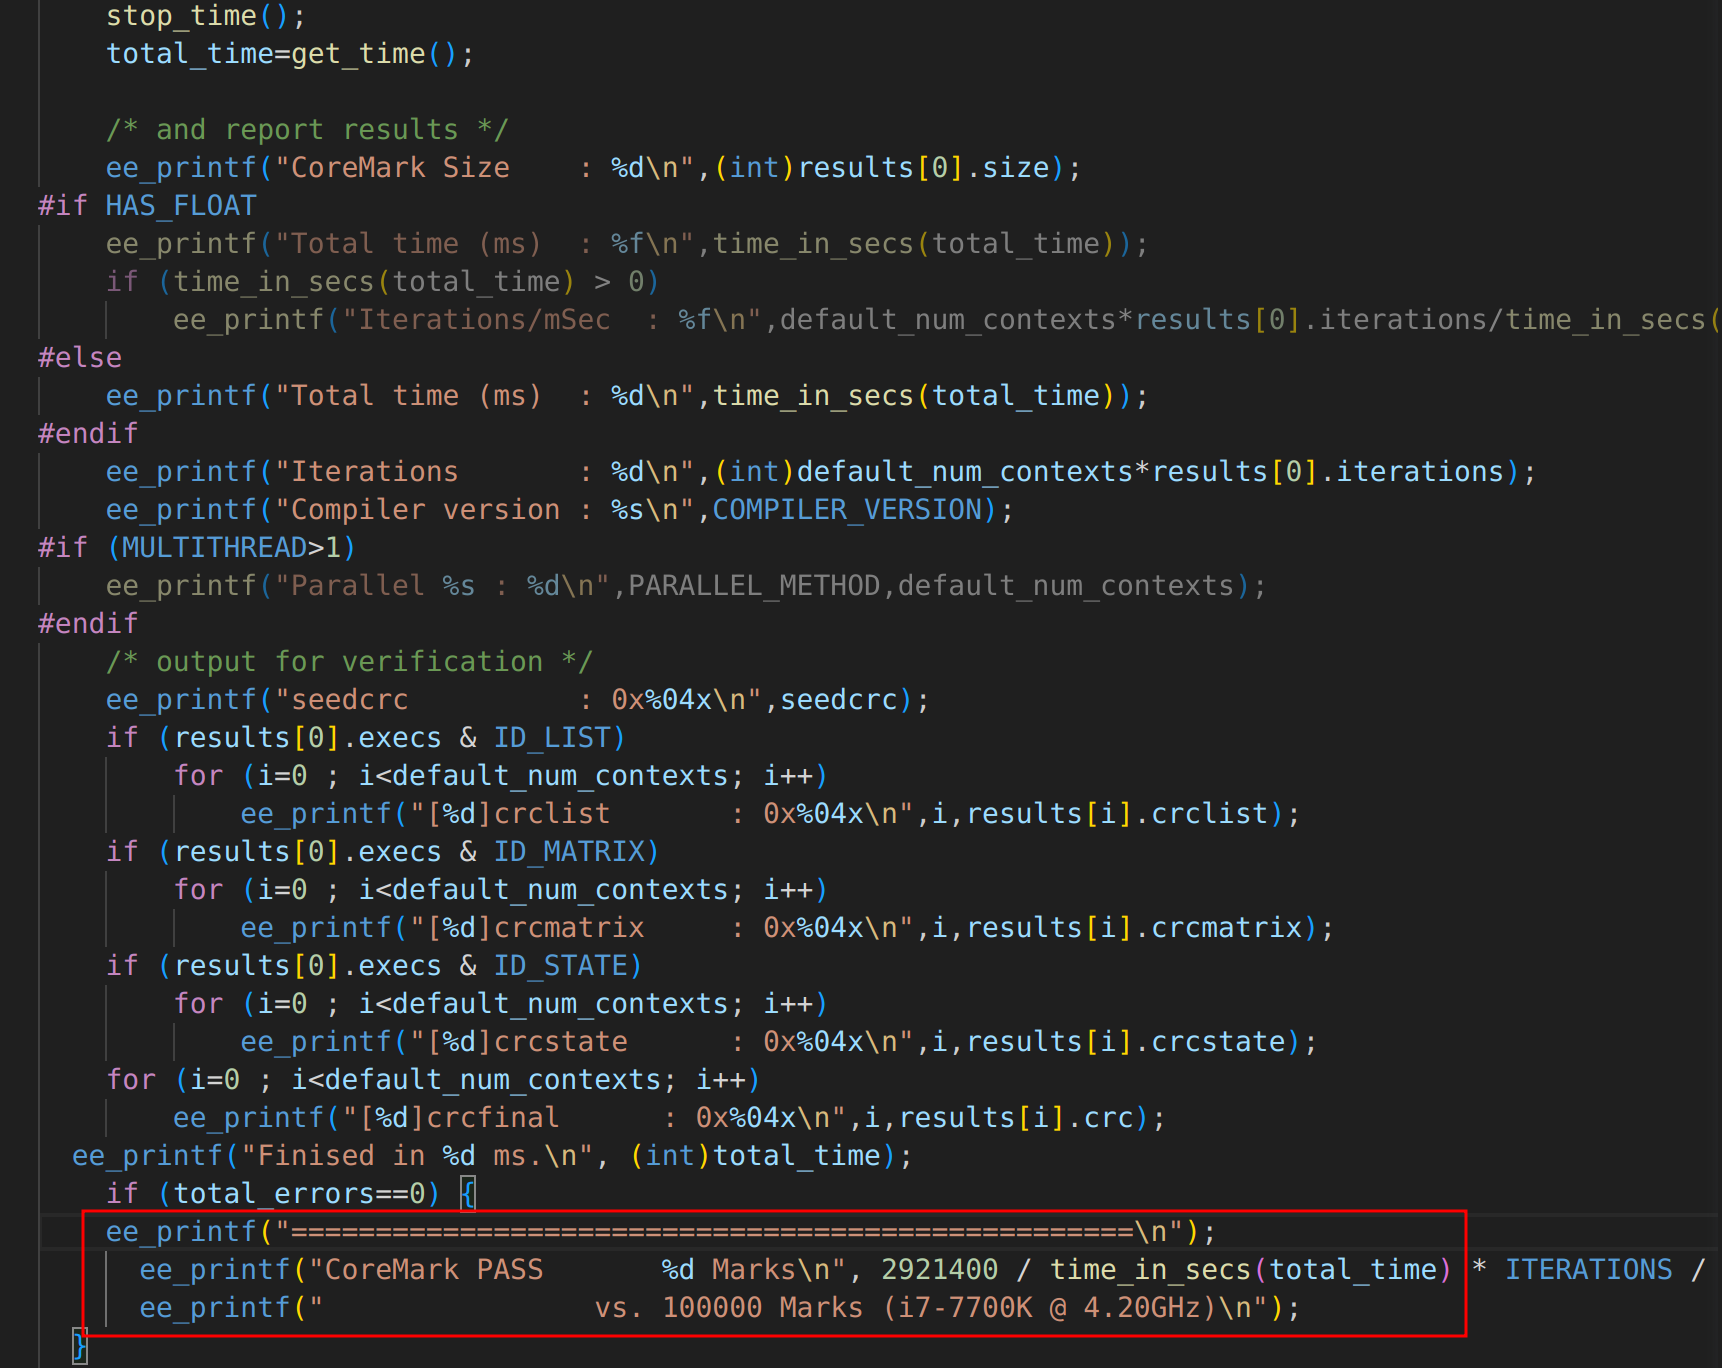
- 提供对printf的重映射支持:在测试完成之后,需要在中断打印测试分数
- 提供一个足够精准的时间测量手段:CoreMark的评价标准是单位时间内运行的CoreMark程序次数是
Benchmark vs ==CPI==
影响Benchmark得分的因素
Benchmark的跑分需要计算一个关键的数据,即程序的运行时间,处理器微架构一模一样的情况下:
- 模拟器上跑benchmark:将处理器编译成模拟器在x86主机上运行,该模拟器运行benchmark的时间,受x86主机性能的影响
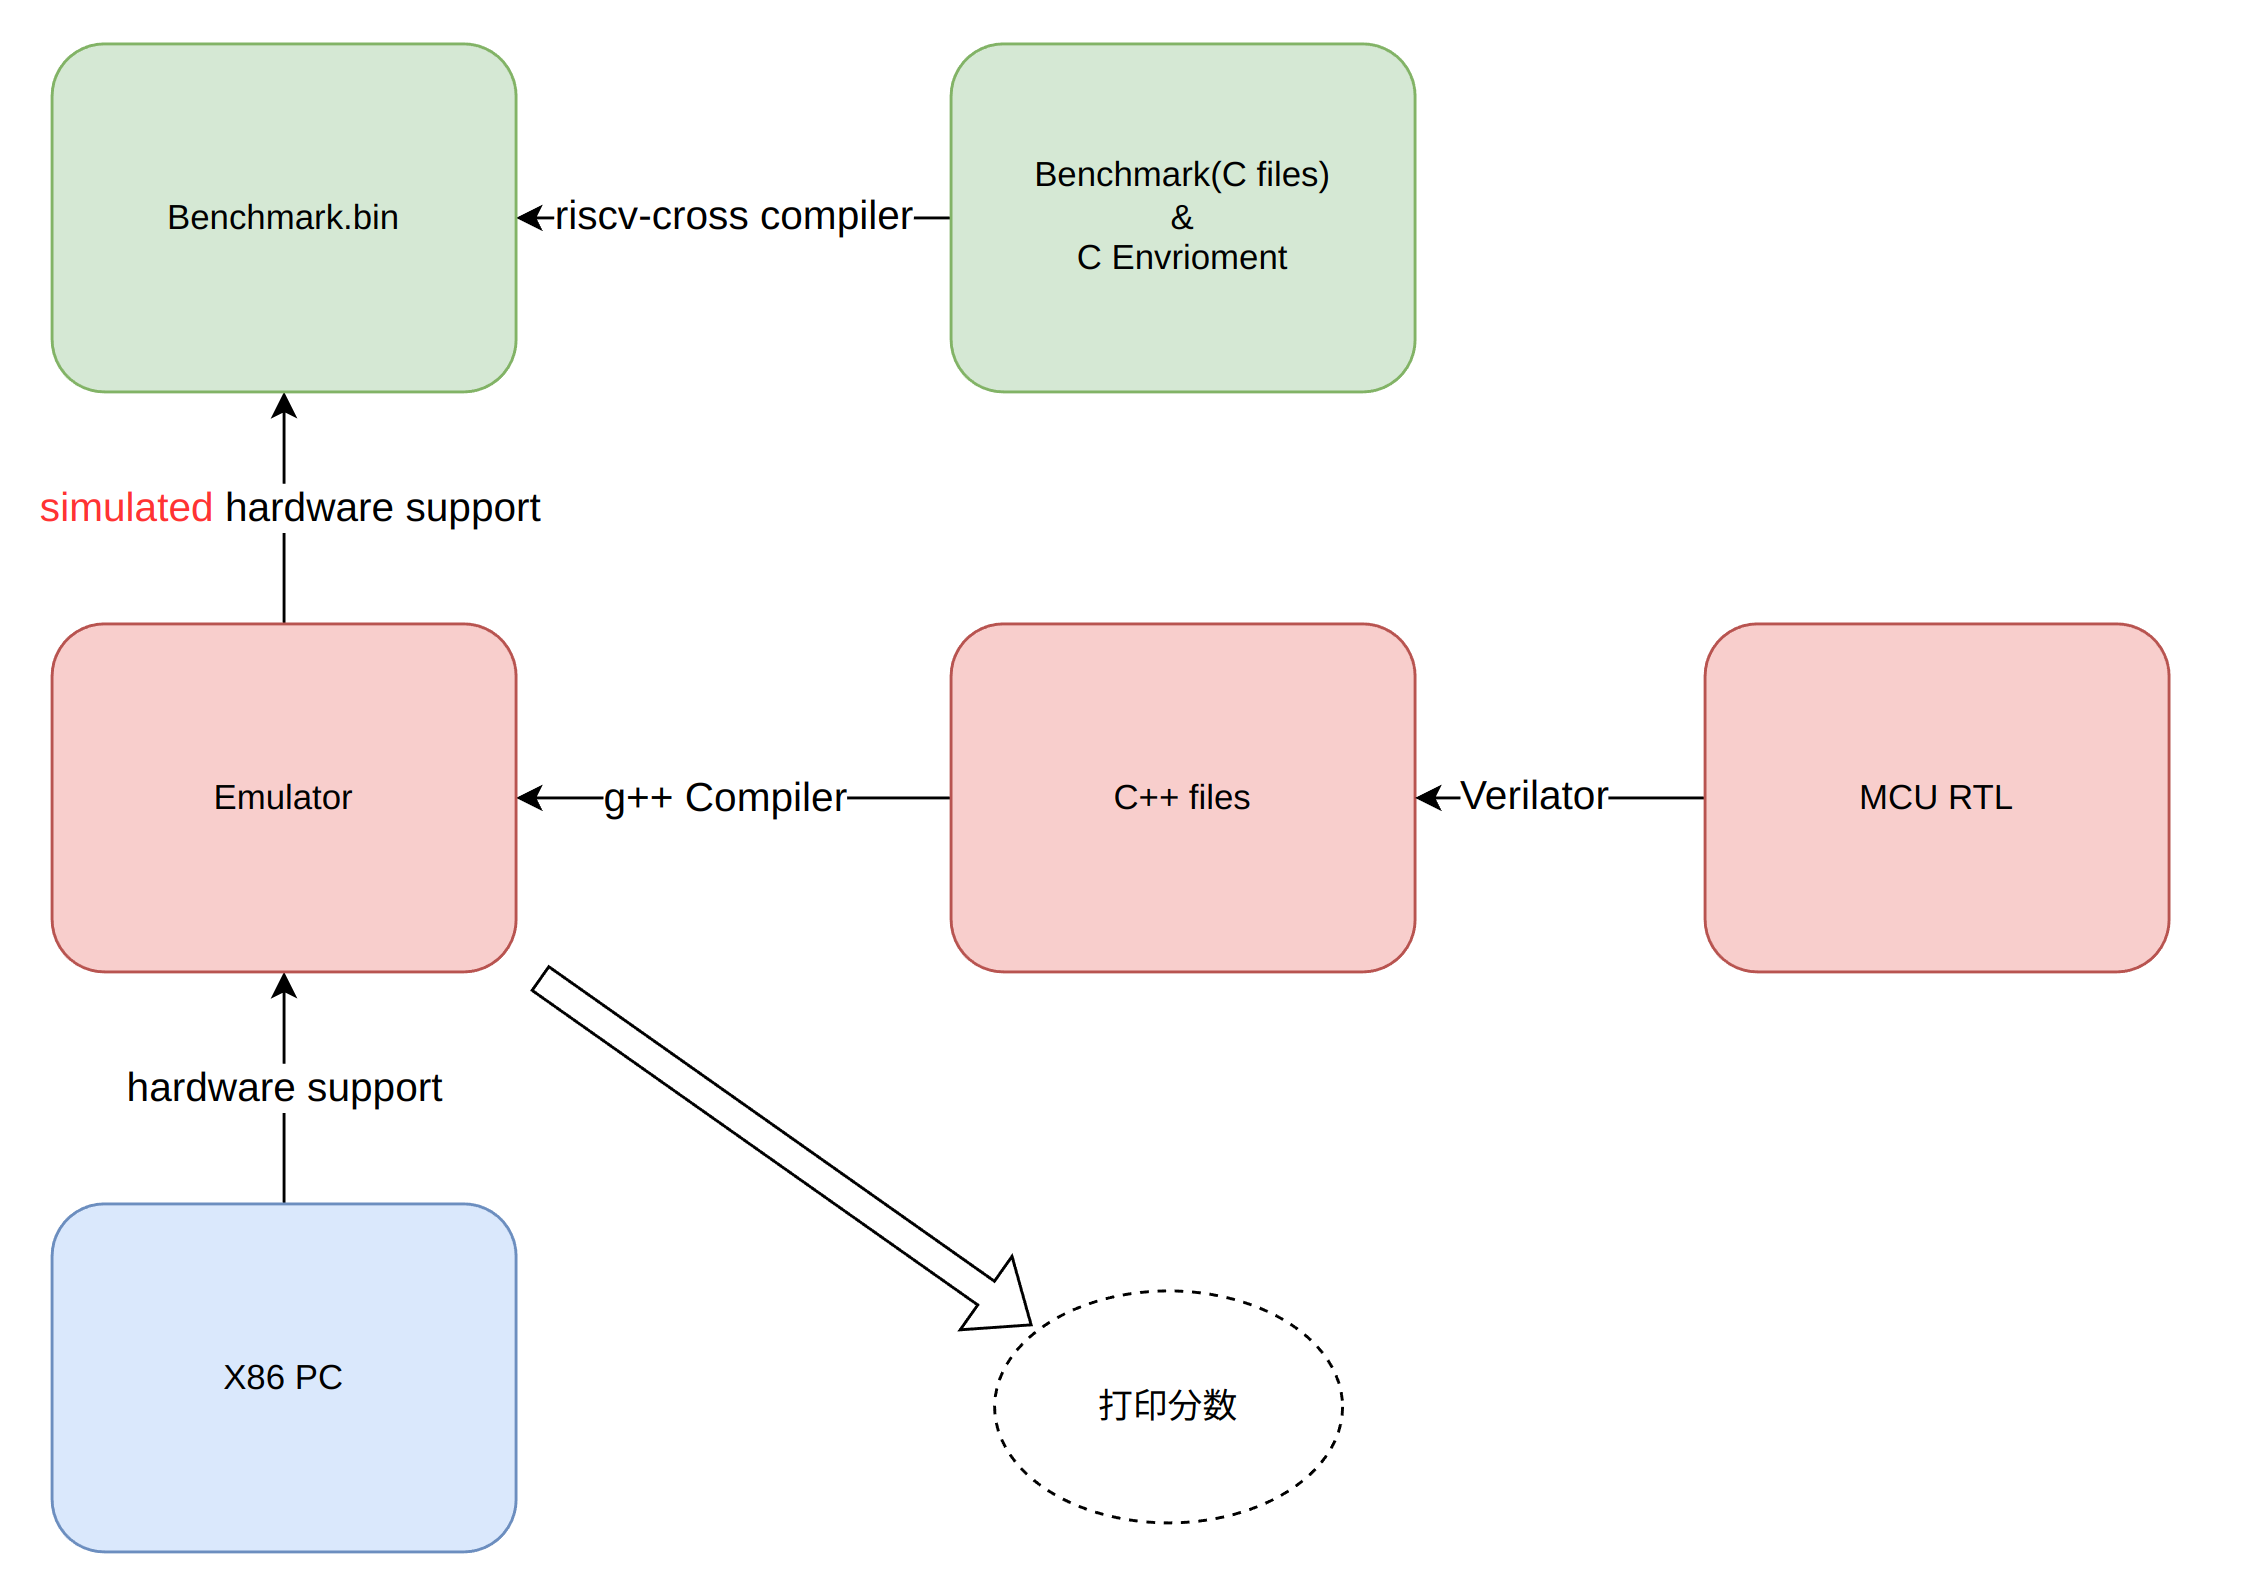
- 在FPGA上跑benchmark:将RTL移植到FPGA上运行benchmark程序,运行的时间受频率的影响
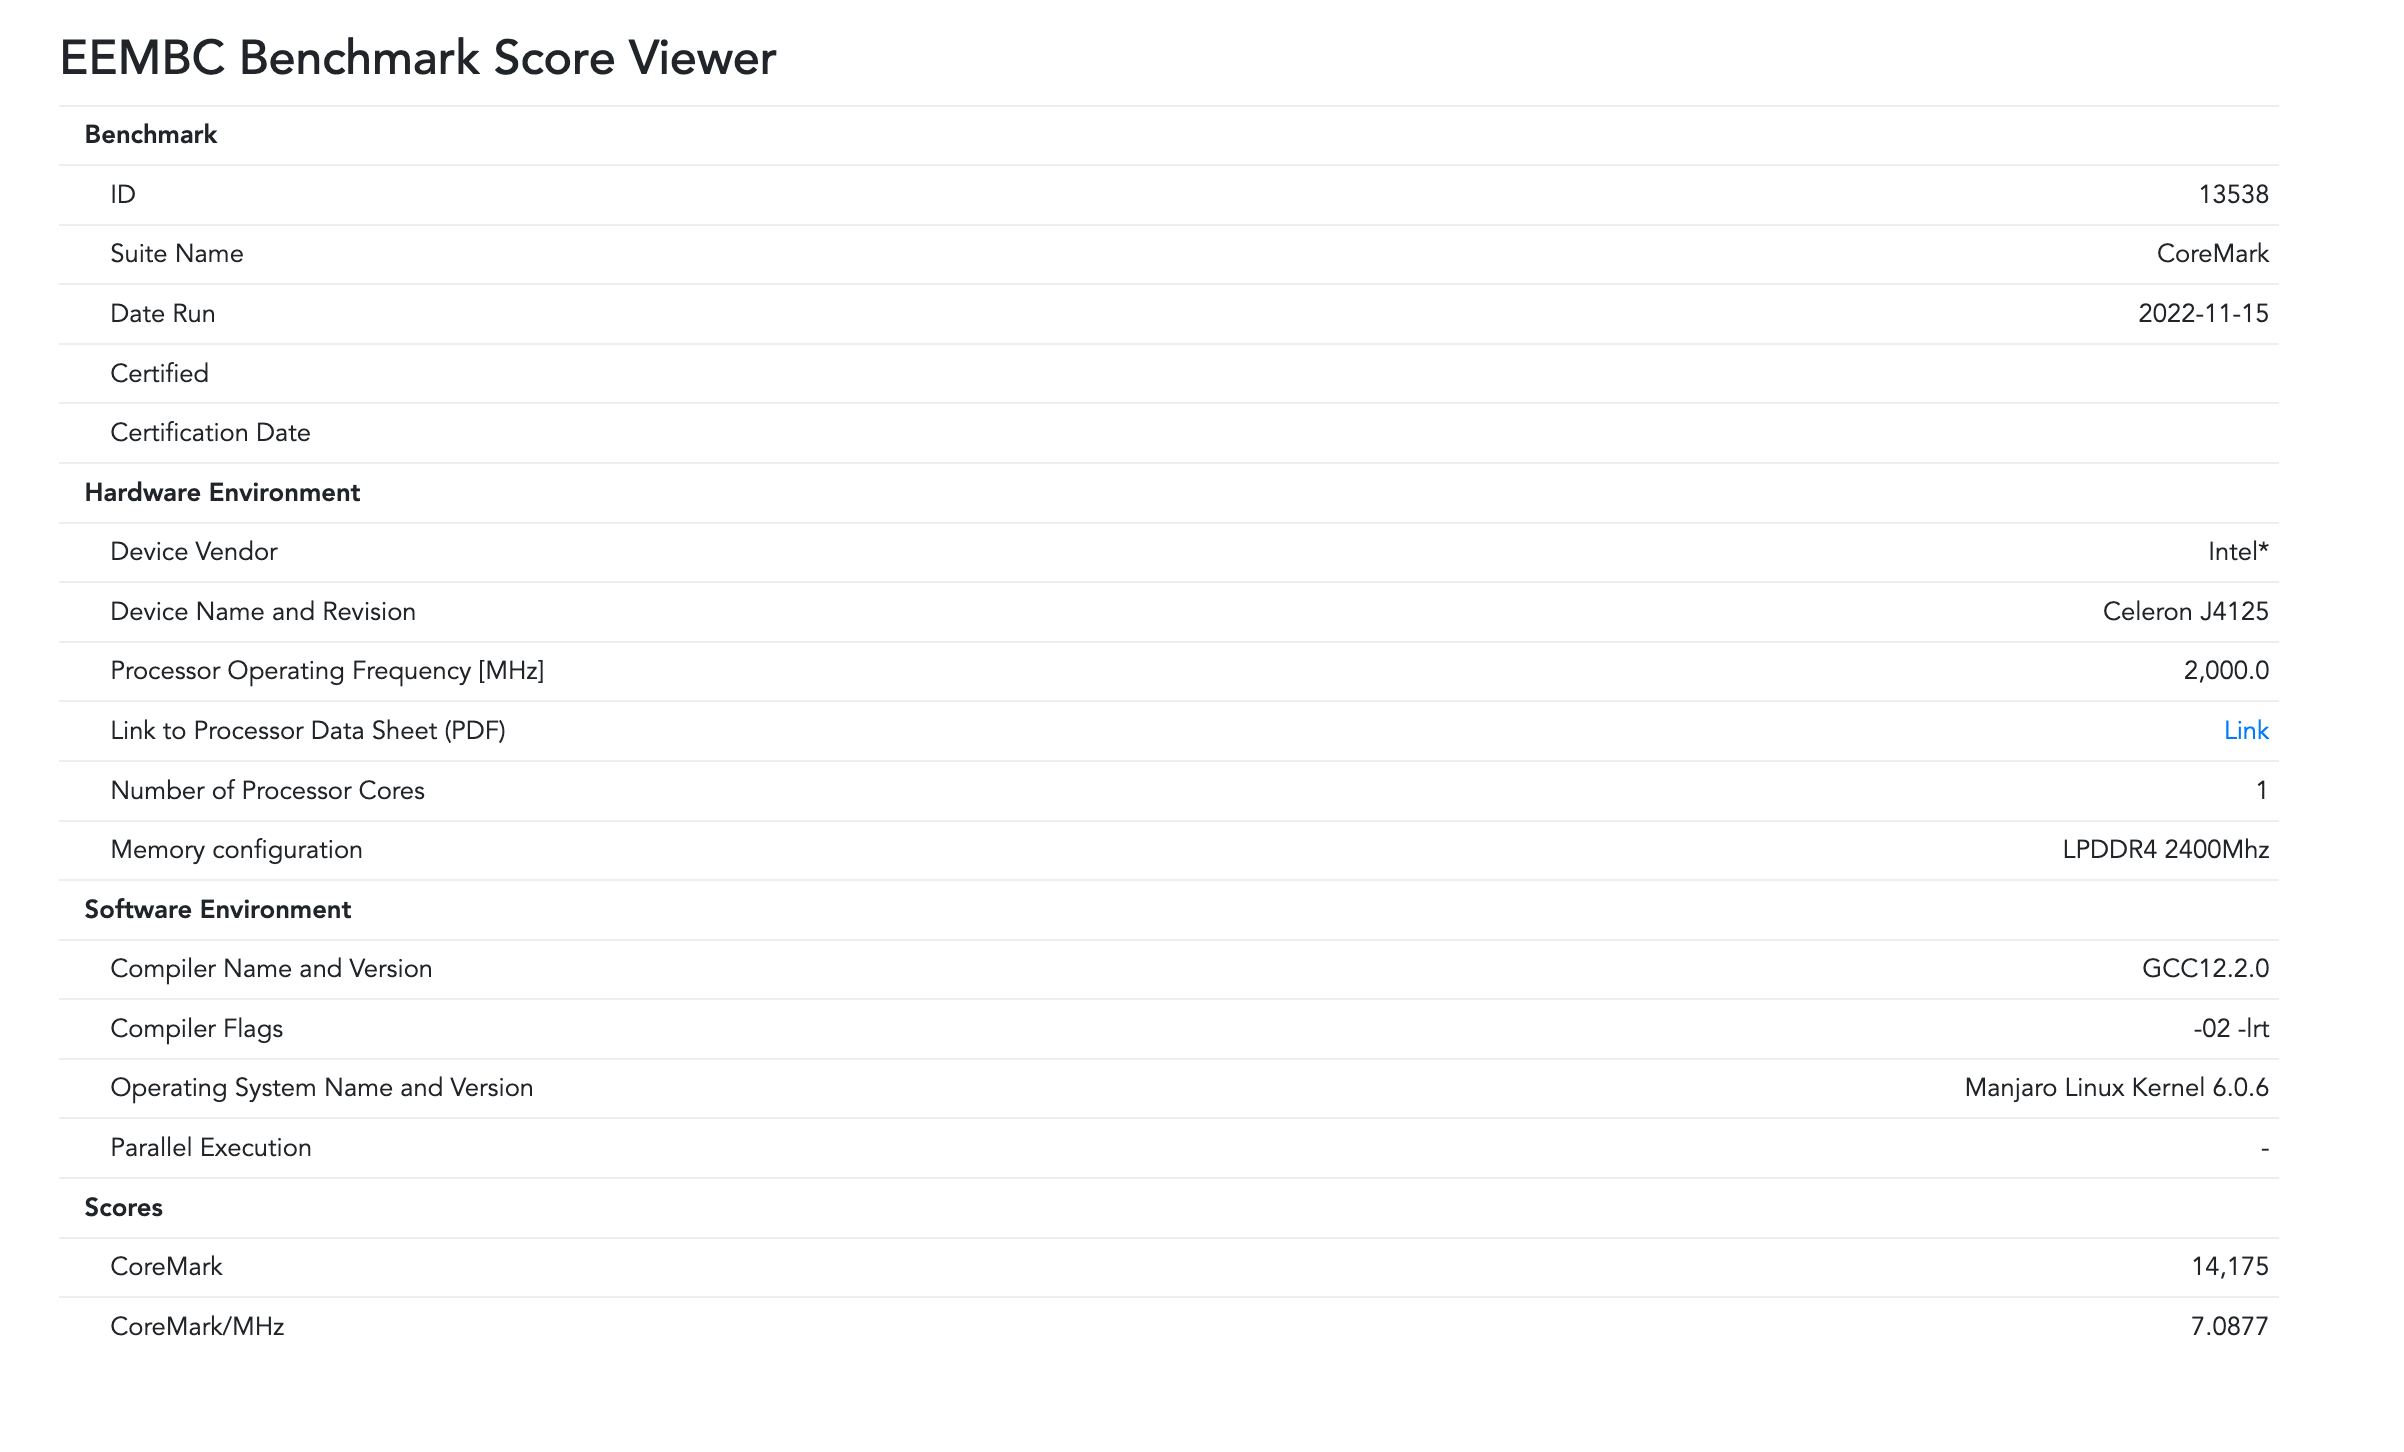
- 如上图所示:coremark官网上跑分排行榜里的处理器得分,会给出
CoreMark跟Coremark/MHz,其实后者更有意义 - 例如:Intel Core I5在2500MHz下的CoreMark得分为12725分、Atmel的设备在21MHz下的得分为71分,因此频率对于CoreMark得分影响很大
- 开源项目如蜂鸟以及Coremark官网上的跑分排行榜,都是在硬件上得出来的,而且会附上频率
- 如上图所示:coremark官网上跑分排行榜里的处理器得分,会给出
- 除此之外
- Benchmarks得分受访存的影响很大,访问慢速存储器会导致程序的运行时间大大增加,从而严重降低得分
- Benchmarks不能完整测试处理器所有的性能,例如尽管Intel I5相比Arm
M4有更好的浮点运算能力,但是其在Benchmarks里的
CoreMark/MHz得分却比后者低了2倍
在模拟器上跑分的时候,通过CPI更能体现性能
- 在处理器微架构确定的情况下,处理器运行同一套benchmark的CPI是恒定的
- CPI(Clock Per Instructions)在MCU上如何计算?
- 在TOP里设置两个计数器:
cycle_register,instruction_register - 每个时钟上升沿都将cycle_register加一
- 在一条指令提交的时候才将instruction_register加一,被flush的指令不会导致instruction_register加一
- 在MCU上跑benchmark程序,结束后即可计算CPI:
CPI=cycle_register/instruction_register
- 在TOP里设置两个计数器:
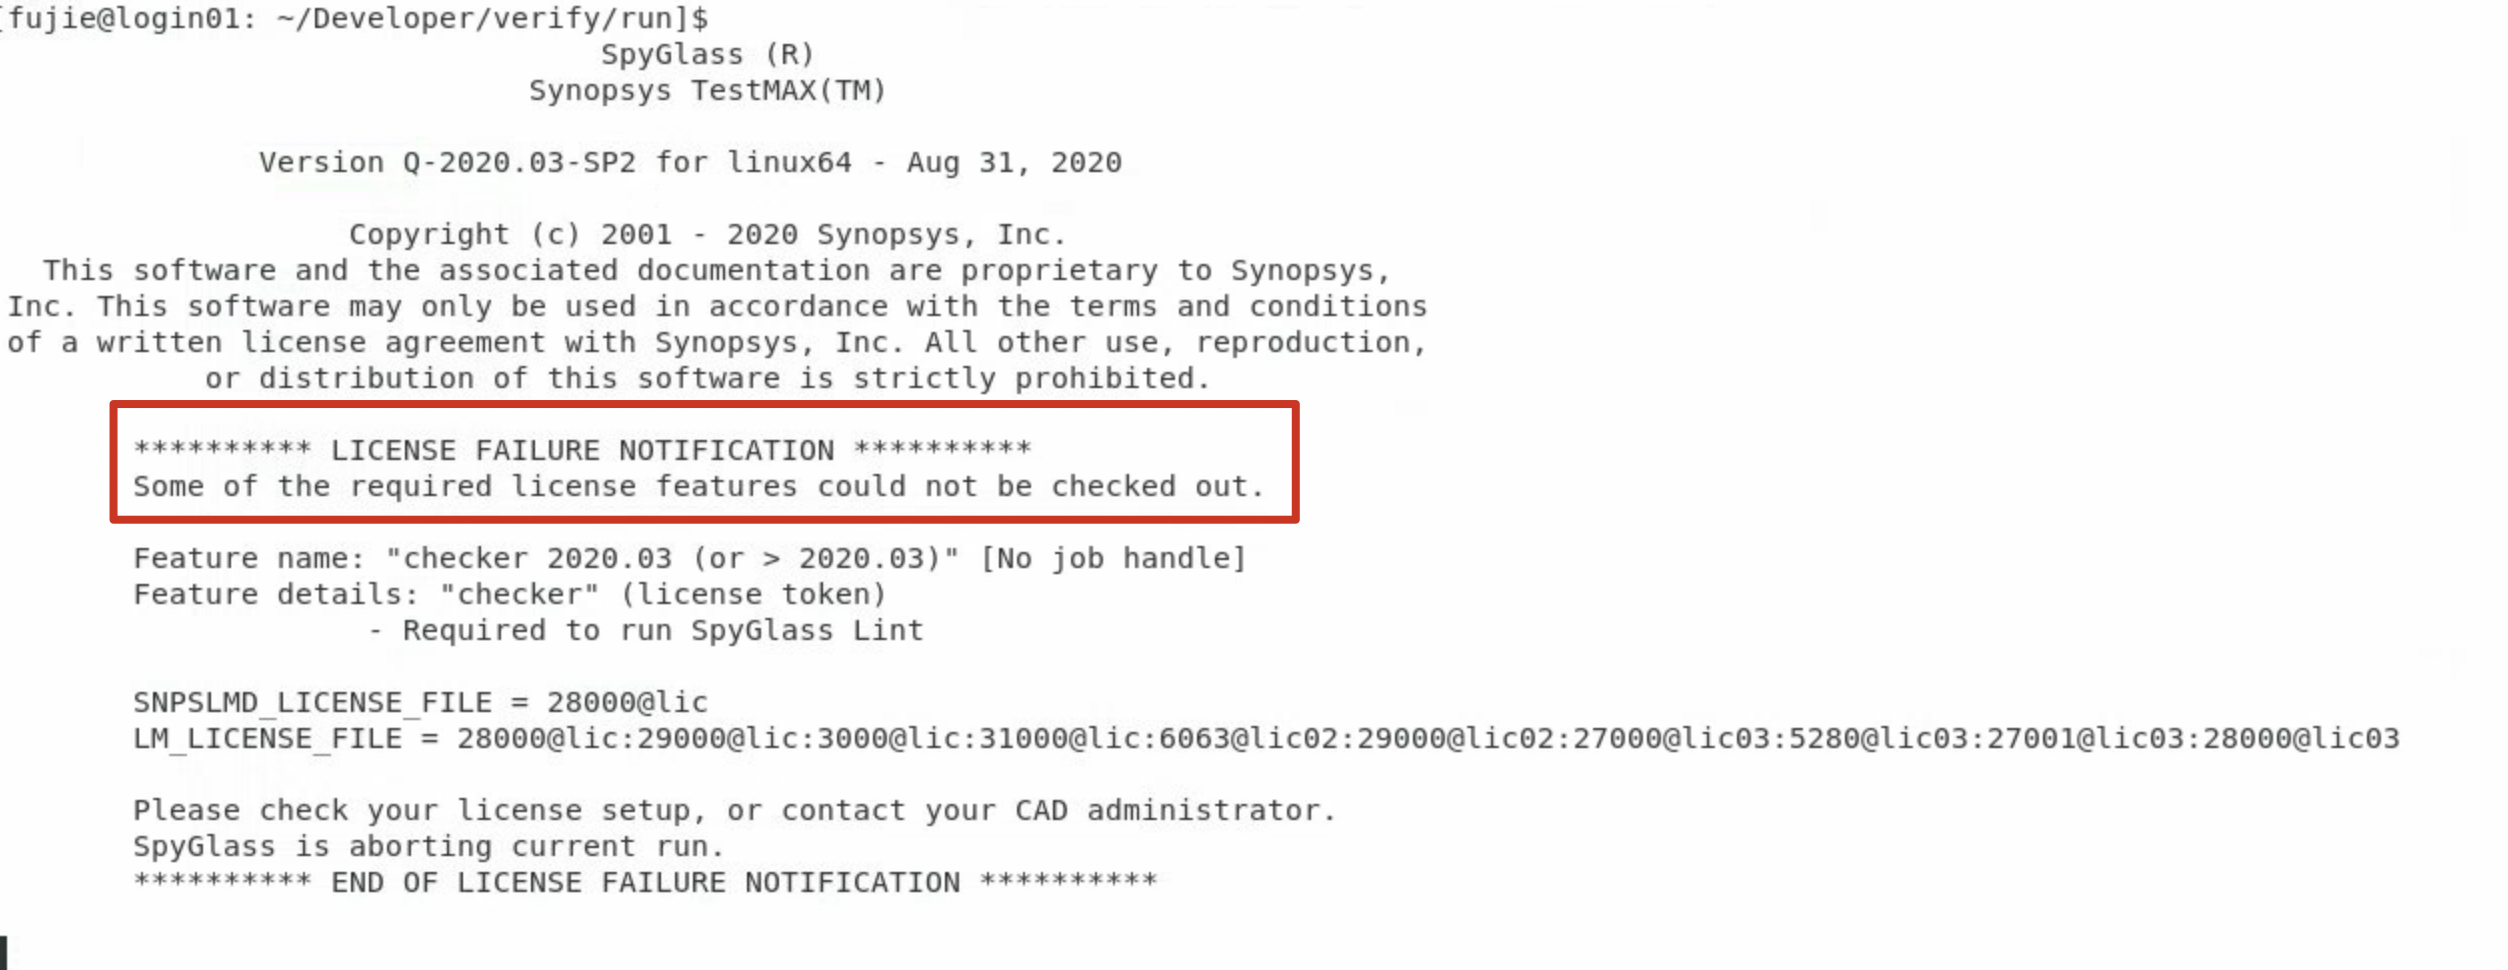
Spyglass License Failure
source了您目录下的
.bashrc文件,依然会License Failure
通过
make all启动spyglass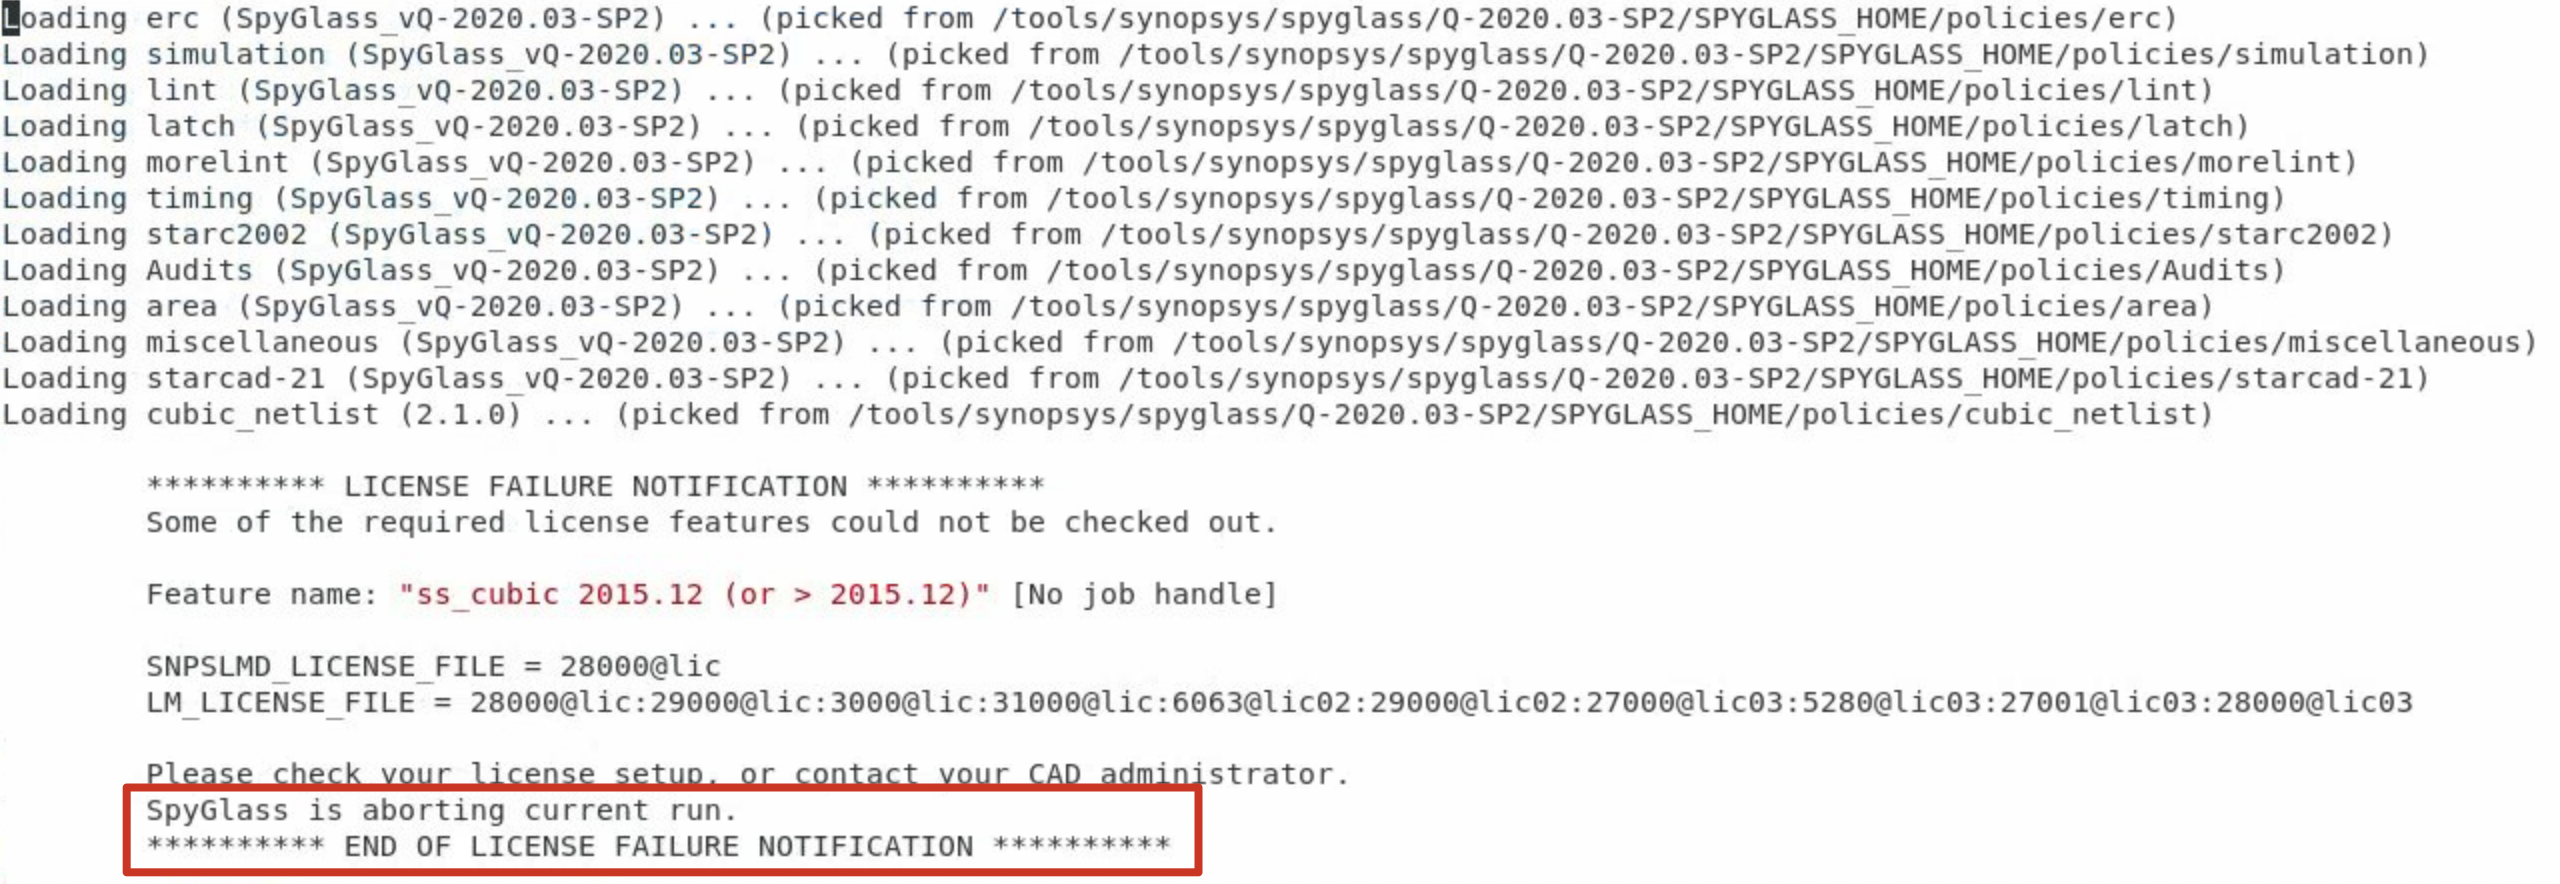
通过
spyglass -gui启动spyglass图形化界面